
How to Get Bokeh Effect in Photography: Tutorial
Bokeh (“blurred” in Japanese) are beautiful, out of focus lights that you often see in the background of a photograph, especially in night photos. It is possible to create bokeh in Photoshop but today I’ll be sharing my tips for getting lovely bokeh straight out of the camera – fast and easy. Bokeh is accomplished through using a large aperture: the lower the number, the wider the aperture is, with more light entering the camera. For a more detailed explanation on aperture, read Nasim Mansurov’s guide on understanding aperture. Alternatively, check out Darren Rowse’s Introduction to Aperture in Digital Photography. I usually use an aperture range between 1.8-2.8, which obtains superbly blurred, bokehlicious backgrounds.
What I use to create bokeh: my 5D Mark III / 550D EF 50mm f1.8 lens. Any DSLR (preferably) prime lens should work.

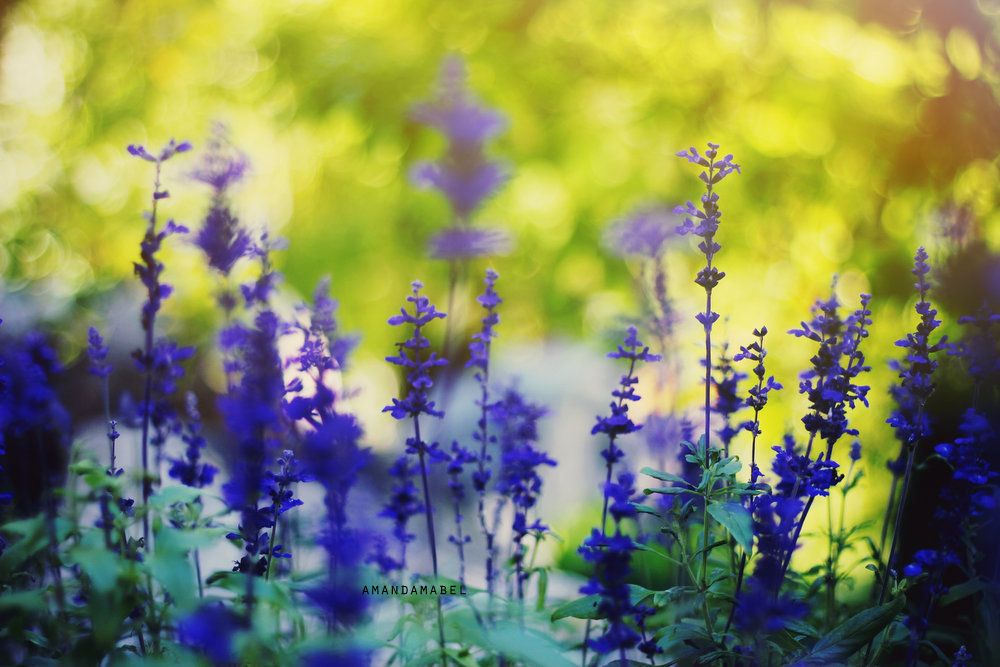
Taken with a Canon EOS 550D an EF 50mm f1.8 lens, aperture 1.8
Step by Step Guide on How to Get the Bokeh Effect:
1. Use M or AV mode (A for non-Canon models) to adjust the aperture to obtain a low f-stop. Anything from 1.2 to 2.8 is excellent, depending on the size and quality of bokeh you’re looking for.
2. Selectively focus on the subject – to get as accurate results as possible, use manual focus. If you have difficulty focusing through the viewfinder, turn on Live View to get a clearer view. You should see the background blur out perfectly while you focus on your subject. Get as close as possible to the subject: the shallower the depth of field, the higher the chances of obtaining good bokeh.
3. Use a steady shutter speed to ensure that your picture isn’t affected by motion blur. In low light or in dim lighting, the lowest shutter speed I use is 1/60, because anything below 1/60 results in motion blur (there is such a thing as blurred bokeh, which isn’t very pretty).
4. Take the picture (or a few for good measure), then check your focus to ensure you’ve gotten the result you wanted.

Taken with a Canon EOS 550D an EF 50mm f1.8 lens, aperture 1.8
Things That Make Excellent Bokeh Include: 1. City lights / Night lights. Street lamps, lit up buildings, Christmas trees, car lights on roads, fairy lights. 2. Trees. A background of trees usually provide white bokeh because of the gaps in the leaves (when blurred, the whiteness becomes bokeh) 3. Petals/Flowers. 4. The sun glinting off water. (The ocean, especially, provides excellent bokeh when the sun is in direct contact with the waves.) 5. Fireworks.

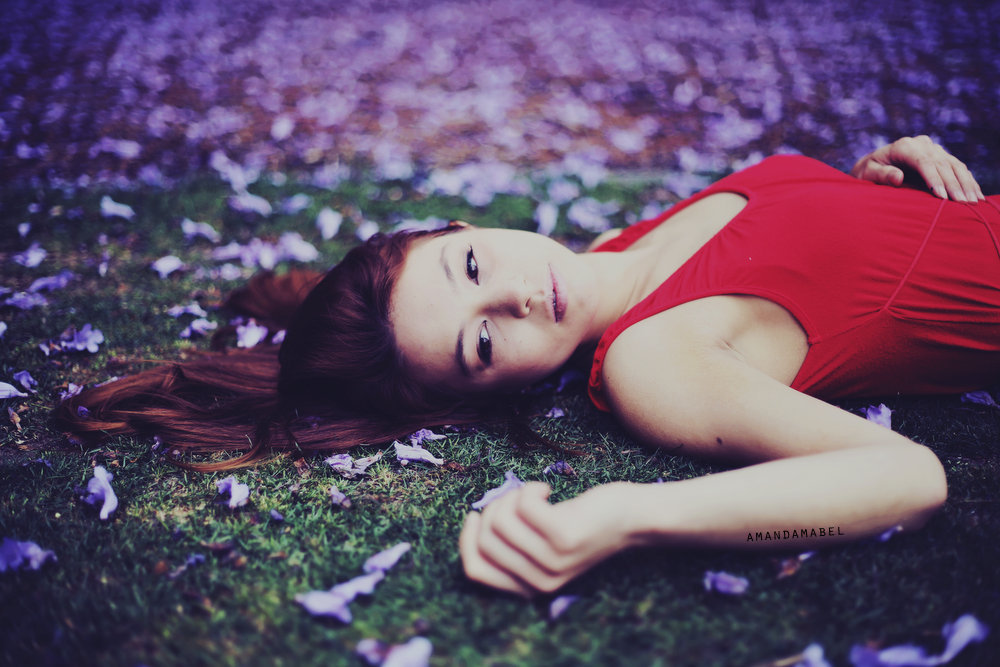
Taken with a Canon 5D Mark III an EF 50mm f1.8 lens, aperture 1.8
During spring, the jacaranda trees shed their luscious purple petals all over the grass. Using a wide aperture of 1.8, I chose my point of focus to be in the centre (ie the model’s face). As the depth of field was extremely shallow, the background and foreground of the photo were both out of focus. The scattered petals in the background then formed unique purple bokeh. Common bokeh colours are white, yellow, green and red; so the purple was an interesting change from the norm.

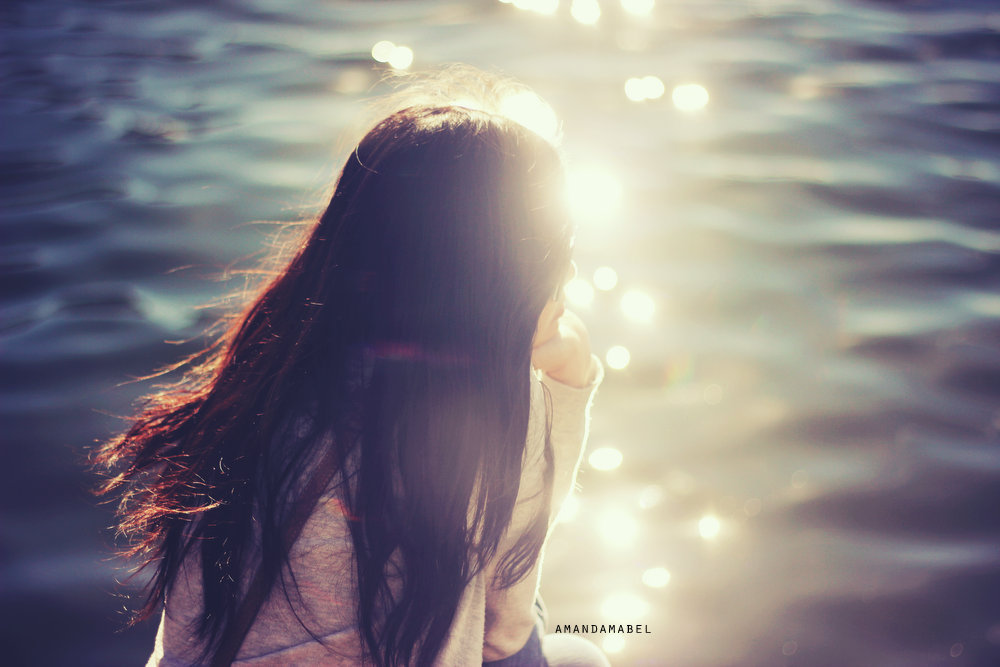
Taken with a Canon EOS 550D an EF 50mm f1.8 lens, aperture 1.8
This picture was taken around 1pm, one fine afternoon in autumn. The sun was directly overhead in the sky and shone directly onto the water, creating what I like to call “water bokeh”. I focused on the model’s hair, using an aperture of 1.8, which not only blurred the background but turned the glinting light into reflective bokeh. The wide aperture also removed the roughness of the rippling waters and created a glossy feel in the background.

Taken with a Canon EOS 550D an EF 50mm f1.8 lens, aperture 1.8
Bokeh can be found at any time of the day, as long as you know where to look for it. To me, bokeh is like the sun of the night – the perfect lighting that adds uniqueness to every photo. What do you think of bokeh? Will it be something you will be looking to add into your photos?
For more posts and to stay updated, follow me on Bloglovin‘, or through my Facebook page. Have a great week ahead!
The post How to Get Bokeh Effect in Photography: Tutorial appeared first on Amanda Mabel.