
GINGER SEWALONG PT 12: BACK POCKET PLACEMENT

I would like to apologize right off the bat for the butt-apooloza you just got a ticket to. If there was a way we could talk about this without using my butt as an example, I would spare you, but al-ass. Butt stand-ins are hard to come by.
I think the power of a great pair of jeans is 50% back pockets. They can look great from the front, but if the pockets aren’t right, you’ll feel it every time you put them on. There are two main considerations, just like in real estate: location and size. The only people who can pull off small pockets are 12 year olds. The rest of us need something that is proportionate to our bodies. The Ginger pockets are about 1/2″ wider than average, which I think works well for most butts, but the perfect location for them will be a little different for everybody.
Earlier in the sewalong I instructed you to baste them to your back legs before topstitching. Now that we’ve got our waistband attached, we can properly do a butt assessment. If you have a large mirror and a hand mirror you can take a look and see how you feel about where they are now. You can also take a butt selfie (sharing it on instagram is optional).
I am going to share some butt selfies I took when I was in the research stage of this pattern to show you how much pocket placement matters. All in the name of science, folks.

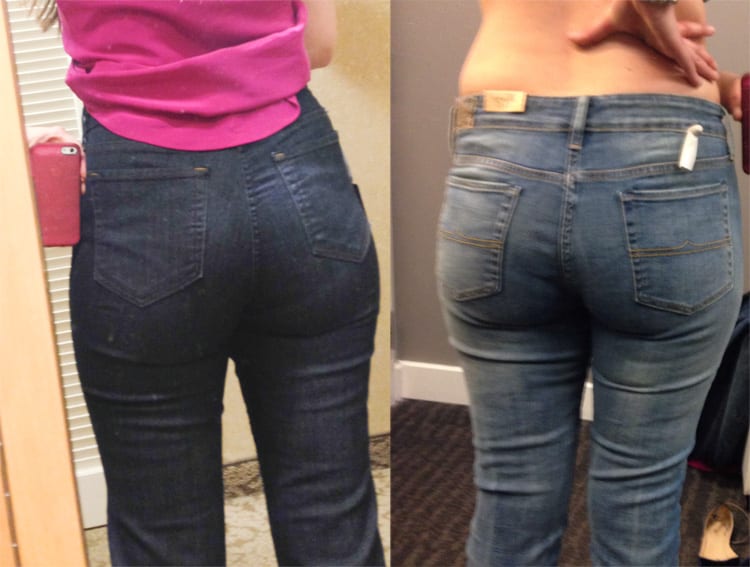
Okay, so on the left we have a perfect case of “Mom butt”. This is a pair of Not Your Daughters Jeans and they are totally living up to their name. Pockets placed high like this make your bum look about twice as long as it actually is. If you have a flatter behind and have jeans that do this you should burn them in a fire. The pair on the right is MUCH better. The pockets are set much lower and wider. This creates the illusion of a smaller, curvier behind, but since I have a bit of a booty I think they are a little too widely set.

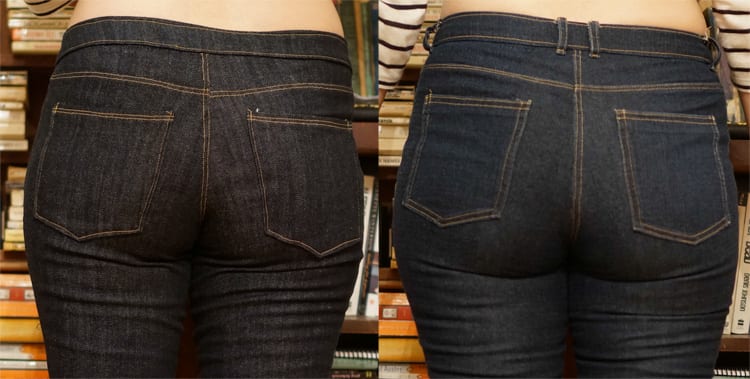
On the left we have what I consider to be almost perfect placement. The pockets are correctly spaced and angled in slightly giving a nice curve, but are perhaps 1/4″ too low (it is crazy how much of a difference a quarter of an inch makes!) On the right, the pockets are too small, too high and too far apart, giving the illusion of a much bigger, flatter bottom.
Here are some general things to keep in mind when deciding on pocket placement:
- As a rule, the pocket should be centered on the fullest part of the bum.
- Pockets that angle in create curves.
- For wider bums, set pockets closer together.
- For small bums, pockets can be set wider apart to create fullness.
- Lower pockets are generally preferrable. Some people (small butts) can get away with setting the pocket below the crease of the bum, but in general your pocket should end around where your bum meets your leg.
With all that in mind, once you’ve figured out the perfect placement of the pockets on your Ginger Jeans, it’s time to topstitch them in place.
Starting from the inside corner, sew a line of topstitching 1/8″ away from the edge of the pocket. Use a hump jumper when you start, and backstitch twice at the beginning to secure. You can sew your second line of topstitching 1/4″ away from the first, but I like to curve the second line at the corners for a softer look. Whichever you choose, marking the stitch line with chalk makes it a little easier to follow.

If you’re not using rivets on your back pocket, you can also sew a little angled line at the top edge to reinforce the seam. You can see that on the left side of the pocket below.
