
How to make a wedding cake

I took this course with wedding cake maker Sandra Monger at Vale House Kitchen; a cooking school surrounded by the rolling green hills of Somerset. Started by Bod Griffiths and his wife a year ago, they also do courses in butchery, fishing, foraging, knife skills, preserves and seasonal cookery.
I've never known how to do this kind of formal baking so this was a great opportunity to try my hand at it. Sandra, in the wedding high season mid-May to mid-October, makes 2 to 3 wedding cakes a week, charging between £400 to £600 each. This might sound a lot but when you consider that she makes all the iced flowers herself -a bride might casually request a cascade of roses on the cake- that alone will take Sandra a week to make. Each wedding cake takes one to two weeks to make. The great thing about her job, says Sandra, is that "all my customers are happy. They are going through a happy period of their lives."
There are trends in wedding cakes, as in everything else: fruit cake was the traditional wedding cake, now most people request a sponge cake while fruit cake has fallen from fashion. With a sponge cake you need a larger cake, fruit cake, being denser, can feed double the amount of people. If it is a tiered cake, perhaps the smallest tier might be a fruit cake, often used for the first child's christening (although today in post-christian UK 'naming ceremonies' are all the rage), or perhaps to send finger slices to absent relatives. Obviously fruit cake lasts longer than sponge cake. This season the trend has been for lemon drizzle flavoured wedding cakes and lace decorations, piped by hand by Sandra. Customers are increasingly influenced by American baking TV programmes such as Cake Boss, so flavours are becoming more exotic - pineapple, mango, coconut, chilli chocolate and salted caramel.
Couples often want 'Hello' magazine-style big-tiered cakes, but may not have many guests. In that case Sandra will make the other tiers out of cake dummies, polystyrene cake models, which she will cover and decorate so that they blend in with the real cake.
The most exotic wedding cake she has ever made was one for a gothic couple with a wedding on Harley bikes on a cliff top. She made a grey and black cake with turrets and sugar bats, she charged around £900 for this time-consuming yet fun work of art.
A wedding cake is rather technical: you must make them straight and level, as a piece of architecture, that must hold several levels upright. You have to think about weight and balance.
It's also easier to make cakes when the weather is cooler or if you have a cool kitchen. (I learnt this last year when I wrote and tested my forthcoming book MsMarmitelover's Secret Tea Party in sweltering heat. Not fun.)
So here is a step by step, if you want to attempt this at home. I'm going to assume that you have already made the cake bases: 2 x 8 inch deep sandwich tins. We are making a two layer cake, one with a real cake, the other with a dummy. However, you can make two real cake tiers.
Equipment:
1 base 'drum' cake board (which is thick)
2 x 8 inch hard cake boards (which are thin)
1 x 5 inch hard cake board.
Clingfilm
A serrated bread knife
A 6 inch dummy cake
A spirit level
Cocktail sticks
A cranked palette knife
Plain side scraper
Set square
A preferably plastic rolling pin
A white non-fluffy apron
A pastry brush
A cake smoother with with one flat edge, the rest rounded
Baking parchment (not greaseproof paper. What is the difference? Greaseproof paper is not non-stick. It is best used for wrapping things, it's cheaper than baking parchment.)
Coloured large head pins
2 thin dowels
Ingredients:
Buttercream: proportion is always 1:2 butter: icing sugar. So in this case we will use:
500g of softened butter
1 kilo of icing sugar.
1 tsp of vanilla extract (or lemon or orange or whatever flavour you want)
1 jar of Seedless raspberry jam
Icing sugar for dusting.
1 kilo sugar paste, ready to roll (what the American and now even the British are frustratingly calling fondant. It's not bloody fondant. Fondant is stuff you melt to pour over French fancies)
Coloured paste
Royal icing:
330g icing sugar, sieved if opened packet
2 large egg whites,
1 tsp lemon juice
Making sugar craft decorations:
Floral paste/Gum paste
You will need Trex or similar
Cornflour
Cocktail sticks
Oasis or an upturned sieve
Coloured paste
A J Cloth
An elastic band.
Tiny rolling pin
Rose petal cutters
Ball tool.
Small paint brush and water
Piping bags and nozzles (1.5mm and 2mm)
Flower punch cutters

Step 1: Soften the butter and make the buttercream. You want to soften the butter to the point of almost melting, you can microwave it at 1/3 power for a couple of minutes. Use salted butter or add a tsp of salt. Add the flavouring of your choice. With icing sugar you can use it straight out of the box if unopened; if opened, sieve it first to get rid of hard lumps.

Step 2: Clean the boards with anti-bacterial wipes and cover one of the thin 8 inch boards with cling film.
Step 3: Cut a square of parchment paper and unwrap your cake bases. Sandra tends to use cake that is a couple of days old. She usually freezes them in advance and defrosts them half an hour or so before using. When she bakes them she greases the sides of the tin and cuts out a circle of parchment paper for the bottom. She has also found that baking her sponge for longer at a lower temperature, 150º rather than 180º, prevents doming.

Step 4: Levelling the cake. Use a serrated broad bread knife and separate the two halves, the most level side on the surface. Get down low, you want the cakes at eye level, and, going slowly, by hand, cut off slivers from the top of each cake half until they look level by eye. You then put the other (dummy) cake next to them, both cakes should be the same height. Then use the spirit level to check if they are level.

Step 5: Creating more layers. Put each cake half on a piece of parchment paper. Put 4 cocktail sticks around each cake half, at the halfway level, this will help with cutting an even layer. Again using the serrated bread knife, slice each half into two crossways. Go very slowly and rotate each cake on the paper as you go.


Step 6: Adding the filling. On the cake layer that you want as the foundation for your cake, with a cranked palette knife, carefully spread on the buttercream, using a firm rocking motion, all over. On the bottom of the next layer, add a layer of seedless raspberry jam. Alternate these fillings so each layer has a layer of jam and a layer of buttercream. Put the cake in the fridge to chill.
Crumbs: save these and freeze them for use in cake pops. You can put the buttercream crumbs in there too.

Step 7: Shaving the sides. Centre the cake by using a plain side scraper to nudge it upright. Using the knife, shave the sides of the cake, going slowly, shaving off small amounts.


Step 8: The crumb coat. Add a layer of buttercream to the top and sides, using the cranked palette knife. Then put the clingfilmed 8 inch hard board on top of the cake, use the spirit level to check the cake is level. Use a set square to check the sides are completely square. Then, keeping the cake on a piece of parchment paper in order to rotate it (or use a lazy susan if you have one), use a plain side scraper to smooth the sides. (Stainless steel ones are easier to wash.) A crumb coat is a thin base layer that makes subsequent coating easier and smoother. It also prevents crumbs from coming off into the rest of your icing. Put it in the fridge to chill again.
Step 9: Remove from the fridge and peel off the cling filmed hard board. Fill in any cracks with buttercream and the cranked palette knife. Put back in the fridge.
Step 10: Rolling out the sugar paste. Prepare yourself for this step. Don't wear fluffy clothing or apron. Wear a white apron. Close the windows. Try to shoo away flying insects. Remove all pets. Tie back your hair. Take off all jewellery on your fingers and wrists. Remove any crumbs from the surface, you want a clean surface to work on. The sugar paste is a total fluff magnet.

Step 11: Knead the sugar paste. Knead it on a clean, crumbless surface with no icing sugar. It's important to knead it well to prevent it from cracking when draped over the cake. Then form a ball.


Step 12: Dust the surface with icing sugar and roll out the sugar paste. Do quarter turns as you roll so that you get a good circle. When you turn it, do it by carefully putting your hands underneath the circle, do not let your thumbs press the top of the sugar paste. You want a blemish free surface. Roll the circle until it is big enough to easily cover the top and sides of the cake.

Step 13: Remove the cake from the fridge and brush it with hot water with the pastry brush. This makes it sticky. Then carefully lift the rolled out sugar paste with your rolling pin and making sure the one side of the circle touches the bottom of where your cake meets the work surface, drop the circle of sugar paste onto your cake. Using the cake smoother, 'iron' the top, which will have the effect of lengthening the sides slightly.

Step 14: 'Skirting' the sides. To smooth the sides, both use your palms on the outside to attach the sugar paste to the sides of the cake. Pull the bottom edge out so that when you smooth it, it will not form creases. Use the flat bottom of the smoother against the work surface and use it to smooth and push in the sides of the cake

Step 15: Trim off excess with a big knife. Try not to snag the cake. Go slowly, cut in small segments. Keep the excess in cling film.

With the fake dummy cake, do the same process, even wetting the polystyrene mould. It's easier than with real cake.

Step 16: We are going to do a coloured base to put the cake on. Covering the drum board with sugar paste makes it look more finished and professional. If you want coloured sugar paste, then add a small amount of coloured paste with a toothpick to your sugar paste. Start off with a little and add more, kneading it until it is perfectly blended to the shade that you want.

Step 17: Roll out the sugar paste into a circle slightly larger than the drum board.
Step 18: Wet the drum board.
Step 19: Lift the sugar paste with your rolling pin and drape it over the drum board.
Step 20: Smooth it out with the cake smoother. Trim with a small knife. If you wish, use a punch cutter to make decorations.


I'm afraid I went a bit mad and did a psychedelic acid house marbled effect. (I was making this cake for my mum's birthday and I chose her favourite colours: lime green, turquoise and peach, for the cake. She once 'had her colours done' and these are her colours. She's worn them religiously ever since.) You can do this marbling effect by colouring two balls and twisting them together, then rolling it out.
So now you have your iced tiers. As I said, wedding cakes are about structure, you need to make sure that your tiered confection stands up, is strong, and doesn’t sink, tip or collapse. Sandra has had only one disaster when transporting a wedding cake; she took it to a venue with a cattle grid. The delicate 3 dimensional sugar craft tea pot on top of the cake got crushed when she drove over the bumps (speed bumps are a particular hate for wedding cake carriers). The mother of the bride was awaiting her at the end of the driveway at the venue. Somehow Sandra managed to divert the mother so she was none the wiser and sneak the cake into a basement room. Sandra’s husband talked her down off the ledge and drove into a nearby town for emergency repair supplies. She managed, by sheer force of adrenalin, to recreate the teapot in half an hour. Now Sandra always carries a wedding cake ‘crash kit’ consisting of: rolling pin, sugar shaker, box of icing sugar, piping nozzles, bags, sugar flowers, ribbon.

Step 21: Select some ribbon to use around the cake that complements your icing colours. Use ribbon around the circumference of the cakes to measure a length of greaseproof paper or baking parchment paper. Measure the height and circumference of both cakes and cut out two strips. (Remember that your cakes will be larger than the cake tins that you baked them in, because you have added buttercream and sugar paste icing.)
We are going to ice some scalloped swags, using a 1.5mm plain icing nozzle, onto the cake. Smaller scallops are easier than large.


Step 22: With your measured section of greaseproof or parchment paper, fold it in half, then again, then again until you have a folded section of about 2-3 cms. Use the bottom of a jar or cup to draw a curve at the top then cut out the curve. Unfold it and you have something a bit like a paper chain with a scalloped edge at the top. Wrap it around the cake, the ends should meet more or less exactly, joining up the scallops and use two large headed pins to pin the paper to the cake. Repeat with the smaller cake. Sandra uses this technique for all sorts of patterns. Sometimes she draws a template onto paper and then pin pricks the pattern into the icing. Step 23: Use another large headed pin to lightly scratch the outline of the scalloped pattern around the cake, rotating the cake as you go, on the icing. Repeat with the smaller cake. When you have finished, remove the pins and the paper.
(Cocktail sticks and pins: count them in and count them out. The last thing you want, especially if you are running a commercial cake business, is for someone to find a pin in their piece of cake. When Sandra delivers the cake to a wedding venue, she has a careful list of everything inedible in the cake, from cake boards to dowels, wire, decorations to give to the caterers.)
Step 24: Make royal icing (icing sugar, egg white, lemon juice as in ingredients list) and colour it if you wish. Cover the bowl with a damp cloth, royal icing sets very hard once exposed to air. Have a tall glass or jug with a damp cloth in the bottom. You can more easily fill your bag this way by standing it in the glass/jug. If you store the icing bag tip during pauses tip down into the damp cloth, this prevents the nozzle from drying up and crusting over with dry icing.

Sandra has come up with the most ingenious icing bag technique: she uses two bags, one for the nozzle and one for the icing. This means she can easily change colours of icing and nozzles. Cut a small tip off the icing filled bag and a larger tip off the nozzle bag, enabling you to force the nozzle to the bottom but still holding it securely.
She fills one icing bag with a tablespoon of her coloured icing. You don’t need much for the scallops. Place the icing-filled bag into the bag with the nozzle, making sure the tip fits into the nozzle.
The decorative icing. This is probably the hardest part of making a classic wedding cake. It takes a long time, even years, to become proficient at piping decorations. Sugar craft is a whole art in itself. My Caribbean neighbour says that, in Jamaica, the bride's mother would make the cake for her daughter’s wedding but that for decoration, she would take it to the local cake decorator, often someone working from home. There are cake decorators in every area.
Sugar paste icing, royal icing is there primarily to preserve the cake, a bit like pastry with pies, rather than for flavour. It makes it easier to transport also. Royal icing will last for years. But the decoration is for beauty.

Step 25: Piping scallops. First of all, try it on a bit of paper before attacking the cake. Anchor, lasso is what I call the technique. Squeeze the icing bag slowly but firmly with consistent pressure and make a point, then continuing to squeeze, loop the icing string to the next point. Once you are a bit more confident, have a go on the cake, where you have scratched out the pattern as a guide. I’ve done quite a bit of piping on biscuits but it’s much harder to pipe vertically! There are special tilting stands to make things easier. (You can end up buying tons of equipment bits and bobs when it comes to sugar craft. It’s like Accessorize for bakers.) Don’t worry about the perfection of the joins, we will be putting tiny sugar flowers on those bits. In fact one will only see the loops between them. If you make a mistake, just wipe it off quickly. If you really go wrong, wipe the sugar paste gently with a damp cloth, then let it dry and start again.

Step 26: Assembling the cakes. With your mini trowel, I mean, cranked palette knife, plaster a bit in the centre of the drum board, spreading it out to fill a small circle in the middle. Then carefully bring your cake to the edge of your paper and, handling it underneath, slide it off carefully and place into the middle of the drum board. Very lightly use your fingers to nudge it into the centre of the drum board.

Step 27: Now take the small 5 inch cake board and place it by eye in the centre of the top of the large cake. With a cocktail stick, scratch lightly in the icing around the cake board. Remove the cake board.

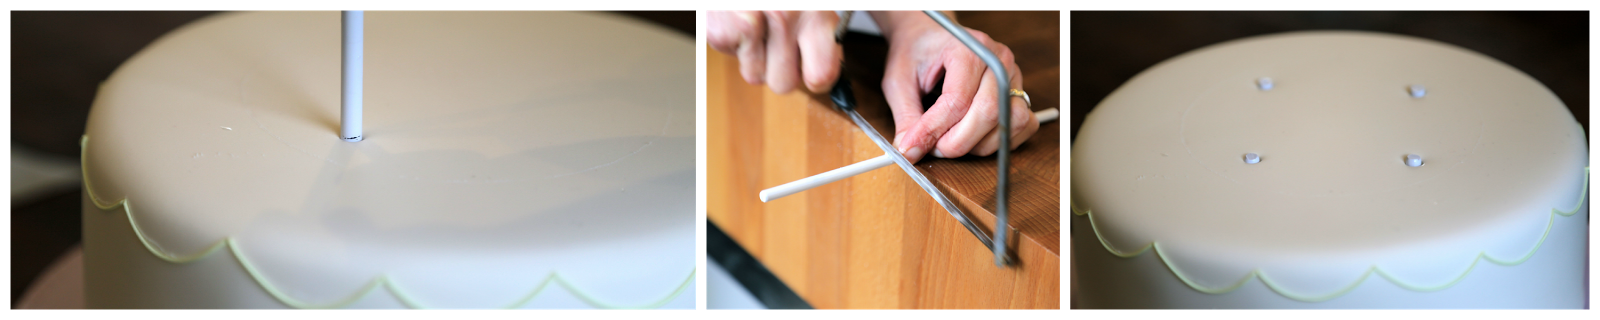
Step 28: Dowelling. You will need two thin dowels and a hacksaw for this. First of all, ‘de-nib’ the dowels so that they have a flat end. Then about 2 centimetres in from the edge of the scratched small circle, press the flat side of the dowel into the cake until it reaches the drum board. With an edible pen marker, mark where the dowel reaches the top of the cake. Remove the dowel. Make the other one. The two dowels can be cut to make four dowels, so mark in all, four pieces of the same length. Cut them with the hacksaw.
Push the dowels in at equidistant compass points a couple of cms (3/4 inch) within the scratched out circle. Your cake is now dowelled. If you are making an enormous wedding cake, you may use larger dowels. The bigger and heavier the cake, obviously the more load bearing framework is needed, sometimes 8 dowels are needed in the bottom layer.
Push the dowels in at equidistant compass points a couple of cms (3/4 inch) within the scratched out circle. Your cake is now dowelled. If you are making an enormous wedding cake, you may use larger dowels. The bigger and heavier the cake, obviously the more load bearing framework is needed, sometimes 8 dowels are needed in the bottom layer.

Step 29: Putting on the top cake. Ice with the cranked palette knife over the joins of the dowels and in the centre of the bottom cake. With the palette knife, spread some more royal icing onto the small hard cake board. Carefully lift the dummy and press it onto the small hard cake board. Then place the dummy cake onto the centre of the base cake.
Use the cake smoother to press down on the top, cementing the tiers together.

Step 30: Add the ribbon. Take the colour of your choice and wrap it around the base of your largest cake. Allowing for an inch or a couple of centimetres overlap, cut it. Do the same with another piece of ribbon for the smaller tier. Then with Pritstick or similar, glue the ribbon to itself around the bottom of the base cake and the bottom of the smaller cake. This 'ribbon trick', which hides any unevenness of the cakes, hides gaps between the tiers and will make the cake look finished. Real cakes are often uneven and dummy cakes are always perfect. The cakes in Peggy Porschen's books for instance will be iced dummies, to make sure they are straight and picture perfect for the photos. (My forthcoming baking book MsMarmitelover’s Secret Tea Party will however feature real cakes in all the photos. I don’t mind a little bit of wonkiness.) Choose your best section of piping for the ‘front’ of the cake and put the ribbon join at the back.

More piping styles: use slightly softer royal icing for this; adding a few drops of water until you have ’soft peaks’.

Piping a snail trail: this wasn’t too hard once you got the knack. Practice on a bit of paper: squeeze, hold it, pull down, squeeze, hold the nib near then pull down, repeat. I piped this around the bottom of the cake between the drum board and the ribbon. Again, this makes it look finished. I used a 2mm plain tip/nozzle for this.

Daisies:
Plunger cutters: roll out your gum paste on a bit of trex and cornflour then cut out flowers with the plunger cutter. Easy peasy. Attach, if freshly done, dabbing with a fine brush, with water to your swag joins. Or, if done later, pipe a little royal icing to stick it on.

Finally: wind some ribbon around the baseboard circumference. Glue with Pritstick around the rim of the drum board to stick.


Step 1: Break off a ball of gum paste, size of a malteser. Work it, knead it.
Step 2: Then put Trex on your hands.
Step 2: Then put Trex on your hands.

Step 3: Rub the ball into a cone shape. Dip one end of the cocktail stick into the Trex and insert it into the wide end of the cone. Normally you would make several of these and leave it to dry for two to three days.
Step 4: if you want a coloured rose, select your colour and knead it into the gum paste.

Step 5: Make a miniature dusting bag by cutting a section of J cloth, putting cornflour into the middle and then attaching an elastic band around the top.
Step 6: Rub some Trex into the work surface. Roll out your gum paste using the tiny rolling pin.


Step 7: Select a petal cutter the same size as your dried cone, cut out 5 petals. (Put any excess gum paste into a plastic bag.)Step 8: Using the ball tool, stroke the edges so that they are thinner and have a 'petal' edge.
Step 9: Wet the cone with the brush and the back of a petal. Making sure that the petal stands 2mm above the cone, wrap the petal around the cone to conceal the cone.
Step 10: Continue using the natural curve of the petal and attach each petal to the outside of the cone, brushing the water at the bottom. Leave to dry until set.
Step 11: You will continue with larger petal cutters until you have a full rose.
You can do this with marzipan, chocolate paste, salt dough.

You can do cookery, fishing, butchery, preserving and foraging courses at Vale House Kitchen in Somerset near Bath.
To commission a Sandra Monger wedding cake go here.
I would love to get your feedback on this post!
To commission a Sandra Monger wedding cake go here.
I would love to get your feedback on this post!
More posts from kerstin rodgers aka msmarmitelover