
Beef shank and tomato pasta sauce
This is a sponsored post on behalf of Glad.
Writing about food even for a part-time job means that you constantly have all sorts of bits and pieces of ingredients leftover in your fridge and sometimes your freezer. It’s often a challenge to use all the odds and ends before they go bad although lately (really, since I read Save with Jamie) I’ve been much better re: making conscious choices about food preparation based on what I have on hand. Sadly, I still end up throwing out more fresh food than I’d like (well, my goal would be 0% food waste) and I know I am not alone.

Fortunately there are some simple steps we can all take to reduce the amount of fresh food we are throwing out – and that starts with storing our foods properly to make sure they last as long as possible. Last month, GLAD challenged me to the #GladFreshFoodChallenge and sent me a package containing samples of their food storage items including their Cling Wrap and Press ‘n Seal, Freezer Bags and Storage Zipper Bags and Sandwich Zipper Bags. My mission was to waste less food by using the GLAD products to more efficiently store my food.
Now GLAD is a name synonymous with food storage in many parts of the world – In Australia, where I grew up, we call plastic wrap/ cling film/ Saran Wrap “GLAD Wrap” and a garbage or rubbish bag is a GLAD bag. GLAD is a staple in my kitchen and I already use all the products I was sent (I ALWAYS have a large amount of frozen banana chunks hanging out in GLAD Zipper Freezer bags, for example!). So for me, the challenge was really making sure I was using them to minimize food waste by storing my food properly.

I’ve used the Press ‘n Seal before to store chicken breasts in the freezer that I have bought in bulk to take advantage of a good price. The fact that you can wrap meat tightly to prevent air getting in and freezer burn forming means that your meat will last longer, even frozen. Noone likes a freezer-burned piece of meat… Knowing there’s a way to take advantage of special prices on things like meat and chicken by storing it correctly in the freezer definitely makes for less food waste and more savings. And I mean, as I said earlier, my freezer is full of forzen bananas, because whose bananas don’t go from being green to over-ripe overnight, leaving you scrambling to eat them or bake with them? The freezer and Zipper Freezer Bags are your friend!
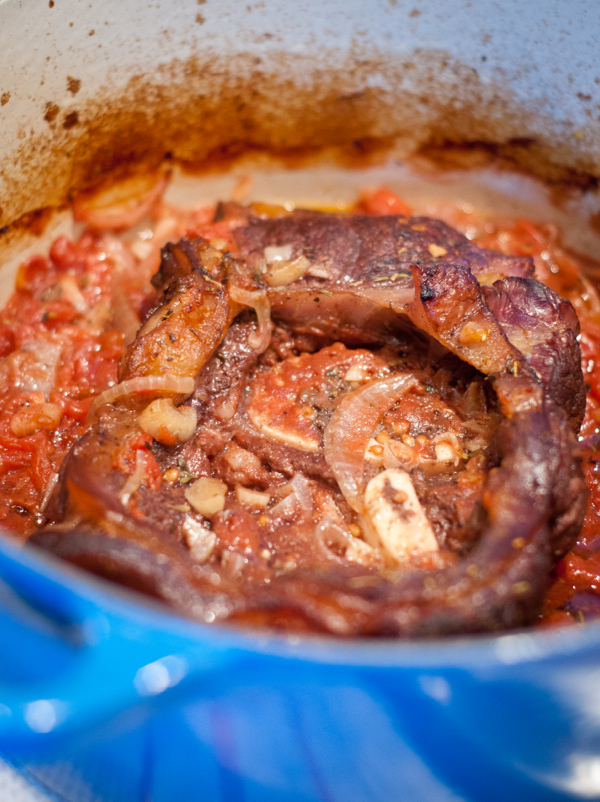
OK so much for taking advantage of good deals by buying things in bulk but what about leftovers? Ah leftovers. These can be the bane of one’s existence. I am constantly looking for way to use up small amounts of ingredients I have leftover from recipe development and I’ve found the way to manage these is to store them correctly in the freezer (and then make sure I don’t forget they are there!) so that I am not racing to use them up before they go off. Case in point: I ended up with about 1/2 a can of tomatoes and 1 beef shank a couple of weeks ago when I made a beef osso buco. Not enough to make more osso buco with but far too much to let languish too long in the fridge or freezer. I looked at my calendar – half the battle in using up leftovers and fresh food before they go off is making sure you know when you will use them – and knew that I would have a night at home a couple of days later where I would be able to cook with these ingredients. So, instead of freezing them I placed both in medium Storage Zipper Bags (I chose this size because it was snug around the beef shank) and put them at the front of the fridge so I would remember they were there.

It comes together in around 20 minutes, using simple ingredients you probably have on hand…


5.0 from 1 reviews
Beef shank and tomato pasta sauce

Prep time 20 mins
Cook time 90 mins
Total time 1 hour 50 mins
Easy beef shank and tomato pasta sauce.
Author: Mardi Michels Recipe type: Main Serves: 4
Ingredients
- 1 beef shank (approx 500g)
- Salt and freshly ground pepper
- 2 tablespoons olive oil
- 1 medium onion, sliced
- 2 cloves garlic, roughly chopped
- 1 teaspoon chopped fresh thyme
- ½ cup red wine
- ¾ cup chopped canned tomatoes
- extra broth or water (optional)
Instructions
- Preheat the oven to 350°F.
- Season the beef with salt and pepper.
- In a large casserole (an enamelled cast-iron pot does a great job here), heat the olive oil over medium-high heat.
- Cook the shank for approximately 8 minutes, flipping it halfway.
- Transfer to a plate and cover with foil to keep warm.
- If you have more than 2 tablespoons of fat in casserole, pour it off so you have about 2 tablespoons remaining.
- Over medium-high heat, cook the onion, garlic and thyme until the onion starts to brown.
- Add the wine and increase the heat to bring to a boil.
- Add the tomatoes and bring the mix back to the boil, then return the shank to the pot, making sure to thoroughly coat the meat in the sauce.
- Cover and cook for 90 minutes, checking halfway through the cook time that the sauce is not too dry - if it is, you can add a small amount of beef broth or water.
- Remove the casserole from the oven and, using tongs, remove the shank from the sauce. Cover the sauce and set aside.
- Using a fork, shred the meat and remove the marrow from the bone. (you'll want to remove the fatty parts and discard them).
- Add the meat and marrow back into the pot and stir well.
- Season to taste with salt and pepper (or if you live in my house, a touch of hot pepper flakes!).
- Serve over pasta.
3.2.2807
It’s an easy sauce with not much hands on time but one that will make your house smell amazing…
For more information on GLAD food storage products, visit www.glad.ca
Disclosure: I received compensation and a selection of GLAD product samples in exchange for writing about my experience using the products. All opinions are my own.

Canadians – Enter to win a DK Eyewitness Travel guide! Closes Wednesday November 12th at 6pm EST. Details here.