
Spool and Nine Patch Quilt ~ A Tutorial and Templates
Two traditional quilt blocks ~ a Spool Block and a Nine Patch Block ~ are all that are required to make this quilt; neither block is difficult to piece however I thought I would share with you a tutorial, and provide templates for those of you who prefer not to draft your own.

Click on any Image for LARGER view.
Let's get started.
SPOOL BLOCK TUTORIAL
Fabric Requirements for each Spool Block:
1 center square 2.5 inches x 2.5 inches
2 contrasting fabrics for side pieces ~ each fabric piece measuring 12.5 inches x 2.5 inches
(which makes this block Jelly Roll friendly).
Step 1
Download, print and carefully cut out your templates or draft your own templates for a 6 inch finished block.

To assist in cutting the fabric pieces for a 6 Inch finished Spool Block I have made templates available for purchase (pdf file) from my Craftsy Store:
6 INCH SPOOL BLOCK TEMPLATES - $US3.00
The pdf file is available for immediate download and includes Spool Block templates for a 6 inch finished block, a full color quilt layout, as well as a black/white line drawing of alternating Spool and Nine Patch blocks with which you can experiment and play with your own color palette.
Step 2
For each Spool Block you will need one center square and four side pieces (two the same pieces of each side fabric chosen ~ you can use solid fabric, printed fabric, or a combination of both).


Mark (on the wrong side of the fabric) a 1/4 inch seam allowance along three sides of the fabric, as pictured above. (I use a 2B pencil with a 7mm lead as it is soft enough to lightly mark the fabric without breaking the lead).
Step 4
Step 4

Align and center the first side fabric to be sewn on top of the center square (right sides together). There is no need to mark the center square as you can easily see if you have correctly centered the fabric by the matching the size of the opposite corners. With a short length stitch start sewing where the lines intersect and stop at the next intersecting point. Back-stitch at the start and end of the stitching line to lock the stitches in place.
Step 5


The third fabric piece is going to fit right in between the first two pieces. Line up the folded edge of the first side piece (the purple fabric) with the starting point (where the pencil lines intersect) of this third piece of fabric. Do not start stitching in the seam allowance of the purple fabric. Stitch one or two stitches, back stitch - and continue on till the next intersecting point.

Stop stitching at the point where the pencil marks intersect but again do not stitch into the seam allowance of the purple fabric. If you have accidentally stitched too far use a seam ripper to undo those stitches.
Your block now looks like this. Finger press the seams away from the center square.


We are now ready to sew the final four side seams of the Spool Block. With the right side of the block facing your fold over the center square diagonally in half (wrong sides together). The side seams that need to be sewn will lie flat together ready for sewing.

Start stitching at the intersecting point and sew all the way to the end. Back stitch at start and end to lock stitches.
Work your way around the block by re-folding the center square and sewing all four of the side seams. Your block will then look like this:


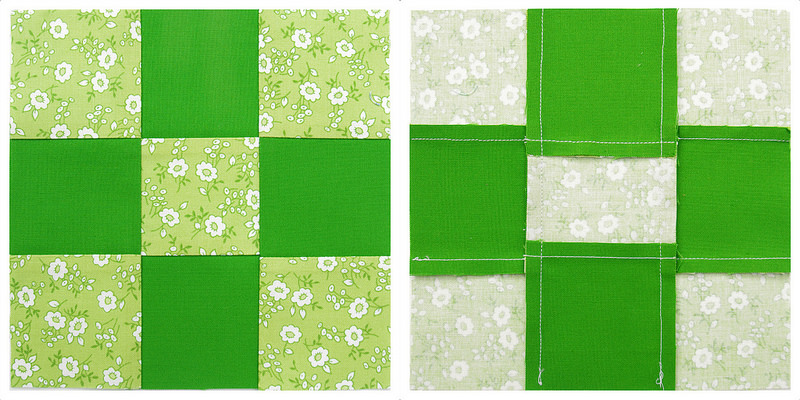
Front and Back of Spool Block
Spool Block measures 6.5 inches x 6.5 inches (including seam allowances).
Press two opposing center seams in towards the center square and the other two seams away from the center square. The points where the fabrics come together will simply twist open. Gently press.
NINE PATCH BLOCK TUTORIAL
Fabric Requirements for each Nine Patch Block:
Nine 2.5 inch squares in two contrasting colors

9 squares
4 solid fabric squares :: 5 printed fabric squares
Arrange your squares in three rows of three ~

Using a quarter inch seam allowance sew squares together into rows of three squares. Then sew rows together. Press seams as desired. These seams won't require nesting or matching with Spool Blocks so direction of these seams is not important in this instance.

Front and Back of the nine patch block.
Nine Patch Block measures 6.5 inches x 6.5 inches (including seam allowances).
Arrange your blocks by alternating a Spool Block with a Nine Patch Block. Using a quarter inch seam allowance sew blocks together in rows. Press seams for each alternate row in opposing direction. Then sew rows together. Press final seams open or one side.

50 Spool Blocks 50 Nine Patch Blocks
POINTS TO REMEMBER:
- Reducing your stitch length will help you to stop on or before the point where lines intersect.
- Back stitch at the start and end of all seam lines to lock stitches.
- If you have puckers on the front of your block it is usually because your have stitched too far and into the seam allowance. It is not too late to fix this. Simply turn your block over and unpick those extra stitches.
- Take your time to press blocks carefully.
- Print templates ACTUAL SIZE. Do not reduce or scale to fit.
Next up ~ a picture blog post of the finished Spool and Nine Patch Quilt.
Happy Stitching!
Rita

RELEVANT LINKS:
Spool Block Templates - RPQ Craftsy Store
More RPQ Tutorials
Spool and Nine Patch Quilt in Progress

More posts from Rita Hodge