
CROW’S FEET 911

TUTORIAL PHOTOGRAPHY BY AMY NADINE, GRAPHIC DESIGN BY EUNICE CHUN
It happens one morning: you get up, wander into the bathroom, lean in to see the mirror more closely and there they are… crow’s feet! You swear they weren’t there yesterday?! You’ve read about them, seen them on your mom, but didn’t think they could happen to you this young! Then it hits you: they’re only going to get worse! So you vow to amp up your anti-aging routine from this day forward. And we’ll help guide you through with our new Anti-Aging Series, starting with this today’s tutorial that takes skincare to the next level.
LED (Light Emitting Diodes) Therapies have been warriors against wrinkles for over a decade now because unlike other devices and gadgets that are complete nonsense, these actually have proven results. Blue lights are used to prevent and clear up acne while red lights work on the appearance of lines and wrinkles (as well as pain therapy) and even dark spots by accelerating cellular metabolism, repairing damaged skin cells and stimulating the production of structural proteins . But you had to make a trip to the spa every week consistently to enjoy and see the results. So you can imagine how excited I was a few years ago when brands made ones to use at home! I’ve sifted through the numerous ones out there to find these three favorites that are professional strength and really work. Spend 10 minutes in front of the TV doing this a couple times a week and watch friends out of nowhere compliment you on your skin. I kinda got addicted after that kind of feedback! Here’s how:
OUR FAVORITES:
- I used Pulsaderm Red LED Wrinkle and Aging Reducer Therapy Light on Lacy above because it’s the one I personally use on myself and it’s an FDA (Class II) cleared medical device.
- I also love Bliss Spa’s Professional Light Stem for Wrinkles because it really stimulates collagen and elastin production for firmer skin.
- The ReVive Light LED Therapy Anti-Aging Device is also one of the more powerful ones out there (and on sale!).
- Protective Goggles – the Pulsaderm device comes with a set. There is no evidence that it harms the eye without wearing them but why take a chance? I chose not to photograph Lacy wearing them because they, well, ruined the pictures, but I wear them when I use it.
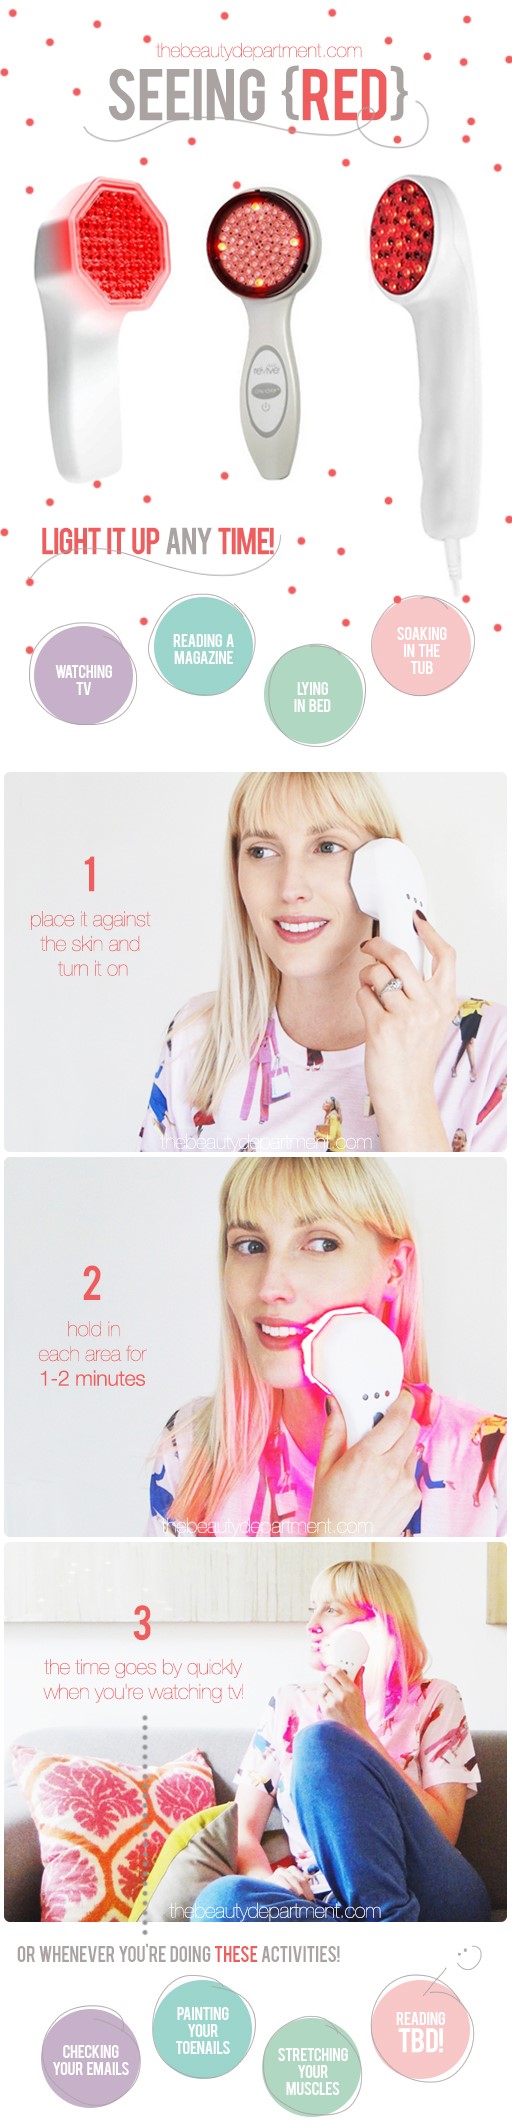
STEPS:
- After washing your face, place the device directly on a problem area and turn it on.
- Hold it over that area (you can actually touch the skin with it) for 1-2 minutes.
- Move it to another area and hold it there for 1-2 minutes. Repeat until you’ve covered every area of concern. I do under my eyes, the outer sides of my eyes, my forehead, in between my eyebrows, my lips and each lower cheek.
Note: You can do this on clean, bare skin or apply your favorite serum first like my facialist does. The red lights will make the serum permeate the surface better and work more. But don’t use this device with a Vitamin A serum as the lights will actually prevent it from working.