
Recipe Rich Pins for Blogger

I'm a total foodie, so I'm excited to share a little something special for food bloggers today! In this post I'm going to show you how to enable recipe Rich Pins for Pinterest on your Blogger blog.
If you haven't seen them yet, Rich Pins are Pins with a bit of extra information on them — for recipes, you can add ingredients, instructions, cooking times, and more.

We'll use hRecipe markup to enable Rich Pins in recipe posts. You can use this markup to turn any recipe on your blog into a Rich Pin-able recipe, even if you're not exclusively a food blogger!
I'm going to show you how to write the markup "by hand" first, then share a few free online tools to help you write your markup faster.
Ready to get started? Let's do it!
Markup For Your Template
The majority of the Rich Pins markup goes into individual posts, but I'm going to save you a little work by giving you one line of code to add directly to your template.
First, back up your template (instructions here). Do not skip the backup.
Next, open up your template by clicking the "Edit HTML" button below your "Live on Blog" screenshot. Find the
tag near the top of your template code (it's usually in the first 10 lines).Immediately below the
tag, enter this meta tag:Replace "YOUR SITE NAME HERE" with the name of your blog. You can do that as a title (for example, "Code it Pretty") or as your blog's URL (for example, "www.codeitpretty.com").

Next, press the orange "Save template" button to save your updated template.
Marking Up Your First Recipe
I'm going to show you how to completely mark up a recipe to make a fully detailed Rich Pin, but you should know that Pinterest only requires you to mark up two parts of your post for Rich Pins: the title of the recipe and at least some of the ingredients.
If you want to leave a little "mystery" to entice Pinterest users to click through to your post, you can just mark up the title and key ingredients. Nothing else is required.
For best results, start with a recipe that has already been published on your blog, and has also already been Pinned to Pinterest. Also, if you don't already have a favicon for your blog, add one! It will show up on Rich Pins from your blog.
Switch to the HTML Editor
Open up a post you'd like to make Rich Pin-nable and switch to the HTML editor by clicking the HTML button at the upper right of your post editor. The HTML button turns a slightly darker grey when it's selected.

Wrap Your Recipe
Pinterest needs a signal to know your post includes a recipe, so we're going to wrap the recipe portion of your post with an HTML element called a div.
Find your recipe in the body of your post and add this line right above the recipe's title:
Then, find the end of the recipe, and add a closing
tag below the last line of the recipe:

That closing tag is super important. If you leave it off, your sidebar will get pushed to the bottom of the page, so don't forget it!
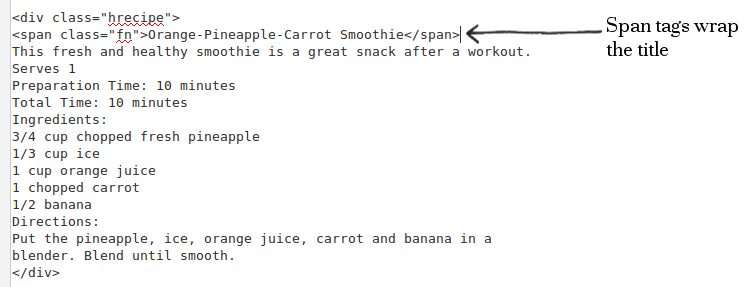
Next: Mark Up Your Recipe Title
Find your recipe's title in the body of your post. Add this line right before the first word of your recipe's title:
Then, add a closing tag at the end of the title, like this:
Orange-Pineapple-Carrot SmoothieAgain, the closing tag is important, so don't leave it out.

Next: Mark Up Ingredients
You don't have to mark up all of your ingredients, but it's helpful if you include the major stuff. Each ingredient needs to be marked up individually with the class "ingredient".
Wrap a tag around each ingredient with a class of "ingredient", like this:
3/4 cup chopped fresh pineapple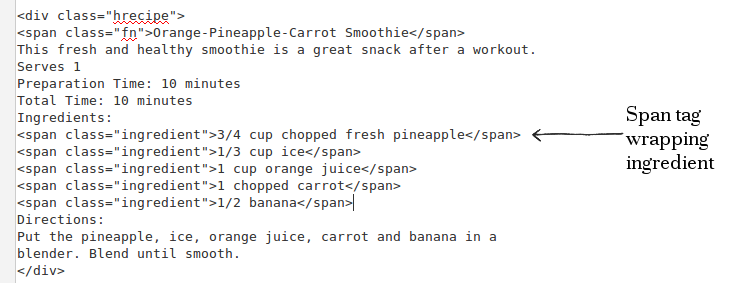

Repeat the process for each ingredient you want to mark up.
If you wrote your ingredient list as an ordered or unordered list, you can insert class="ingredient" into the opening list item tags for your ingredients instead, like this:
- 3/4 cup chopped fresh pineapple
The effect is the same as adding a span tag, it just saves you some time!
Optional Markup
Yield
You can indicate your recipe's total number of servings using the "yield" class, like this:
Serves 1Cook Time, Prep Time, and Duration
You can indicate cooking time, preparation time, and the total time it will take to make your recipe. Here are example of how to indicate each:
Cook Time
10 minutesPrep Time
10 minutesDuration (prep and cook time combined)
10 minutesTo change the time markup to match your recipe, change "title" value to the correct amount of time. Minutes are indicated with a capital M, hours are indicated with a capital H.
Re-Publish Your Post
When you're all marked up and ready to publish, press the orange "Publish" button up top. Your published post will look normal to your readers — the little bits of markup we added around your recipe won't be visible in the published post. But, if you view your page source you'll see everything you just added to the post.
Test Your Recipe Markup and Submit to Pinterest
Now you're ready to test your Rich Pins! Before you test, though, you should know that the Pinterest validator is flaky. Your first recipe may not pass — one of my tests failed even though I was using Pinterest's own demo markup. If your first URL doesn't validate, try again with another post. As long as you're using the correct markup, you should be able to pass validation after a few tries. Here's how to get validated:
- Go to the Rich Pins Validator on Pinterest's developers site and submit the link to your post with rich pin markup — not your home page.
- If your URL fails, don't get discouraged. Mark up another recipe and submit that one, making sure to include the recipe name and ingredients markup. It can take a few tries before the validator recognizes your markup, even if it is correctly formatted.
- When your URL passes, you'll be prompted to apply for Rich Pins. Click the "Apply Now" link to continue.
- On the next screen, check the "website domain" field. If you have a .blogspot.com URL, you'll need to correct the URL to your blog's actual address (for example, codeitpretty.blogspot.com).
- Set the "Data Format" radio button to "HTML Tags" and press the red "Apply Now" button.
After you apply, you'll see a preview of how your Rich Pins will look. The screenshot below was provided by Olivia Morrissey from Not A Plain Jayne, one of the early testers of this tutorial.

Pinterest takes a few days to approve blogs for Rich Pins, and will notify you by email when you are approved. Olivia got her approval notification in 4 days.
Recipe Markup Tools
If you need a little help speeding up the process, there are two free online tools you can use to generate your markup.
RecipeSEO.com is an online recipe builder that generates hRecipe markup for you.
If you use the Chrome browser, you can use the hRecipe Helper extension.
Show Off Your Rich Pins!
When your Pins get approved, I'd love to see them! Share them in the comments below, Tweet them to me @codeitpretty, or share it with me on Pinterest.
Image in title card CC-BY Flickr user ilovebutter.