
30-Minute At-Home Workout

As much as I complain about Boston winters, I really don’t think I could live without all four seasons. Each one brings with it a new routine, new clothing options, new scenery and new activities. I’m teaming up with my friends at Target® to share some of my favorite wintertime activities. I’ve also included an at-home workout for those days you’d rather not deal with that winter weather (aka every day except the first snowfall of the season…)
My Favorite Ways to Stay Active during the Winter

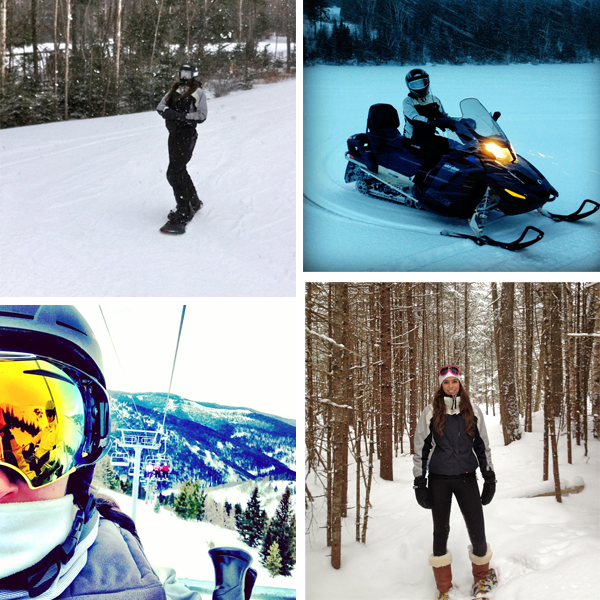
I usually only make it to a mountain one or two times a year, but I always cram in as much skiing or snowboarding as possible. Last year it was a trip to Vail.
2 | Snowmobiling
You might not think sitting on a machine counts as being active, but steering that thing is a serious upper-body workout! My dad has a few snowmobiles up at our Maine house and it’s always fun taking them out for a spin.
3 | Snowshoeing
I had never tried snowshoeing until a couple winters ago around my parents’ Maine house, but it’s a really fun winter version of hiking.
4 | Investing in a gym/studio membership for cardio.
For me, it’s worth it. I used to muscle through outdoor runs all winter long, but now that just seems like torture. The occasional cold-weather run on more mild days is nice, but now when winter hits, I spend the extra money to take my cardio indoors. That used to mean buying a trial gym membership to use the treadmills, but this year it will probably mean a combination of spinning studios, Barry’s Bootcamp and Indorow.
5 | Working out right in the comfort of my warm, cozy apartment.
I live in New England. Winters aren’t pretty. There are days when not only do I not want to workout outside, but I don’t even want to walk outside in order to get to a gym or studio for an indoor workout. Hello, at-home workouts!

And speaking of which…
30-Minute At-Home Workout
Equipment I Used:
- A set of 8-lb weights (adjust to your fitness level)
- A chair (any elevated surface will work)
- Exercise mat
This workout is broken up into 6 parts: you’ll spend 5 minutes on each body part before moving onto the next. Think of it as 6 little AMRAPs. Set a timer (or just watch the clock) for 5 minutes. You’ll go through the given exercises for that body part as many times as possible before those 5 minutes are up. When you finish, grab a drink of water, take a quick break, and then move onto the next body part.
If you’re a beginner, you might just want to stay on each body part for 3-4 minutes. If you’re more advanced, add on some time, staying on each for 6-7 minutes.

ABS | Set a timer for 5 minutes. Complete as many rounds of the following as possible.
- 10 Starfish Crunches: These are the bane of my existence in Barry’s Bootcamp classes. Start lying on your back with arms overhead. Arms and legs should be out wide so that your body is forming an “x” shape on the ground. From here, lift your legs an inch off the ground, engaging your core. The goal is to never let them come to rest, but if you’re a beginner, do so in between reps. From this starting position, crunch up, bringing your right leg straight up into the air as you bring your left arm up and across your body to touch that right foot (get as close as you can—it’s ok if you don’t actually make contact). Slowly lower back to starting and then repeat on the other side: right hand coming up to meet left foot.
- 50 Bicycle Crunches: Start lying on your back, hands behind your head (but not pulling on your head) and legs extended straight out, hovering off the floor a couple inches. From here, bend your left knee in, keeping the right leg extended out straight, and crunch your upper back up off the floor, twisting the right elbow across your body to meet the left knee. Repeat to the other side, fluidly moving from one side to the next, legs alternating in a pedaling motion. Don’t move so quickly through these that you aren’t extending your leg out completely straight with each rep. Each crunch (not each set) = 1.
- 10 Side Plank Lifts with a Knee Crunch (RIGHT): Start in a side plank with your right hand on the floor directly underneath your shoulder. From here, lower your hips towards the floor and then engage that right sidebody to lift the hips back up. Next, crunch your left knee in towards your left elbow while keeping your hips up (don’t let them sag down as you do the crunch—right oblique is still engaged!). That’s one rep.
- 10 Side Plank Lifts with a Knee Crunch (LEFT)
RIGHT LEG | Set a timer for 5 minutes. Complete as many rounds of the following as possible.
- 15 Curtsey Lunges to Calf Raise: Start standing with feet hip-width apart. From here, sink down into your curtsey lunge: right foot stays planted on the ground and as you bend that right knee, reach your left foot behind it as far to the right as you can until the ball of the left foot is planted on the ground as well. From this deep lunge position, you’re going to slowly stand up on the right foot, bringing the left foot back to center and then up, knee towards chest. As you do this, press through the ball of your right foot, lifting the right foot up for your calf raise. Lower the right heel back to the ground, going right into your next lunge.
- 15 Knee Drivers in Low Lunge: Start in a deep lunge: right foot planted on the ground (keep weight in your heel) with knee bent to a 90 degree angle and the ball of your left foot planted on the floor as far back as you can extend that leg. Your goal is to stay this low on your right leg the whole time. Keeping all your bodyweight in the right heel, drive your left knee forward, in towards your chest and then extend the leg back out, ball of foot tapping lightly back into starting position before going right into your next drive. You want to shift as little weight as possible into your left foot while doing this (focus on that isometric hold on the right).
- 15 Step Ups: Start with right foot planted on a stepper, bench or chair. This will be your base leg: keep it planted on the stepper with the majority of your bodyweight in that heel through the duration of the exercise. As you step up, lift your back knee up, driving it into your chest at the top. Lower back down, lightly touching your back foot to the floor before driving powerfully right back up.
LEFT LEG | Set a timer for 5 minutes. Complete as many rounds of the following as possible.
- 15 Curtsey Lunges to Calf Raise
- 15 Lunge Knee Drivers
- 15 Step Ups
CHEST & BACK | Set a timer for 5 minutes. Complete as many rounds of the following as possible.
- 10 Push Ups with Rows: Do a push up (from your knees or feet), hands planted on the ground wider than your shoulders (we’re targeting the chest; not the triceps). Have your weights placed right beside your hands (or hold them the entire time if it’s comfortable), and at the top of each push up, row the right weight up towards your armpit (elbow to the sky) and then the left.
- 10 Superman Lifts: Start lying on your stomach, arms stretched overhead. From here, squeeze the shoulder blades, back and glutes to lift your arms and legs off the ground as high as you can. Pause for a second at the top, and then slowly lower extremities back down to starting position.
- 10 Alternating Superman Planks: Start in a plank position, hands stacked underneath your shoulders. From here, lift your right leg straight up off the ground at the same time you lift your opposite left arm straight up, reaching out in front of you. Use your core to stabilize! Slowly lower hand and foot back to the ground and repeat on the opposite side, lifting your left leg and right arm. Each one (not each set) is equal to 1.
- 10 Laying Chest Flys: Lay on your back with feet on the floor, knees bent. Holding a weight in each hand, extend your arms out wide to the sides. Weights should be hovering off the floor, not resting. This is your starting position. From here, bring your arms up and together, meeting in the middle directly over your chest. Keep a soft bend to the elbows as you do this. Slowly return back down to starting position.
BUTT | Set a timer for 5 minutes. Complete as many rounds of the following as possible.
- 10 Squat Pulse-to-Jumps (3 Pulses, 1 Jump): Feet about shoulder-width apart, squat down, sending your hips and butt back and down (not the knees forward!). Bring your hands in front of you as you sink down. Staying low, pulse down deeper about 1-2 inches, 3 times. From there, explosively jump straight up, swinging your arms back behind you as you do. Land softly and sink right back into a squat, hands swinging forward, starting your three pulses at the bottom.
- 20 Hip Bridge Lifts: Start on your back, knees bent, feet planted on the ground, arms by your side. Squeeze the glutes to lift your butt off the ground, thrusting your hips up towards the ceiling. Pause at the top and then slowly lower back down, not letting the butt come to rest on the floor.
- 20 Donkey Kicks (RIGHT): Start on all fours: knees stacked under hips, hands stacked under shoulders. From here, you’re going to press the bottom of your right foot up towards the ceiling, squeezing that right butt cheek. Pause at the top and then lower down most of the way (don’t let the right knee come to rest on the floor). As you do these, keep a straight spine by engaging your abs, pulling the belly button in towards the spine.
- 20 Donkey Kicks (LEFT)
ARMS & SHOULDERS | Set a timer for 5 minutes. Complete as many rounds of the following as possible. I used 8-lb weights for all the following exercises.
- 10 Triceps Kickbacks: Bend your knees slightly and lean your torso forward slightly with a straight back (pull those abs in tight!). Arms are at your sides, elbows bent. Keeping your upper arms glued to your sides and just hinging at the elbow, send the weights behind you, extending your arms and squeezing your triceps. Pause for a second at your fullest extension, then slowly bring the weights forward, again by bending the elbows.
- 10 Serve the Platters: Start holding a weight in each hand at hip height, palms facing up. From there, reach your hands up and out in front of you to shoulder height. Careful not to the shrug the shoulders as you do this. Keep a soft bend in the elbow at the top, and then slowly return the weights back to hip height.
- 10 Shoulder Presses: Start with arms in goal post position: elbows bent at 90 degrees at shoulder height. From here, press your hands up overhead, bringing weights together above your head. Lower back down, but only so far as brings your elbows back to shoulder height. Don’t let them dip down lower than that. As you do these, be careful not to shrug your shoulders up towards your ears.
- 10 Shoulder Press-Ups: Imagine your forearms and elbows have magnets on them. Holding a weight in each hand, palms facing your face, hold your forearms in front of you, elbows bent at 90 degrees. Fight to hold the elbows as close to each other as you can throughout the whole movement. From here, you’re going to press your hands straight up, lifting the elbows, keeping forearms close together. Be careful not to shrug your shoulders up towards your ears as you do this. After pressing up as high as you can, slowly return back to starting.

