
Leather Tool Roll DIY+ GIVEAWAY

Read to the bottom for a GIVEAWAY from the Leather Hide Store.
From where I'm sitting, the only thing better than genuine leather is a genuine man, with said leather, working on our house. Who agrees with me here?
So, when I received this unbelievably gorgeous hide from the Leather Hide Store, I knew it was destined to become something for my man. He has spent a lot of time helping me out lately--rearranging furniture, hanging shelves, painting my new sewing room. He needed a thank you gift in a big way, and preferably something that helps us both out.
I made him this Leather Tool Roll so that his tools look good in the house, and he feels extra cool carrying them around.
Why this tool roll is awesome, according to my husband:
- "I like how it holds all my favorite tools in one place."
- "Now I can leave my tools in the house without making a mess."


Here are the specs on this Leather Tool Roll:
- Measures roughly 13.5" wide by 9" high when the top is folded down.
- Each of the five pockets is 2.5" wide and 5" deep.
- Holds five of my husband's favorite tools.
- Rolls up for easy carrying and storage.
- Includes a leather handle on the inside for hanging on the wall.


STEP ONE: Choosing the right kind of leather is very important for this project. Choose a sturdy leather so your tool roll will wear well over years. I chose an Outlaw hide from the Leather Hide Store, an upholstery leather which is perfect for this project. This leather is 1/16th of an inch thick, very supple and soft, with a shiny finish on the right side and a soft suede on the back.
Outlaw leather would also make the perfect knife set for a cooking enthusiast, or a chisel set for an artist.
First, cut a piece of leather measuring 14.5" by 23". As you can see, I placed the tools on my leather to make sure the width was correct. The size of the pockets in this tutorial should fit most handheld tools, however, you can always alter the measurements you find here to accommodate tools of different sizes.


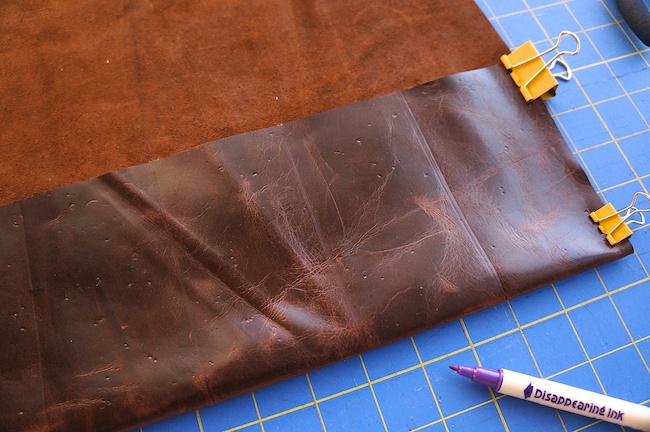
Using the top of the fold and a clear ruler, make a mark 1/4" from the edge on both the right and left sides.

Place a second mark 2.75" from the mark on the left. Continue marking the leather every 2.75" until you reach the final mark on the right side. You should have six marks, all 2.75" apart, in a straight line 10" above the bottom edge of the leather.

Place a very small dot of glue on each of the marks. (I used Tacky glue, a favorite of mine for leather working).

Carefully lift the bottom edge of the leather and press it into the glue. Make sure the edge is straight.

You should allow this to dry for 15 to 30 minutes before moving on to the next steps, so that the glue will not coat your sewing machine needle while you sew.
I like to use paper clamps to hold the leather together while it dries, and the weight of the tools to press the leather pieces together.

After the glue has dried, begin marking your stitching lines for the tool pockets. First, draw a line 1/4" from the edge. (I then used paper clamps to hold the edge in place). Draw a line every 2.75" from the top to the bottom of the pocket. (NOTE: The glue dots you placed earlier should be directly in line with the top of each stitching line).


Pick a thread. Sometimes I like to use contrasting thread, but this time I chose to use some that matched perfectly.

Play around with the straight stitch settings on your sewing machine until you find a stitch that looks great on your piece of leather. I used a stitch length of 3.5 on my Janome machine, and didn't change my tension. Just make sure you check the tension on both sides of your stitching and make adjustments accordingly. Both sides of your stitches will be visible on the finished product.

Take your leather to the machine and start sewing! First, sew along your marked line 1/4" from the right edge, back stitching at the start and finish. Add another row of stitches 1/8" from the right edge to fortify the outside edge.
Go slowly as you stitch! Your machine will be working hard sewing through two layers of leather. You may need to help guide the leather under the needle, as each presser foot deals with leather differently. Hold the back of the leather with your left hand, and the front with your right, and guide it through at an even pace.

Continue sewing along the other marked lines, but stop before you sew the final line on the left side. You may need to roll the leather as you go, to fit the whole piece inside the sewing machine.
STEP : Add the Strap

Cut a long strip of leather measuring 3/4" wide by 31" long for the strap. Sandwich one short end in between the leather on the left side of the tool roll. There is no need to clamp this in place; you can hold it in place while you sew.

Back at your machine, stitch the final line on the left side, holding the end of the strap inside the seam as you go. Add a second row of stitching 1/8" from the edge for extra strength. And now you're finished stitching the pockets!

NOTE: If your presser foot has left scars on your leather, I have good news! You can rub most of them off with your finger. The oils in your skin will help to rub the marks out. Over time, the leather will become scuffed and marked in many different places and those presser foot marks won't be noticeable anymore.

STEP: Add the handle
Once you have sewn all the pockets, it's time to add the handle. Cut a long strip of leather measuring 1" by 14.5". Place it in the middle of the tool roll, with it's bottom edge exactly 9" from the folded bottom edge of the tool roll.
Line up the ends with the sides of the tool roll.


Stitch the handle down by sewing 1/8" from the edge until you come to your mark. Create a box with your stitches and sew back to the edge. Repeat for the other side. You will now have an open handle in the middle of your tool roll.


Now for the best part: a GIVEAWAY of $50 to the Leather Hide Store! Enter below by liking the Leather Hide Store and CailaMade on Facebook, and leave a comment for an extra entry. Good luck, and thank you so much for reading! If you have a friend who might like this project, please consider sharing the link!
a Rafflecopter giveaway
More posts from CailaMade