
Video Amigurumi Mouse Tutorial

I had such a hard time waiting until after Halloween to release this pattern. I'm in love with all the mouse characters I've ever read about in children's books and seeing them come to life in the form of amigurumi is so much fun!
There are some outfits that go with the mice and
those will be released in a few days in a separate post. Once the clothing patterns are ready I will link the posts here.
Copyright 2013 Author: Sharon Ojala - Amigurumi To Go, All rights reserved Finished products can be sold
This pattern is not to be sold. Furthermore this pattern and all the images contained inside this pattern are not authorized to be sold as a cross stitch pattern or shared in full on any cross stitch site
Special notes: I worked in continuous rounds with a 3.75mm hook and worsted weight yarn. Have any questions or if you come across a mistake in the pattern please leave a message in the comment section below. This pattern will give you a Mouse about 5 1/2 inches tall depending on your choice of yarn and hook size.
st = stitch
sc = single crochet
2tog = 2 stitches together
sl st = slip stitch
f/o = finish off
Supplies used:
3.7mm hook
any color of worsted weight medium #4
embroidery floss for the nose
sewing needle
yarn needle
safety eyes 4.5mm but use any size you like or use felt or yarn for eyes
How to read the rows: Each row has a sequence as given below. For example 1sc then 2sc in next st means repeat that sequence 1sc then 2sc in next st followed by 1sc then 2sc in next st over and over to the end of that particular row. The number inside the parentheses ( ~ ) is the number of stitches you should have at the end of that particular row.
Click here for the full video tutorial
Video is in order as follows:
BODY
1) magic circle with 6st (6)
2) 2sc in each st (12)
3) 1sc then 2sc in next st (18)
4) 1sc in next 2st then 2sc in next st (24)
5) 1sc in next 3st then 2sc in next st (30)
6) 1sc in next 4st then 2sc in next st (36)
7-10) 1sc in each st for 4 rows
11) 1sc in next 4st then 2tog (30)
12-13) 1sc in each st for 2 rows
14) 1sc in next 3st then 2tog (24)
15) 1sc in each st
16) 1sc in next 2st then 2tog (18)
17) 1sc in each st
18) 1sc 2tog (12)
sl st next st and f/o leaving a long tail for sewing
Read when to put the eyes, nose and ears on before starting the head:
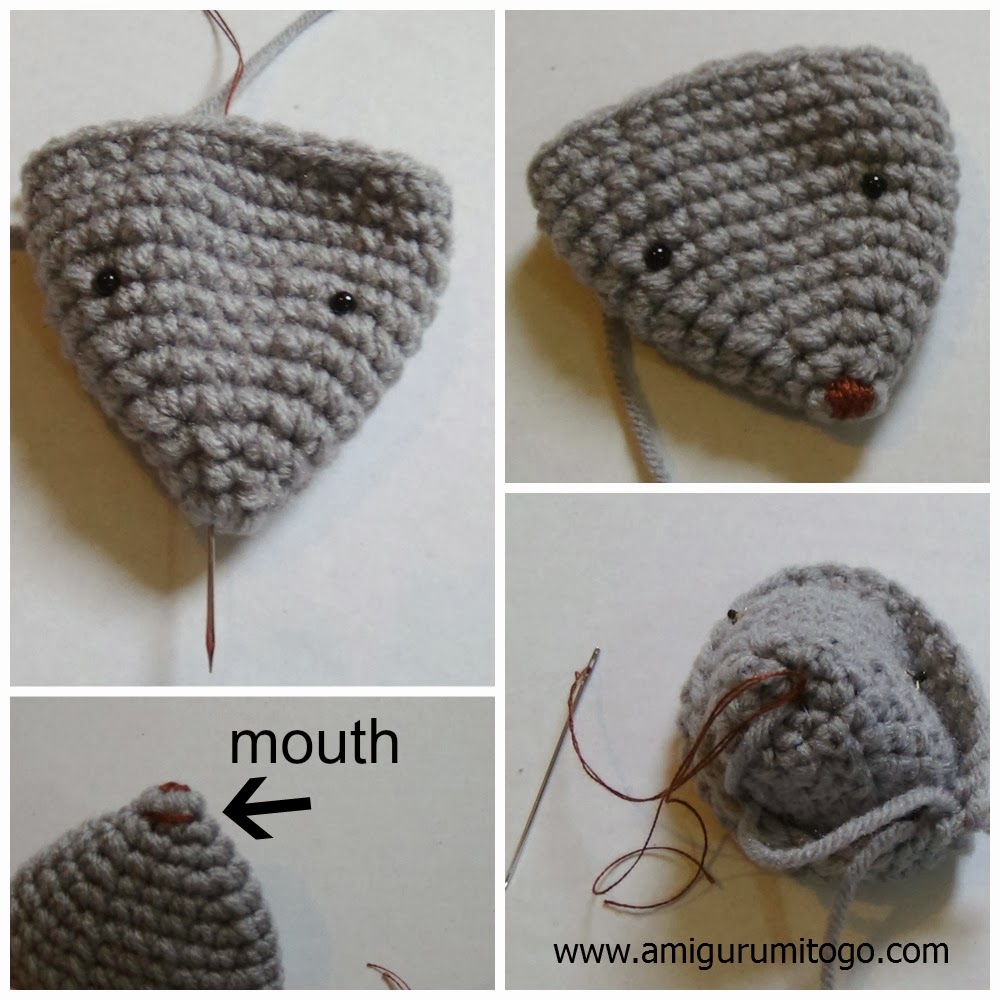
*if you use safety eyes they can go in after you've completed row 11. I put the ones you see pictured in between the 7th and 8th row with 6 stitches between them. Make sure you are happy with placements before securing anything in place. You can also whip stitch the nose in before stuffing and closing the head, see pictures below.
The ears are placed on the 10th or 11th row in line with the eyes. These can be sewn in before or after you close up the head. It's what ever you find to be easier for you. If you want to sew them in before then do it after you finish row 13 of the head, see pictures in the Ear pattern section.
Video is in order as follows:
- Introduction
- Make body
- Make head
- Eyes, nose and mouth
- Finish head
- Make feet, arms, ears and tail (includes an alternate tail)
- Adding wire
- Sewing it all together
BODY
1) magic circle with 6st (6)
2) 2sc in each st (12)
3) 1sc then 2sc in next st (18)
4) 1sc in next 2st then 2sc in next st (24)
5) 1sc in next 3st then 2sc in next st (30)
6) 1sc in next 4st then 2sc in next st (36)
7-10) 1sc in each st for 4 rows
11) 1sc in next 4st then 2tog (30)
12-13) 1sc in each st for 2 rows
14) 1sc in next 3st then 2tog (24)
15) 1sc in each st
16) 1sc in next 2st then 2tog (18)
17) 1sc in each st
18) 1sc 2tog (12)
sl st next st and f/o leaving a long tail for sewing
Read when to put the eyes, nose and ears on before starting the head:
*if you use safety eyes they can go in after you've completed row 11. I put the ones you see pictured in between the 7th and 8th row with 6 stitches between them. Make sure you are happy with placements before securing anything in place. You can also whip stitch the nose in before stuffing and closing the head, see pictures below.
The ears are placed on the 10th or 11th row in line with the eyes. These can be sewn in before or after you close up the head. It's what ever you find to be easier for you. If you want to sew them in before then do it after you finish row 13 of the head, see pictures in the Ear pattern section.

Use a sewing needle and embroidery thread, go inside the head and out where you want the nose. Do a series of whip stitches until you are happy with how the nose looks. Use a couple whip stitches to put in the mouth as well. Once you are done turn the head inside out and knot off your thread ends.

HEAD
*we start with the nose so keep the stitches as tight and neat as you can. Also be sure to finish off the last few rows as neatly as you can as this will be the back of the head and it will be visible.
1)
magic circle with 6st (6)
2) 1sc then 2sc in next st (9)
3) 1sc in next 2st then 2sc in next st (12)
4) 1sc in next 2st then 2sc in next st (16)
5) 1sc in next 3st then 2sc in next st (20)
6) 1sc in next 4st then 2sc in next st (24)
7) 1sc in each st
8) 1sc in next 5st then 2sc in next st (28)
9-11) 1sc in each st for 3 rows
12) 1sc in next 5st then 2tog (24)
13) 1sc in next 2st then 2tog (18)
14) 1sc then 2tog (12)
15) 1sc then 2tog (8)
sl st next st and f/o leaving a long tail for sewing. Use a yarn needle and weave the yarn tail in and out through the last 8st. Pull until the gap closes, neatly knot off and carry the yarn tail inside the head to hide it.
EARS
1) magic circle with 6st (6)
2) 2sc in each st (12)
f/o leaving a long tail for sewing. Pinch together the bottom of the circle where you just f/o, put in a couple whip stitches to hold the shape and knot off.


ARMS
1) magic circle with 6st (6)
2-7) 1sc in each st for 6 rows
8) 2sc in each st (12)
9) 1sc in each st
10) 1sc then 2tog (8)
11) 2tog 3times f/o leaving a long tail for sewing. Using the yarn needle weave the yarn tail in and out through the remaining stitches, pull until gap closes and neatly knot off. Carry the yarn tail through the hand and up the arm out the other end, knot off. Use the remaining yarn tail to sew the arm to the body. Do not stuff

FEET
1) magic circle with 6st (6)
2-7) 1sc in each st for 6 rows
sl st next st and f/o leaving a long tail for sewing. Do not stuff. Sew in as pictured and don't pull the yarn so tight that you alter the shape of the foot or body.

TAIL
1) magic circle with 4st (4)
2-21) 1sc in each st for 20 rows
sl st next st and f/o leaving a long tail for sewing. Sew as pictured. If it is too much of a struggle to work in a circle with only 4st then please refer to the video where I show how to make an alternate tail with a chain.

And we are done!
I hope you enjoyed the pattern and got yourself a little mouse made. Please show off pictures of your finished mouse on my facebook page Amigurumi Freely. I can't wait to see them!
Happy Crocheting!!
I hope you enjoyed the pattern and got yourself a little mouse made. Please show off pictures of your finished mouse on my facebook page Amigurumi Freely. I can't wait to see them!
Happy Crocheting!!
More posts from Sharon Ojala