
DIY Beaded Pendant Light
This project today shall be know as The Project That Almost Broke Me. Not because it was so hard - in fact this DIY beaded pendant light was actually pretty straightforward - but because right after I'd finished making it my garage door crashed down on top of it and crushed it into tiny pieces.
Pretty much this:

Except also trying not scream, swear, and/or cry in front of my 5 year old.
This wood bead pendant light was one of the DIY projects I did for the Home Depot Holiday Style Challenge (the DIY lacquered grasscloth coffee table was the other one). Once I recovered from the Great Garage Door Crash of '14 I regrouped and started over again, and today I have a step-by-step tutorial for you on how to make your very own DIY Beaded Pendant Light.

But don't hang it from your open garage door to work on it. Just don't.
Here's what you'll need:
- 5/8" square moulding
- half round moulding
- wood stain
- small eye hooks (84)
- medium eye hooks (2)
- finish nails
- wire brad nails
- clamps
- fine gauge wire
- metal chain for hanging the pendant
- 3/8" wooden beads (1000)
- 3/4" wooden beads (500)
- 1" wooden beads with 3/16" hole (500)
- pendant kit
To make the frame for the light I used 5/8" square moulding, half round moulding, and fine gauge wire.
I used a miter saw to cut the 5/8" square moulding into twelve different pieces with straight ends:
- 4@3"
- 4@4 3/8"
- 2@18 5/8"
- 2@20"
- 8@4 3/8"
- 4@20"
- 1@4 3/8"
- 1@20"


Then drilled six small pilot holes (spaced equidistantly) on all of the 5/8" square pieces (notice how I spaced the holes on the longer of the pieces).

I screwed small eye hooks into each of the pilot holes - first by hand, then with needlenose pliers to finish.


On the longer pieces (4 3/8 and 20") I also added an angled eye hook at what would be each corner when assembled.

To assemble the squares that make up the frame, I clamped then nailed two 3" and two 4 3/8 pieces together to make a square, then nailed the 4 3/8" half round around the outside. Then I repeated to make another small square, and then with the 18 5/8" and the 20" pieces to make the large square for the middle of the frame.

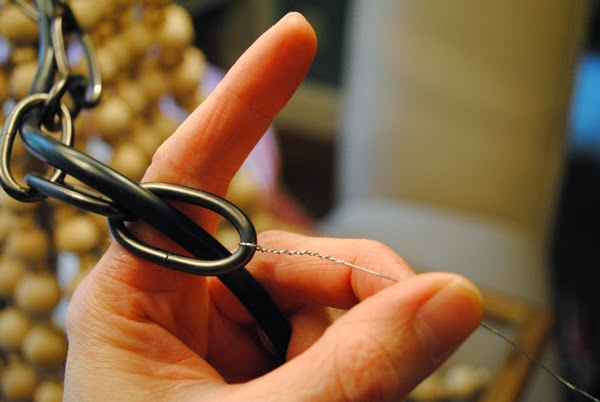
To suspend the bottom square from the center square, I cut four pieces of fine gauge wire to exactly the same size and then twisted each one from the corner eye hooks of the large square to the corner hooks of the smaller square. You want to make sure the wires are exactly the same length or the frame won't hang straight. Corner to corner, the wire I used measures 13", but cut them longer than this so you have some extra for twisting the wire around itself at the corners. The wire is so thin it's hard to make out in this photo but you can see it a bit if you look at the left corner of the small bottom square.

For the top piece, I nailed the straight edged 4 3/8" piece of half round across the top of the square to make a crossbar, then screwed one of the larger eye hooks in the center of the crossbar. I did the same for the large center square with the 20" straight edged piece of half round.


I didn't take a photo of stringing the beads - it's a bit time consuming, but put on a movie or TV show and the time passes quickly :) You'll be stringing 27 strands of beads onto fine gauge wire for the bottom section of the pendant and 27 strands for the top section.
For the bottom strands I used 10 1"-beads for each strand with a 3/8" bead in between each one and five 3/8" beads in a row for the bottom where the strand will attach to the frame. I also added a few 3/4" beads between the 1" and 3/8" at the bottom for the corner strands - just eyeball how they look once attached and see if they need a little extra to drape properly.
For the top strands I used five 3/8" beads in a row at the top of the strands, then alternated large and small again with seven 3/4" beads and ten 1" beads on each strand.
To suspend the top small square from the center large square, I strung the metal chain from one of the larger eye hooks to the other. It measures 17" hook to hook. To attach the beaded strands you just twist the fine gauge wire from eye hook to eye hook. I suspended the frame from a sturdy light fixture in my kitchen to work on it. Well...the second time around. I started working in the garage but we all know how that turned out...

You can also see in the above photo how I twisted the wire from the pendant kit through the chain, leaving the part where the light bulb screws in hanging below.
I continued twisting the wire through the top section of the chain that will hang from the ceiling.

I twisted a bit of fine gauge wire around the top of the chain - this will feed through the pendant kit canopy to actually hold the fixture up. I secured it around the metal bar that sits under the canopy.

To install the pendant kit I followed the directions included in the package. Its' pretty simple matching of colored wires - I talked about how to swap/install hard wired light fixtures HERE.
The finished pendant is pretty heavy so you'll definitely want someone to hold the light fixture for you while you hang it - you need two hands to do the wiring.
I love how the pendant came out and how it looks in my living room! I used a large round light bulb, which I like the look of better than a standard-sized one. The bulb hangs slightly off center because of the center crossbar but I couldn't figure out a better way to suspend the frame. It bugs me only slightly, but I have a feeling it's one of those things only I will notice :)


More posts from Jennifer Bridgman