
Dash for the Deadline


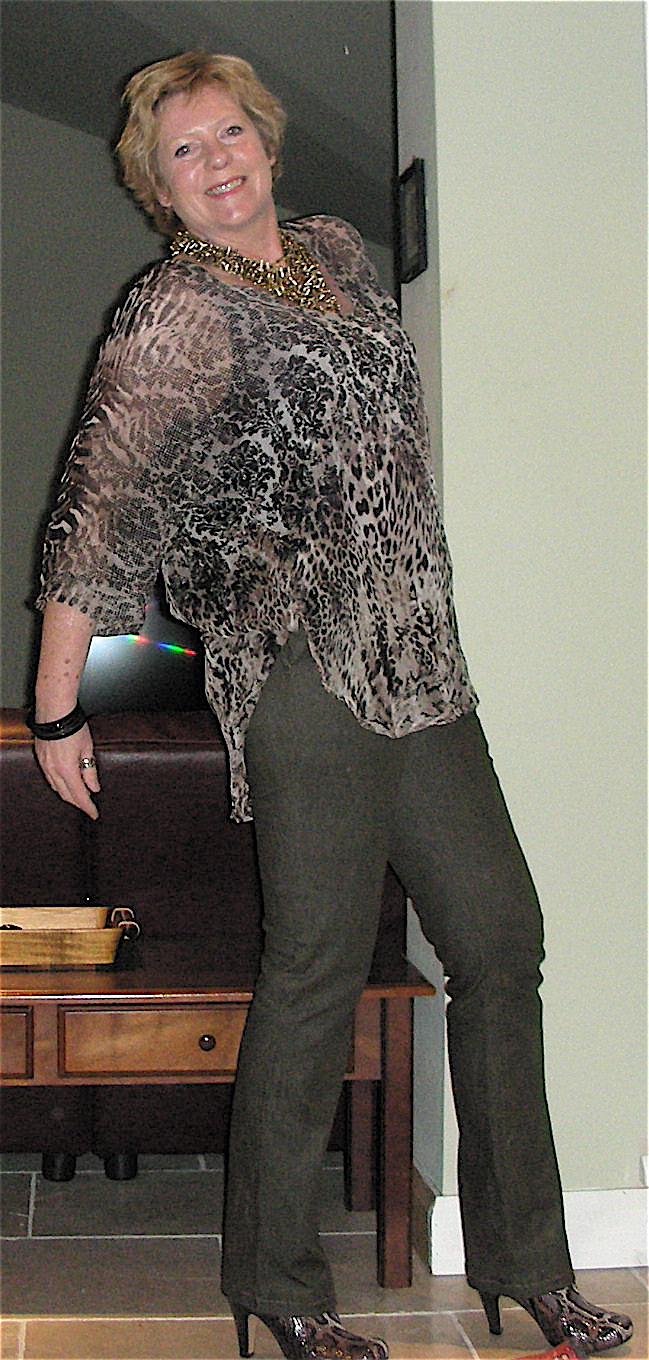
The end of January is fast approaching (hooray - pay day!) and the first Jungle January is drawing to a close. In a last ditch attempt to 'move' into animal prints I online purchased a rather cheap poly chiffon that incorporates, zebra, snake, cheetah, tiger, leopard, spots and a few fleur-de-ly for good measure. I think the postage was more expensive than the fabric!

The pattern is a mis-mash of a very easy Vogue shirt and Rachel Comey V1247: there is a back yoke, back pleat, kimono sleeves, a few darts in the front for shaping, shirt tail hem with the back longer than the front, 3/4 sleeves and bias bound V neck. - There, a bit of everything to match the fabric.

Didn't take too long to make either as there is no fitting, no sleeve insertion and the hem is just rolled and machine sewn.
More importantly to me are the jeans.


They are Issey Miyake Vogue 1204, not quite skinny but straight legged with front slant pockets and all the usual jean accoutrement. An unusual departure in style for me but I thought I'd give them a go. I normally make boot cut style jeans to balance out the child-bearing hips and I was rather concerned about the front slant pockets bulging out when I sat down. I made them long enough to cover the tops of the snakeskin ankle boots - but short enough so that you can see the boots.
There are a staggering 12 pieces sewn together to make these jeans, including pocket linings and double of everything apart from the left and right fly - 22 bits plus 5 belt carriers. I think that's a lot of pieces for two legs and a waistband.
There are a staggering 12 pieces sewn together to make these jeans, including pocket linings and double of everything apart from the left and right fly - 22 bits plus 5 belt carriers. I think that's a lot of pieces for two legs and a waistband.

Fabric is a stretch denim that was brown until it was washed and then became olive green. That's OK, I've got lots of things that co-ordinate with them - not least the animal chiffon!
Most of the fears of the style were unfounded. However, these jeans are LOW, especially in comparison to my usual fit.
I did my own unique method of achieving the perfect fit in jeans - it goes like this in 10 easy steps:
1. Cut out a 14
2. Make the fronts and backs with all the pockets and fly
3. Sew up the inside legs as real
4. Stitch the outside legs and centre back with 5mm machine baste stitch
5. Try on inside out and pin out all the excess on the outside legs and centre, especially at the waist.
6. Rip out the basting and stitch on the pin lines.
7. Try on again and pin out any new wrinkles and bagginess
8. Rip and stitch.
9. Fit the waistband to the new size.
10. Attach a button and hem
Works every time!

But that's the problem... I never adjust the paper pattern to take account of these changes so every time I make a pair, I have to go through the whole rigmarole again. However, I have also found that even with a pattern I have adjusted and altered the fit still needs tweaking with every new fabric used. One stretch denim does not behave the same as another stretch denim.
Money shot coming up.......
Money shot coming up.......


There, I've tried animal print twice this month and I'll have to admit - it's not for me. I will be wearing my animal print lined dress at a very important meeting this week and if I can muster the courage I might just accessorise with the matching scarf.
Anne, it's been fun and you've made me go where no other sewer or designer has enticed me to go before. A big thank you for hosting and managing Jungle January; hunting down and displaying all those animal print inspired garments - Meow to you!
For me, it's time to go back to SWAP.
More posts from Sewruth