about shop patterns projects printables extras sponsorship wild olive twitter flickr pinterest subscribe

project // simple scissors sheath

Simple Scissors Sheath

Do you make sure to keep the blades of your sewing and embroidery scissors safe from harm? A simple sheath protects the scissors, along with your stitching (project bags get crowded sometimes!) or even your toes. Yes, those points do hurt when they fall to your feet. Today I'll show you how to make these fast and easy sheaths that keep your scissors in great shape while they look cute too!

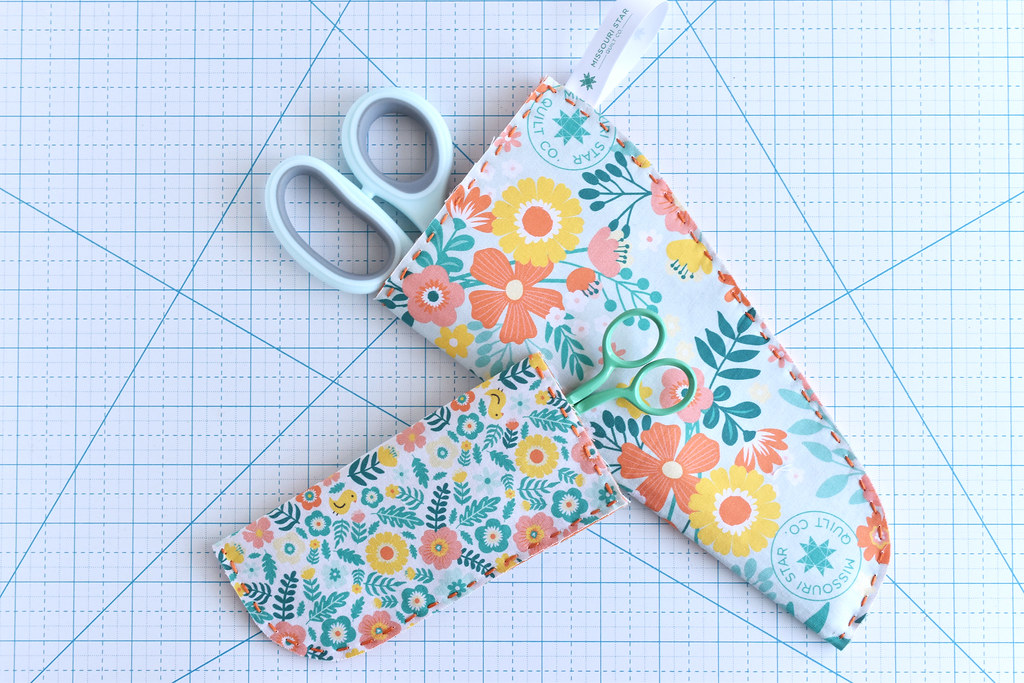
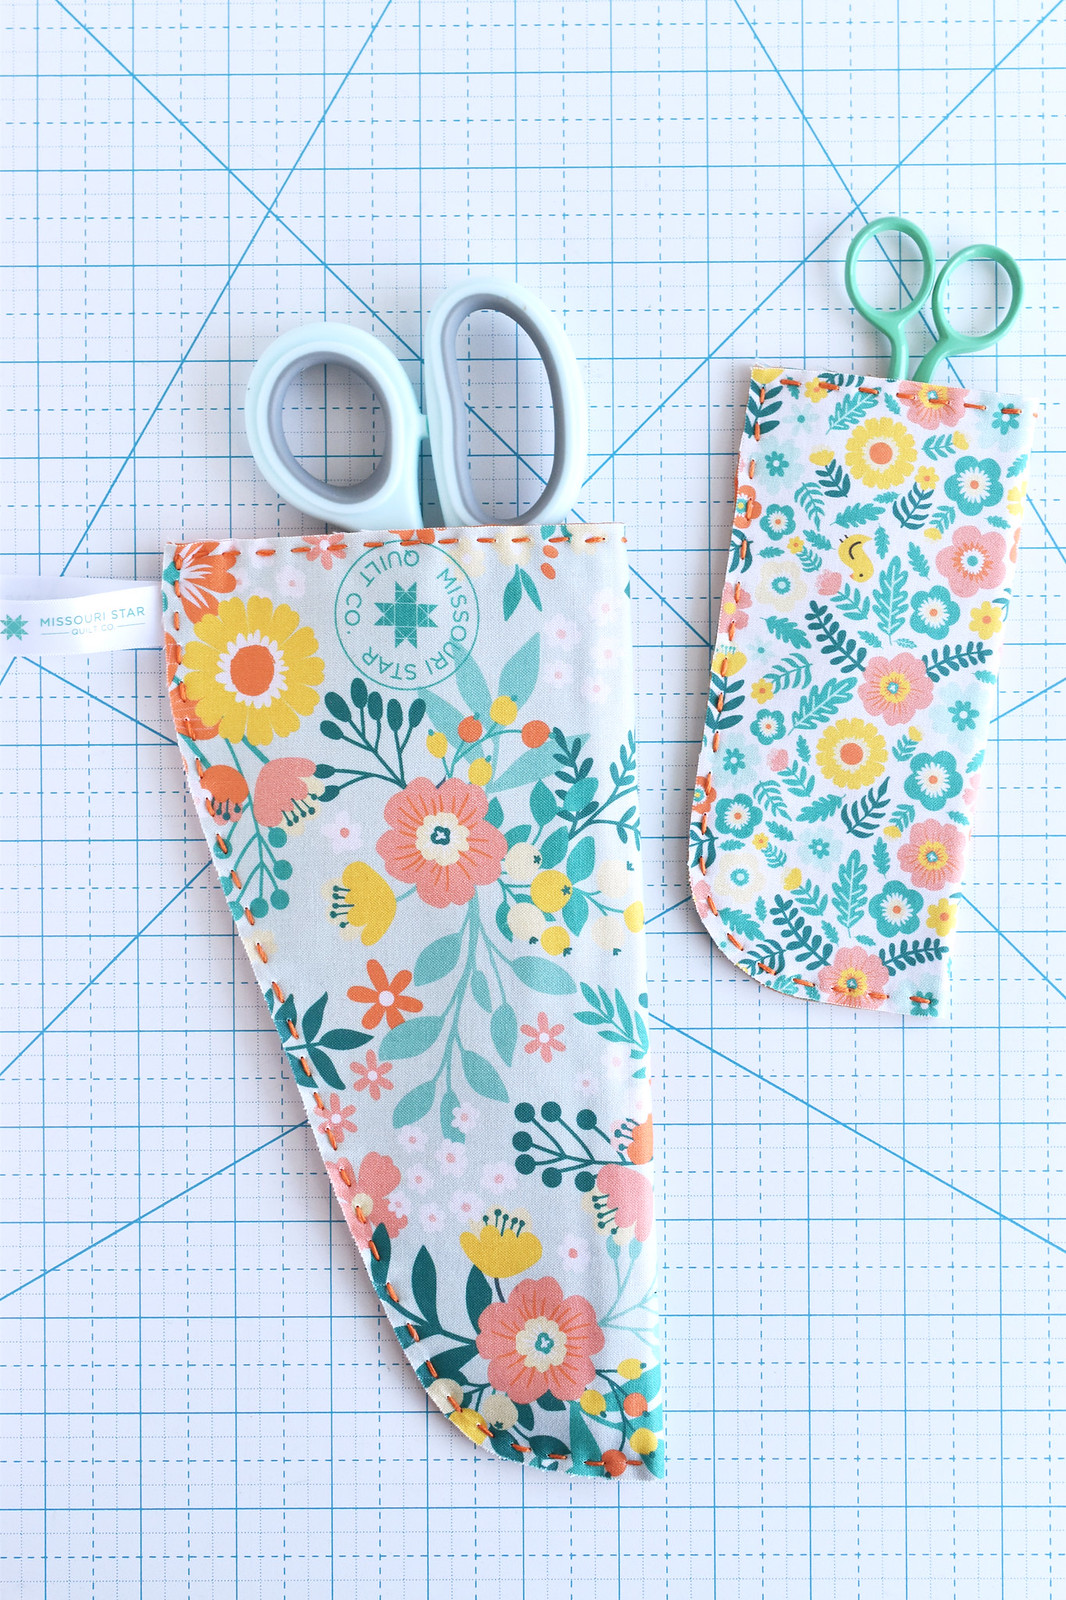
This pattern and tutorial have two sizes and shapes for two new pairs of scissors that I have. Larger shears, and smaller, precision scissors. And while a sheath is usually just something to cover the blade, this has the scissors sliding in so it's more sheath like, and less pouch like. Call it what you will!

Simple Scissors Sheath

I LOVE these scissors. I love most scissors, but when I got my first pair of these little babies, I was smitten. They are simple and cute, but more importantly, they cut like a dream. I HAD to have all the colors. (Sadly, at the time of writing, they are temporarily sold out at Missouri Star Quilt Co., where mine came from).

Simple Scissors Sheath

But this is what happens when you drop your enamel-painted scissors. You see, I tend to carry my work around the house with me and sometimes even when I'm just sitting there working, I drop my scissors. A lot. Multiple times a week. And I've damaged several pair this way.

So I'm hoping to get better about keeping them in a sheath or a little case to minimize this problem of mine.

Simple Scissors Sheath

This project expanded when Missouri Star Quilt Co. sent me their 8" Everyday Scissors (affiliate link). And I'm so glad they did! First, it meant I got to make another scissor sheath (technically, I didn't need to...they come with a plastic sheath and a plastic pouch). But they also made cutting out the layers of felt and fabric for this project a lot easier.

While I may not carry these scissors around the house with me the same way I do with those I use for embroidery and hand sewing, I like having them look cute. I went full Missouri Star and used their Quilt Town fabric line, which has their logo and everything.

If you'd like to make a simple scissors sheath, maybe for the MSQC Everyday Scissors or other shears (including pinking or scallop shears!), read on! And I've got the pattern for the smaller sheath too!

Simple Scissors Sheath

Here's what you need:

Fabric (two 10x10 inch squares for the large sheath or two 7x7 inch squares for the small sheath)
Wool or wool blend felt (10x10 inch for large or 7x7 inch for small)
Fusible web (10x10 inch for large or 7x7 inch for small)
Ribbon (optional - I used the ribbon from my fat quarter bundle)
Embroidery floss
Iron and ironing mat
Pencil
Scissors
Chenille needle

DOWNLOAD THE SCISSOR SHEATH PATTERN PDF

The Quilt Town fabric and the Everyday Scissors both were courtesy of Missouri Star Quilt Co. I'm an MSQC partner, which means you can save 20% on most items for purchases over $50 through April 30, 2024 when you shop using this link. (Bonus: using my link also helps support the work I do!)

Simple Scissors Sheath

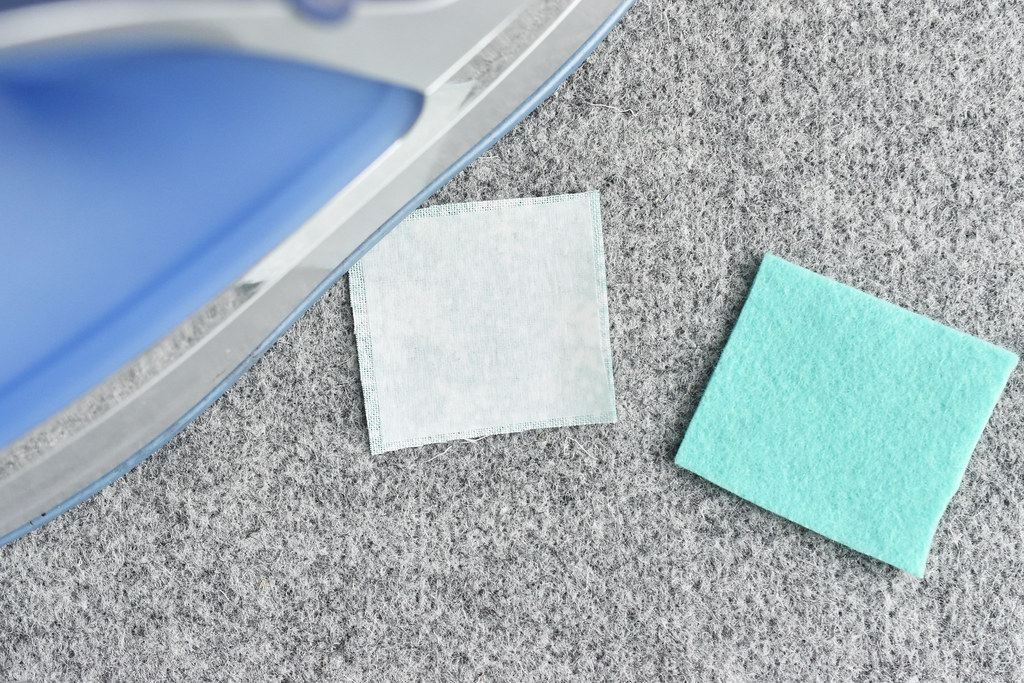
First, you need to layer the materials as follows:

Fabric wrong side up
Fusible web
Felt
Fusible web
Fabric right side up

Simple Scissors Sheath

Iron the layers to fuse the fabric to the felt. You'll need to iron the fabric on both sides.

Simple Scissors Sheath

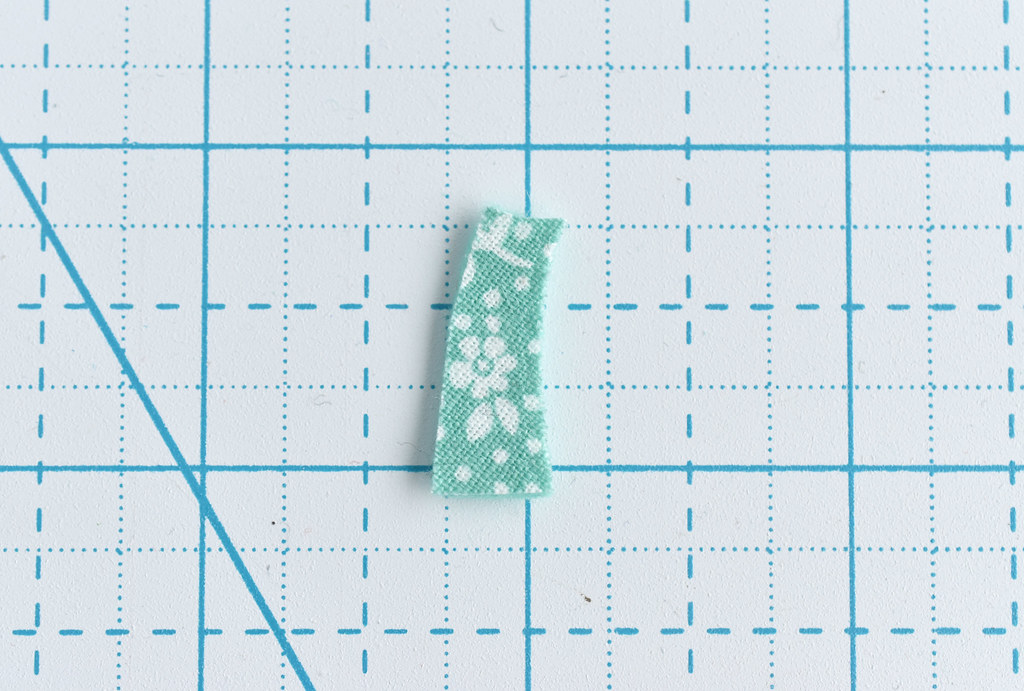
Fold the fused piece in half, with whichever side you want showing on the outside of your sheath.

Simple Scissors Sheath

Cut out the template and place the long straight edge on the fold. Trace the other sides with a pencil.

Simple Scissors Sheath

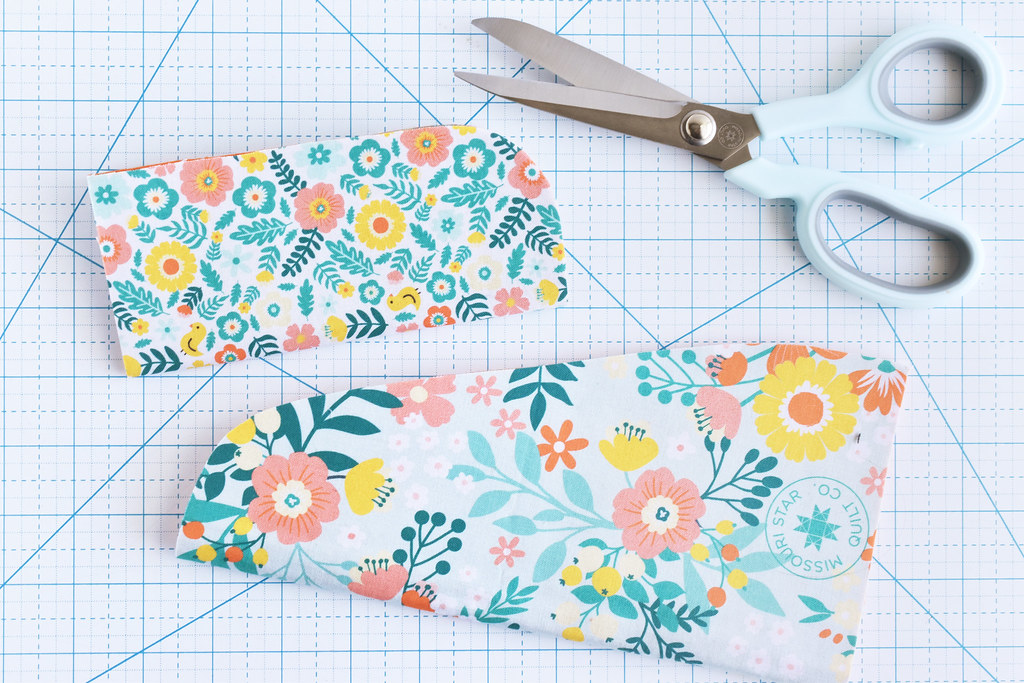
Cut out the sheath. The Everyday Scissors cut through all these layers with ease!

By the way, the process for both sheath sizes is exactly the same. On the size/shape is different. Er...except for the ribbon in the next two steps, which I left off of the smaller sheath.

Simple Scissors Sheath

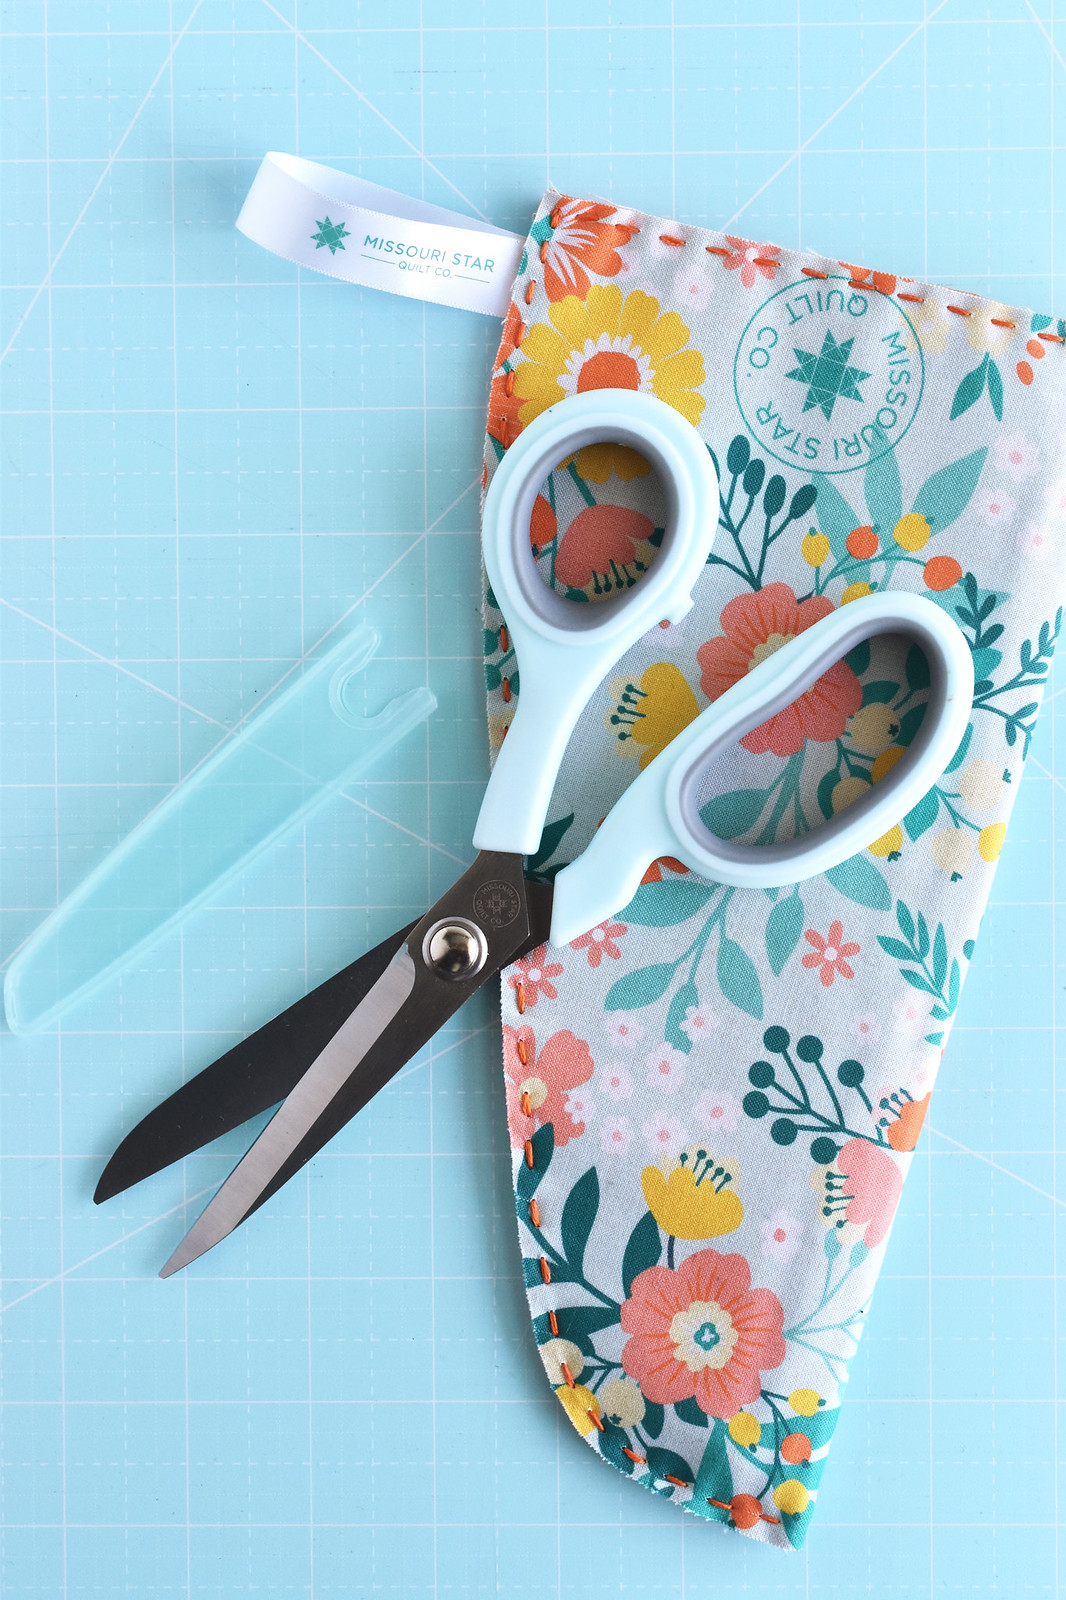
Cut a small piece of ribbon and fold it in half. Because my fat quarter pack came with this adorable printed ribbon, I HAD to use it here.

Simple Scissors Sheath

Place the ribbon between the layers. I put mine on the side close to the end that will remain open. The ribbon tab is completely optional, but I thought it was cute.

Simple Scissors Sheath

Stitch along the edge with running stitch, using all six strands of embroidery floss for a nice bold look.

After I stitched my first sheath, I realized that I probably should have added some stitching to the open edge. I went back and did that after I was finished, and I'm glad I did. When I made the second one, I stitched the straight edge that ends up being the opening first, then I stitched the other sides together.

Simple Scissors Sheath

And that's it! I love that the insides of these also have a cute print, and the fabric makes it less likely that the really pointy scissors won't poke the felt.

If you want to, you can also add a snap to prevent the scissors from sliding out. We'll see how I do with mine and if I think I need the snap.

Simple Scissors Sheath

Really I'm just hoping that my new little enamel-handles stay safe and happy now.

Simple Scissors Sheath

At the very least I'm happy seeing these in their lovely fabric homes!

project // disney snacks mickey pretzel felt ornament

Mickey Pretzel Felt Ornament

I'm not sure why, but soft pretzels shaped like Mickey Mouse just taste better. And if I'm turning iconic Disney snacks into felt ornaments, a Mickey pretzel was a must!

Now, this one looks a little different than the actual pretzels, which you can see below. But believe me when I tell you that it looked SUPER weird when I was trying to make this match. In fact, even Disney themselves changed the look when they released the pretzel items in their Disney Snacks merch line earlier this year.

Take a look at the comparison and tell me that this is still a Mickey Pretzel. Right?

Mickey Pretzel Felt Ornament

These photos tell a story. It starts with me deciding that I wanted a picture of a Mickey pretzel in front of the Pixar Pal-A-Round, formerly Mickey's Fun Wheel. But there aren't a lot of places that have Mickey prezels at Disney California Adventure. So I took a photo near the Animation Academy (close to where I got my pretzel!). But then I decided that my favorite wall in all of Disneyland was RIGHT there, so this was a good place for a photoshoot. You know...me in my ears...enjoying a pretzel with ears.

We then hike over to get the photo with Mickey in the background and my sister gasps! "You actually took a bite? But what about your photo?!?" And I told her that it was just as authentic this way. And it tasted great too!

Mickey Pretzel Felt Ornament

Now here's the scoop on making this ornament. Each ornament in this series goes together the same way, which is pretty much the same as much other felt applique ornaments. This one is just easier. You can watch my YouTube video showing an ornament from start to finish. (It's a different pattern, but you'll get the idea!).

This design has just one piece for the pretzel itself and then a bunch of french knots for the salt. You've gotta have the salt.

I used wool blend felt from Benzie Design (affiliate link). I cut the circles with my Circles and Scallops die, also from them, but you can use the circle templates in the PDF with plain or decorative scissors if you'd like.

I used freezer paper to cut the pretzel shape and carefully cut out the center sections.

You can embroider the details through the paper before carefully tearing it away, but it's actually easier for this one to remove the freezer paper and freehand the stitching. You can also use seed beads for the salt if you'd prefer!

Next, I stitched the pretzel down to the front circle with a tiny whip stitch and two strands of embroidery floss.

To assemble the ornament I used running stitch around the edges, then I filled in with a second round of running stitch. This is technically holbein stitch and it looks the same on the front and back.

Then I just used embroidery floss to make a little hanger. Other than the salt french knots, this is a fast one to make and perfect for any Disney Snack fan. Of course, now I'm wondering if I should have added a little cup of "plastic cheese"!


project // felt honey bee essential oil diffuser

Felt Bee Essential Oil Project

Do you love felt ornaments and essential oils? They go really well together because this wool felt bee ornament is also an essential oil diffuser!

I pretty much only use essential oils for the scents and how they fill the air with wonderful smells. So when I thought about how felt is often used with diffusers, I went...wait. What would happen if you put these oils on a wool felt ornament? I did some testing with scraps of Benzie felt and was SO HAPPY with the results that I decided to make a whole thing.

And you can too!

Felt Bee Essential Oil Project

Today I'm sharing a free pattern, but you could use my other felt ornament patterns as diffusers too.

I will say that while I tested how the oil and felt interact, I haven't tested it long term. I'm not sure at what point it would look gross or if it would get sticky or break down. But the point here is to have a handmade object that you use for a specific purpose. If it doesn't last a really long time, I'm still happy! Hexagons and Scallops Deep-Etch Dies

The ornament base for this uses my new Hexagons and Scallops deep-etch die from Benzie. When I started planning this die, the original idea was for a set of hexagons with some shapes you could use to also make bees and flowers. Because bees...honeycombs...hexagons...

When working with Benzie, we ultimately decided to make the set ONLY hexagons, but I still had these little bee shapes and so I thought it would be fun to share them here! But first I have a few more things to say about these hexagons.

The dies are great for making ornaments, and many of my felt ornament designs will fit on this. I'll also be creating some NEW patterns with the hexagons specifically in mind. The varying sizes allow you to make mini ornaments too, and I'm working on more projects to really put these shapes to use. I have other new dies too, and you can find them exclusively from Benzie Design.

Benzie Deep-Etch Dies (affiliate link)


Now, let's make a bee ornament that's also a diffuser! You will need:

Wool or wool blend felt
Embroidery Floss
Hexagons and Scallops Dies (optional)
Scissors
Freezer paper (optional, but helpful!)
Pencil
Iron
Needle

Bee Diffuser Template PDF

Felt Bee Essential Oil Project

Using the Hexagons and Scallops die, cut two large plain hexagons and one large scalloped hexagon.

Normally I just use a front and back, but because we're putting oil on this, having an extra layer ensures that none of the oil comes through. I've tested this and it didn't come through with two layers of felt, but this is extra assurance. Plus the layers look cute!

You can use the bee and flower pieces on other ornament shapes if you want. Or just cut out several hexagons by hand!

Felt Bee Essential Oil Project

Trace the pattern templates onto freezer paper. For the bee, you need one large bee shape and two smaller wing/petal shapes. For a coneflower like I made, you'll need one circle and three smaller wing/petal shapes. You can also make a different flower with more petals if you want.

Iron the freezer paper onto the felt.

Felt Bee Essential Oil Project

Embroider the face and stripes onto the bee before you cut it out. I used french knots for the eyes, a scallop stitch for the mouth, and back stitch for the stripes, all with three strands of black embroidery floss.

Felt Bee Essential Oil Project

Cut out all the pieces and peel off the freezer paper. For the embroidered bee, carefully tear away the paper.

Felt Bee Essential Oil Project

Arrange all of the pieces on the top hexagon. You can use a drop of glue to hold the pieces in place if you'd like.

Felt Bee Essential Oil Project

Using two strands of matching embroidery floss, stitch around the edge of the flower center. Be sure to stitch through the petals as you do this. Use the same process to stitch around the bee body, stitching through the wings at the same time.

You can leave the flower petals and bee wings unstitched so they can stick up from the base. It's cute and 3D this way!

Felt Bee Essential Oil Project

Layer the three large hexagons like a little sandwich. Make sure the front and back hexagons are in alignment with each other.

Felt Bee Essential Oil Project

Using three strands of embroidery floss, stitch around the hexagon with running stitch. Hide your starting knot between the layers of felt.

Felt Bee Essential Oil Project

When you reach the start, go back and stitch in the opposite direction, filling in the gaps with the running stitch. When you finish, hide the ending knot between the layers of felt.

Felt Bee Essential Oil Project

To make a hanger, slide your threaded needle between the layers of felt at the top point of the hexagon.

Felt Bee Essential Oil Project

Bring the ends of the thread together and tie a knot.

Felt Bee Essential Oil Project

To use your ornament as a diffuser, add a few drops of essential oil to the back. The oil will show for a few minutes, but then it will start to soak in and dissapate, leaving the smell behind. I found that the aroma lasted a few days before I needed to add more oil.

Felt Bee Essential Oil Project

I went for orange essential oil because it felt like something a bee would like. I don't have too many scents right now, but now that I know I can make these little hanging diffusers, I may need to add to my supply. Especially with so many scents available!

Felt Bee Essential Oil Project

To go with my little bee, I also made a honeycomb that doesn't use any extra patterns. It's just all cut using the Hexagons and Scallops die. Of course, I added a little face because things are better with faces! And now I just need some honey essential oil to use with this one!

Felt Bee Essential Oil Project

project // disney snacks mickey waffle felt ornament

Mickey Waffle Felt Ornament

This is not always an easy snack to find at a Disney park, but Mickey waffles are highly regarded. Which is why you should absolutely make a felt ornament version so you always have this favorite treat close by. I will admit that this isn't EXACTLY what a Mickey waffle looks like. But I made it my own style and I think it's so cute this way!

In this series of free patterns, I'm making classic Disney snacks out of felt and turning them into little appliquéd ornaments. This is the second snack, and you can find the first one, popcorn, right here.

These are minimalist patterns, in that there aren't full step-by-step photos, but you'll find an overview below. And if you've ever made any of my other felt ornaments before, you'll already know what to do!

Mickey Waffle Felt Ornament

Before we get to the pattern and process, let's take this ornament on a little vacation...

On my last trip to Disneyland, I didn't find a Mickey waffle, but I did spy some "G'warffle Mix" in the window of the Good Boy! Grocers in Toontown. Surely you could make some Mickey waffles with that mix, right?

Actually, I've heard that Tokyo Disneyland is the best place to get a Mickey waffle. Apparently you have to wait awhile, but you get to see them making the waffles fresh and that they are soooo tasty! But then, I've also seen photos of churro Mickey waffles, and that sounds pretty amazing. Mickey Waffle Felt Ornament

If you haven't made one of my appliqué ornaments before, I recommend watching my YouTube video showing an ornament from start to finish. It's from another pattern, but the process is the same.

Here's how I made the Mickey waffle:

First, this is wool blend felt from Benzie Design (affiliate link). I cut the circles with my Circles and Scallops die, also from them, but you can use the circle templates in the PDF with plain or decorative scissors if you'd like.

I cut the pieces with freezer paper, and I embroidered the details through the paper before carefully tearing it away.

Next, I layered the pieces and stitched them down to the front circle with a tiny whip stitch and two strands of embroidery floss.

To assemble the ornament I used running stitch around the edges, then I filled in with a second round of running stitch. This is technically holbein stitch and it looks the same on the front and back.

Then I just used embroidery floss to make a little hanger. There's a pretty good chance that I'll be filling at least a small Christmas tree with these ornaments this year!


All these needs now is a little bit of syrup!

pattern // tiny quilt blocks cross stitch

Tiny Quilt Blocks Free Cross Stitch Patterns

It's National Quilting Month, and today I'm sharing some free tiny quilt block cross stitch patterns! These are pretty small (most are less than one inch!), so you can stitch them pretty quick. And they are designed more as two groupings: one with the sawtooth star, pinwheel, 8-point star, and antique tile blocks, and the other with the larger grouping of flying geese.

I've made actual quilts, felt quilt blocks, embroidered quilts, embroidery patterns OF quilts, but it was about time that I bring my love of quilts to cross stitch.

Of course, on the 12x12 blocks I added some of my signature smiling faces, but those are done only with back stitch and french knots. You can add them if you like or leave them off if you prefer.

Tiny Quilt Blocks Free Cross Stitch Patterns

Because of the count on these and to make them work out the patterns on a small scale, the individual blocks don't fit easily with the flying geese. There might be a way to make the rows of flying geese into a border for a grouping of the other blocks, but I haven't done that math!

But just like with regular quilting (and cross stitch!), you can move things around, repeat elements, and more. For example, you could choose just one of the small blocks and stitch multiples of them, just changing the color arrangements. This is also a great way to get more comfortable swapping in colors on a cross stitch pattern!

I do think these would be especially cute stitched up as little cross stitched pins (clearly I have a love for small quilty pins!), but they would also just be fun to make teeny tiny designs for your mini gallery wall, or you could line them up and make a bookmark, or...I'm sure you'll find sweet ways to use them. I mean you might even combine them with other patterns all together!

Ready to cross stitch some tiny quilt blocks! I know that I am!


project // felt shamrock ornament with benzie deep-etch dies

Felt Shamrock Ornament Tutorial

I always love a good mix-and-match project, and this felt shamrock ornament is SO MUCH THAT! First, it combines felt and printed fabric. Next, it mixes up the idea of ornaments and non-Christmas holidays. And finally, it uses two different deep-etch dies that I designed for Benzie Design, changing up how you use one of them in a big way.

And among all of those things that I think are pretty fun, one of the things that make this project unique from almost every other ornament pattern I've made is that this has a very 3-dimensional quality to it. Plus, St. Patrick's Day is just kinda fun, right?

But first, let's talk about the deep-etch dies.

Felt Treat Trio - Dies
Stamp of Approval Deep-Etch Dies

*This post contains affiliate links.* I've designed several sets of dies that you can use with a manual cutting machine (I have the Sizzix Big Shot). The first set was called Circles and Scallops and its primary use is for cutting out ornament bases, but there's a lot more you can do with them too.

Then I created a set called Stamp of Approval, which has stamp base pieces, but also hearts and an X and O. Now, you could make a shamrock stamp with just this set, but I went for a circular ornament and the second to largest heart.

I didn't think I needed a die-cutter like this. But I LOVE using it. And I love finding new ways to use the dies that I have.

Felt Shamrock Ornament Tutorial

So if you are still processing all this, the shamrock on this ornament is made with hearts. The stem part is just cut freehand. And while this tutorial doesn't have patterns (I'm using the dies, afterall), you could cut circles for the ornament base and then cut out some hearts if you don't have these dies.

I'll also show you how to easily make this a 4-leaf clover, which would make this a lucky charm and not just an ornament.

Felt Shamrock Ornament Tutorial

I maintain that hearts are NOT just for Valentine's Day, and using them to make something else entirely only adds to my point.

So let's grab some supplies and make a shamrock ornament!

Felt Shamrock Ornament Tutorial

You will need:

Wool blend felt in two colors
Circles and Scallops deep-etch die
Manual die cutting machine
Green printed fabric
Paper-backed fusible web (I used Wonder Under)
Iron
Stamp of Approval deep-etch die
Scissors
Green embroidery floss
Needle
Stuffing

Felt Shamrock Ornament Tutorial

Cut out a front and back circle for your ornament.

Felt Shamrock Ornament Tutorial

Iron the fusible web to the back of the fabric, then peel off the paper and iron it to a piece of felt.

This is a piece that's the right size for one heart, but you can prepare a larger piece to cut all your hearts. You'll just run them through the cutting machine one at a time.

You'll need a total of three hearts for a shamrock or four hearts for a 4-leaf clover. Felt Shamrock Ornament Tutorial

Place the die on the fabric side of the fused felt. Cut it out with the die cutter. You may notice a little embossed line around the edge, but that will go away if you iron it.

You can place the die on the felt side instead of the fabric side, but I found it had a cleaner cut placing the die on the fabric.

Felt Shamrock Ornament Tutorial

Cut a small stem from one of the fused scrap pieces. It can be as simple as a rectangle if you want!

Felt Shamrock Ornament Tutorial

Fold the hearts in half with the fabric sides touching. Iron them to crease the center.

Felt Shamrock Ornament Tutorial

Arrange the pieces on the scalloped circle. This is how a 4-leaf clover would look, but I went for a shamrock, so the hearts needed to spread out a little.

Felt Shamrock Ornament Tutorial

Use three strands of embroidery floss and running stitch to sew down the middle of each of the shamrock pieces.

Felt Shamrock Ornament Tutorial Place the front and back of the ornament together an sew around the edges with running stitch through the stitch markings. Leave an opening and add a bit of stuffing inside.

Finish sewing the opening closed.

Felt Shamrock Ornament Tutorial

Add a simple hanging loop on the back of the ornament.

Felt Shamrock Ornament Tutorial

Share your finished ornament with your favorite Irish friend or make a bunch to decorate an all-seasons tree!

Of course, you can also hang one of these in your car as a good luck charm. Maybe even fill it with lavender so it doubles as an air-freshener!

Felt Shamrock Ornament Tutorial

One of the reasons I made mine as a shamrock, verses the 4-leaf clover has to do with St. Patrick himself. Well, sort of. Legend says that St. Patrick would use a 3-leaf clover or shamrock to explain the concept of the Trinity: Father, Son, and Holy Spirit. Like the leaves, they are all separate but also one and the same.

That may not have been something St. Patrick really did, but I still love that this Irish symbol can be a reminder of the Trinity even today!