
DIY Shadow Art + Video

Happy #100reveal Thursday!!

You guys. I have got the COOLEST project for you today. As I was brainstorming ideas for these fun GE reveal® light bulb projects my natural train of thought was obviously to do something cool with light. But we’ve already rewired a light, and made an amazing chandelier for the entryway.
Something different was just what the Dr. ordered.
Something new.

So armed with $100 to The Home Depot, and a GE reveal® light bulb I set out on my quest.
You know when you get an idea that just seems so crazy, and when you tell everyone in your life about it they genuinely don’t understand what you are explaining? No? Just me?
This project describes that perfectly. I have been super obsessed with shadow art lately, but it is always done on such a grand art installation scale.
I wanted a way to be able to simplify it enough to use it in my house. And probably not use it to make human shapes because that would be terrifying to stumble across in the middle of the night.
So after thinking long and hard about it for a minute or 2 I set out to see if it would work. If I could actually do something using light and shadow.
I conducted a little experiment and here is what I learned:

It is entirely possible…IF you have the right kind of light bulb, and the right angle.
The light bulb is critical, it needs to give off enough light to cast a strong shadow and it also needs to be focused. A regular style light bulb disperses the light too much, but a reveal® indoor flood light worked perfectly.
The angle of the light, will lengthen shorten your shadow, and the distance from the pegs will straighten out the letters (the further away the less skewed they are.)
So with this in mind we started with a little trip to my version of Disneyland…The Home Depot.
I bought a GE reveal® indoor flood light (and a regular one for the before and after) (4) 8’x1”x6”, a 3’x1”x1” wooden dowel and a 2×4’ sheet of underlayment.
After you’ve measured the exact size of the underlayment (this will serve as the backboard for everything) you are going to cut 2 pieces that measure the width of the underlayment horizontally (2’) and 2 pieces that measure the vertical distance between the 2 horizontal boards. This is a backer frame and will give you something to attach the face frame and the underlayment to.
Next you are going to cut 2 boards with 45 degree angles that have an inner measurement that match your underlayment.
PSA: For the LOVE cut these angles so that they look like this:

Not like this:

Court, I’m talking to you.
If you did not heed the above advice, head back to The Home Depot and buy yourself another couple of boards…#fun.
Once you have your boards cut the right way, use a nail gun to attach them to the back frame.

Then put your underlayment on top and secure it with a few nails.

To make the light I took apart this cute desk lamp that I’ve had laying around and a few spare parts from the Bent Arm chandelier build.
All I did was deconstruct this light that I bought a while ago:

And put it back together with the long arm in between the base and the socket (I wanted to be able to adjust the light angle as much as I need to.) I also swapped in a cord that looked better and had a higher wattage rating.

Then I drilled a small hole in the center of the frame and fed the cute new wire through. The last bit of light construction was wiring a plug on the end. Its time for a common sense disclaimer, these bulbs can get warm, this isn’t a light that you will want to leave on for hours and hours. Yes? Yes.
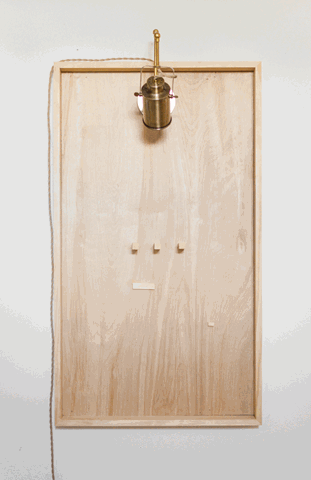
Once the light was hung inside the frame (with a small screw) it was time to place the dowels.
I did this part last so that I had complete control over the way that the shadow cast.

Once I measured and marked where my short dowels (they measure 3.5”) were going to live, I used a small amount of Titebond III wood glue to adhere them to the board.

A roll of painters tape works wonders to hold them in place while the glue dries.


Want to see what it turned into?
When the house lights are on and the spotlight is off you have this curious and delightfully inoffensive bit of wooden art on the wall.

When you shut off the house lights, and turn on the spotlight you get a friendly little message:

Amazing right?! I mean, who doesn’t want your decor to actually greet you!!? And for a grand total of less than $50 no less!

Because of the closeness of the light onto the board I was a little curious if you would even be able to tell a difference with the reveal® light bulb. Oh ye of little faith Mandi. Of course you can. Directly on the light it’s a little hard to tell a difference, but look at how much cleaner white the reveal® side is, and how much sharper the shadow. (Bulbs used were 40 W Soft White Spotlight vs 45 W reveal® Halogen Indoor Flood bulb.)


What do you think? Do you love it?!
Its time for another giveaway!! You know the drill, (10) winners will win a $100 Home Depot gift card, and a GE reveal® lighting package, all you have to do to enter is leave a comment and let me know what level of DIYer do you consider yourself to be and/or tell me about your favorite DIY project that you have completed!


