Layering HTV Without the Bulk (Silhouette Tutorial)

Today's lesson is on layering HTV. It builds on Heat Transfer Vinyl 101 and multi-color HTV so be sure you're up to speed on them before you continue here, because this Silhouette tutorial on HTV will assume you know the basics.
So let's say you have a design that you want to put on a shirt and it requires the vinyl to be layered. The problem with multiple layers of heat transfer vinyl is that it can get bulky and stiff and make the shirt uncomfortable.
And that, my friends, is where I'm going to help you today....well, actually the 'subtract all' tool is going to help you.
I'm making a monogrammed onesie with the first letter initial in the Silhouette brand metallic silver HTV and the full name in glitter HTV. Can I just take a minute to drool over this glitter htv? The color is awesome...it's the 'Jade' Glitter HTV from Expressions Vinyl - go grab some, you won't be sorry.
Anyway, what we're going to do is open up Silhouette Studio. Using the text tool type out the 'bottom' layer first so for me that's the single letter. You can size it and pick your font. I went with font 'Bell MT' for both the single initial and the full name.

Now click the text tool again to get a new text box and type out the text for your top layer of vinyl. For me that was 'Sophia.' Again, size it and pick your font.
Drag the top layer over the bottom layer and position it EXACTLY where you want it. Here's where the magic happens.

Select both layers and from the Modify window click Subtract All. You get these dark red lines around the overlapping areas. You'll see why in a second...

Now just select the top layer and move it away. You can see that you have cut out the overlapping area from the bottom layer. Do you see where I'm going with this? (Note: If you resize from here on out, select both the layers and resize at the same time or the overlay won't fit correctly in your cut out!)

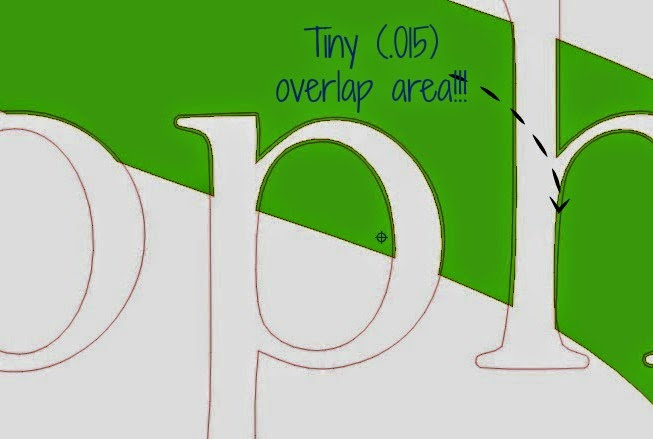
You're not done yet. You could cut like this and try to align the two layers up, but you risk seeing a tiny bit of the shirt peeking through. So to get around that...what you want to do is make a very small offset around the top layer. Highlight the top layer > Offset Window (Icon looks like a little pentagon along the top toolbar) > Offset > Adjust the distance of the offset. I went with .015. That means a very, very small amount of the top layer will be layered on top of the bottom layer - but just enough that it will prevent any gaps between the HTV and the shirt.

So you're actually going to delete the original top layer and cut the offset. I've filled the bottom layer and zoomed in really close so you can see how the tiny offset will create just enough of an overlap to avoid a gap and prevent the shirt from peeking through.

And one last very important step... MIRROR the images! Delete the originals and now you're ready to cut.
Once the two layers are cut, weed them and get ready for the fun part!

Flip the bottom layer - in my case the 'S' - onto the shirt and press it on there with your iron. Peel up the backing when it's set.

Take your top layer now and position it exactly over the cutout area and press it down like you normally would for HTV.


Once you've waited your minute and given lots of pressure, peel off that backing, too. At this point I usually press the entire design one more time.

If you look at the shirt, it looks like the design is layered. Since we cut out the overlapping sections, however, both the top and bottom top layers are actually directly on the shirt and not stacked on top of each other. And that's how you layer HTV without the bulk and stiffness!

Note: If you're working with a layered HTV design that does not include text, the same basic method will work.
More Glitter HTV Projects & Ideas...


Shop Expressions Vinyl Glitter HTV
Note: This post may contain affiliate links. By clicking on them and purchasing products through my links, I received a small commission. That's what helps fund Silhouette School so I can keep buying new Silhouette-related products to show you how to get the most out of your machine!
Thanks for coming to class today at Silhouette School. If you like what you see, I'd love for you to pin it!


More posts from