
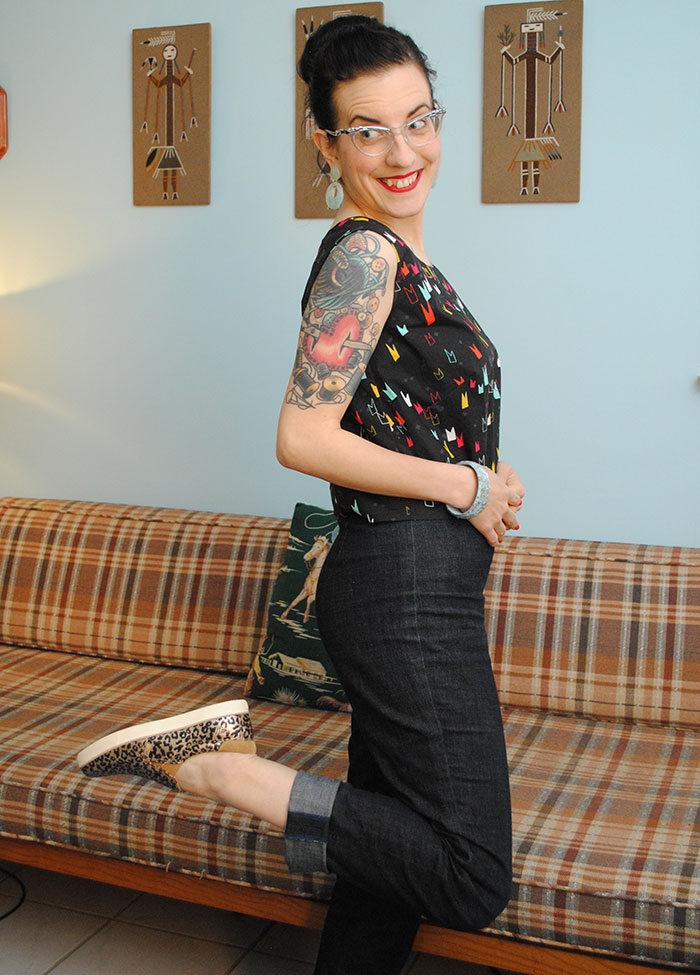
A very basic 1950s sleeveless top
I have my next Vintage Pledge item of the year to share! I believe I pledged to sew 5 things from vintage patterns, which I figured would be easy for me, since I sew with vintage patterns quite a lot in general. Though I haven’t been sewing as much this year, so it’s taken until May to hit #2 and #3. Soon you’ll see my second item, a wrap dress, as soon as I finish up the jewelry that’ll go along with it. In the meantime, here’s #3 that I finished Friday night, shortly after finishing the wrap dress. It’s a simple 50s shell that I’d actually started weeks ago and put it aside, so it just needed to be hemmed.
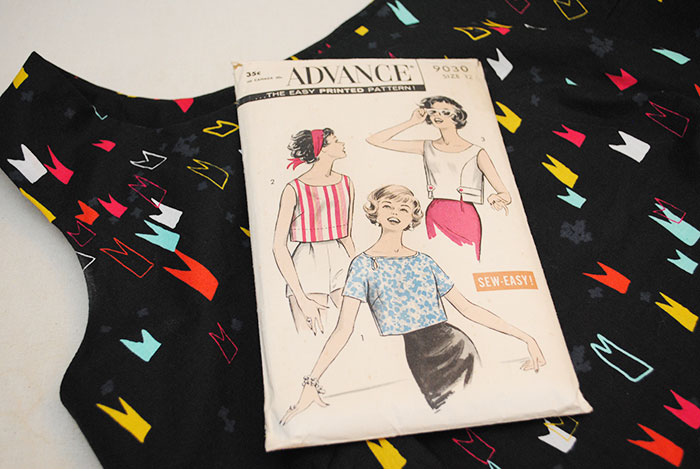
This top is seriously basic, as you can see! Practically boring, honestly. (And really hard to photograph without looking dippy, as it turns out!) It’s just a little sleeveless top from a late 50s pattern, Advance 9030. Although as you can see on the envelope, there are a couple of other views with cute details going on. This view was meant to be cropped, but I did a narrow hem instead so it would hit just below my waist.

It features a bust dart with kind of a nice shape similar to a French dart but less dramatic and…. well really, that’s it! In fact it was so simple I was tempted not to do a muslin, but I’m glad I did. I lowered the armhole by about 1/4″ and had to lower the bust darts a whopping 1 3/4″. I started by lowering it 1 1/4″ on the muslin (sort of guessing at that after comparing it to another well-fitting bodice, since it’s something I often have to do) and then went another 3/4″ lower on the real deal.
Below is my look of “hey the bust dart is in the right place and the armhole doesn’t gape, either” happiness!

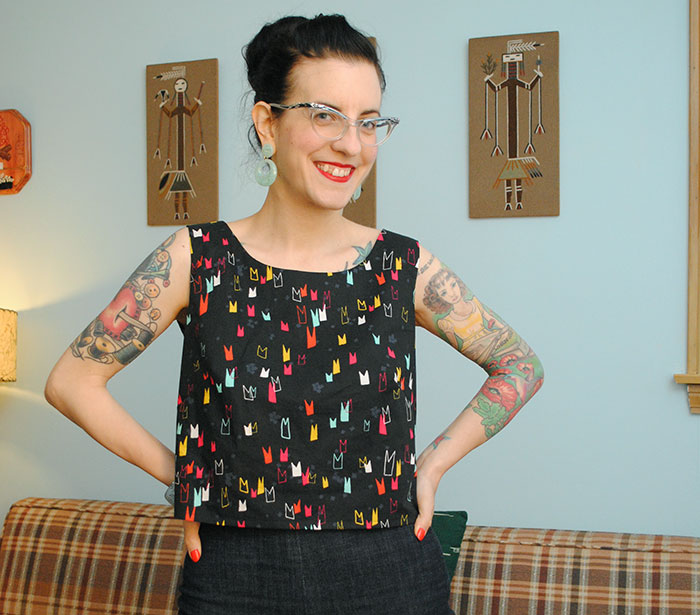
Honestly, the fit is pretty much perfect to me, exactly what I was hoping it would be! I would make no future adjustments, and that’s rare to say. No gaping at the back or the armholes, no bunching under the armholes, and not overly large considering you pull it over your head and it has no closure. Tops like this can go from cute and vintage to a trapeze or maternity top quickly, especially if you’re a bit busty. I’m happy this managed to avoid that look, although it obviously could stand to be ironed (sorry, I was wearing it all day).

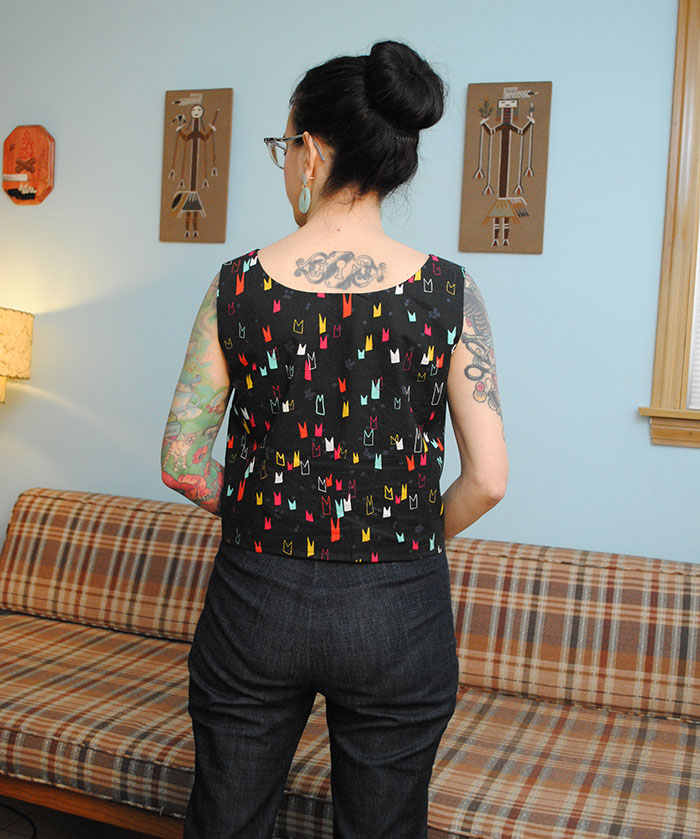
The wrinkles are really bad in the back as you can see below, and this is frankly an unflattering photo but I thought it would be worth mentioning I’m wearing these with my Butterick B5895 denim cigarette pants that have entered the it-should-almost-be-criminal-not-to-have-washed-these-by-now zone. For all the saggy wrinkles from the stretched out denim, they’re still better than some of my muslins of that pattern were! I really need to make another denim pair as I wear them so often, the lapped zipper edge and some seams are showing wear from washing.

Back to the top. The armholes felt suspiciously high when I was making the muslin, but I did some research, because it looked good, it just felt weird. After doing a lot of reading, I realized that apparently a higher armhole is more of a European fit (any Euro friends able to confirm that?).
And while it seems counter-intuitive, a higher armhole apparently gives you a bigger range of motion, too. So I lowered the armhole just a smidge, only 1/4″. With this higher armhole, you don’t get that thing where you raise your arms above your head and your entire shirt follows. Sorry, I forgot to photograph it, but trust me, this does stay put!

After getting used to the fit, my only complaint is that this top is black and it makes getting even “invisible” deodorant on it much easier. Oh well. But after wearing this a couple of times, I don’t even notice the feeling that my shirt is riding up my armpits any longer. So I’m glad I stuck to my guns and didn’t lower the armholes a bunch to make it roomier!
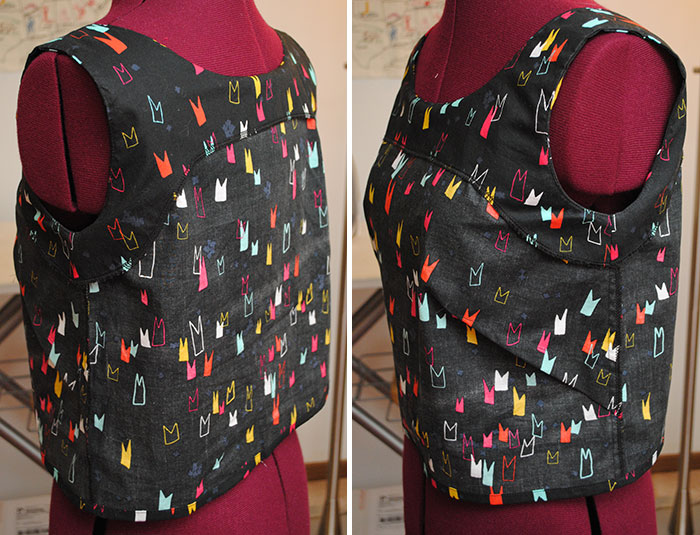
So now here’s something interesting to me and long-winded about the construction; just skip until the next photo if you don’t sew! I’m not one to get too fussy about the insides of things I sew. I mean yes, I want it to look nice, and there are certain places that make me nuts that never look good enough to me (the bottom end of a zipper springs to mind). But I generally don’t get too crazy about it. I also have no problems with some minor hand sewing in the things I made, either. But but but! This simple shell has a feature that tickles me to no end: an all-in-one neck and armhole facing… that I did entirely by machine! I mean 100%, down to even tacking the facings to the armhole side seams and being able to understitch all but 3″ or so at the top of each shoulder.
I was familiar with the idea of doing an all-in-one neck and armhole facing, and I think it’s a great little feature for sleeveless items if you don’t want to use bias tape. (It’s one of those… I hate working with bias tape… I hate facings… which do I hate more? kind of things.) I’ve done it for the lining on the Elisalex dress, which zips up the center back, and generally if you look online for tutorials, that’s the same type of tutorial you’ll find, but for facings. However, this method requires a center back opening, like this tutorial. If you’re not familiar with the concept, it may seem at first like couldn’t you just sew the facings together and to the right side and flip it all in? But you totally can’t. It’s just one of those facts of (sewing) life.
Anyway, point being this: my top has no opening because it slips over your head. And I didn’t want to use the instructions in my vintage pattern to do a combined neck and armhole facing, because it involved lots of hand sewing and overly fussy details. But the fact that the pattern did call for all-in-one facings instead of bias tape or separate facings got me thinking, and so I went on a hunt. Surely there was a way to accomplish this with no opening!
And lo and behold, I was right. There are very few tutorials, and unless this has changed in the last few weeks, the ones that exist are either pretty unclear or geared towards a specific project, and so have lots of extra details you have to kind of filter out in your mind, which isn’t always easy in a tutorial. The closest I got was this one from Colette, from the Rooibos sewalong several years ago, although it took some work to understand a couple of the steps because the photos weren’t super clear and you have to ignore all of the piping instructions. But finally I wrapped my mind around it and was on my way.
And I’m thrilled how it turned out! Looks nice and neat, was easy to do, and because they’re sewn together at the shoulders and side seams, the facings don’t go anywhere! That’s one of my biggest complaints: even when you tack facings at key spots, I don’t know about yours, but mine always manage to flip out. I love this so much I was tempted to write a tutorial even so I’d be able to easily remember how I did it next time, ha ha! Obviously not that many people want to do this or there would be more help out there.

The fabric I used is a cotton lawn from Cotton Steel called gnome pants, and the name sucked me right in, of course! But I actually decided to run the print upside down, so instead of pants, they’re like little crowns. Lawn was the perfect weight fabric for this kind of top, since I wanted it crisp but not stiff. Rayon would be too drapey and most mid-weight cottons would probably stand at attention too much.
I’d love to make more verisons in Liberty lawn or poplin (I need to figure out if we can get the poplin over here). Or vintage fabric. It used about a yard, so it’s perfect for special fabric like that!

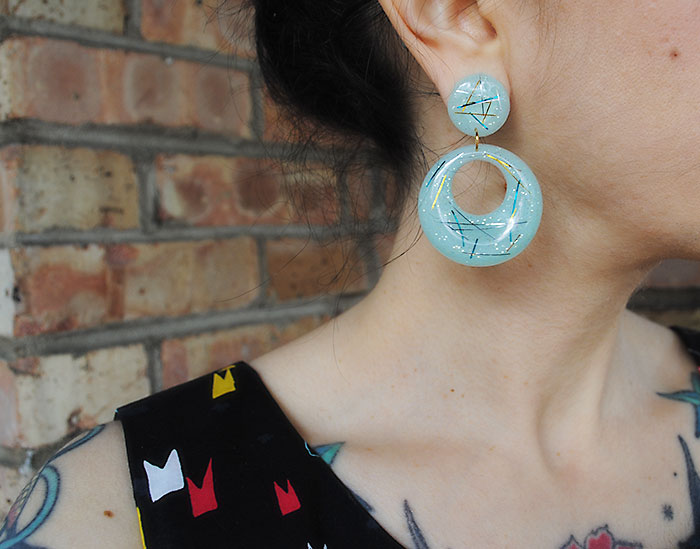
Well, that’s a hell of a lot to say about a very simple top. I paired it with tinsely faux lucite earrings that I made, and a vintage confetti lucite cuff bracelet that Mel gave me for Christmas.


Now let me change the topic a sec. Ladies who sometimes wear shoes of questionable comfort like me, be sure to take care of your feet. After wearing a few too many questionable shoes in the last few weeks and then going on a really long walk in non-supportive Keds, I caused myself some issues with my left foot. Don’t worry—I’ve been very careful, and I’m being extremely diligent about regular exercises and massage and it’s already tons better after a week. Physical therapy is so important, can’t stress that enough!
But as a result, I’ve been wearing trainers and other supportive shoes a lot lately, especially when walking around the house (which is a lot since I work from home). So meet my gold and leopard print Gola slip ons! Had to show you, since they’re much cuter than the boring-but-insanely-comfortable-and-supportive Skechers I’ve been wearing more often. I don’t love having to do that, but I do love my feet feeling better. I’ll be back in “normal” me shoes more regularly soon.
So moral of the story is take care of your feets and don’t give them too much hell without a breather! They’re the only ones you get.

Anyway, that’s all she wrote on this top and outfit. Since I’ve been wearing cigarette pants a lot lately, this slip over shell shape works really nicely for me and I can see it becoming a summer and spring staple. I was looking for some more collarless shirts in my wardrobe, and this is a good pattern to make a few! Throw on a cardigan if it’s chilly and I’m good to go. I could see it working well with pencil skirts perhaps, too, so it might give me a reason to get the Sew Over It Ultimate Pencil Skirt pattern. I loved Emmie’s version from winter!
I’ll soon share the wrap dress that I finished up and am mostly pleased with (it has some issues). Both were finished on my new Bernina! It’s the Tula Pink edition of the 350 and I’ve only been using it about a week but omg you guys. It was soooo worth waiting over a year to upgrade to a Bernina. I’ve already been able to do several things on her well that my old Singer made me feel like an inadequate sewist about. Soooo much love for Betty (what I named her).

What to sew next?? I may take a stab at a different wrap dress pattern, or perhaps another pair of trousers, or maybe another version of this top. We’ll see!