
Revel Nails Acrylic Dip Powder System (with Instruction Video)


I have something new and exciting to share with you today… Revel Nail’s acrylic dip system! With this system you can achieve beautiful acrylic overlays on natural nails or tips, and you can also achieve a perfect acrylic French manicure in just a few easy steps.
Revel Nail’s acrylic dip powders come in 2 oz jars, and are available in 65 different colors. The powder is ultra fine and silky to the touch. The dip system includes the dip powders, Prep Gel (step #1), Pro Base (step #2), Activator (step #3), and Finish Gel (step #4). There is also a brush softener available in case you accidentally let one of your brushes harden. These items are sold separately or you can purchase them all in the French Manicure kit, which includes white and pink powder. My photo below also shows the cuticle oil, which can be purchased separately.

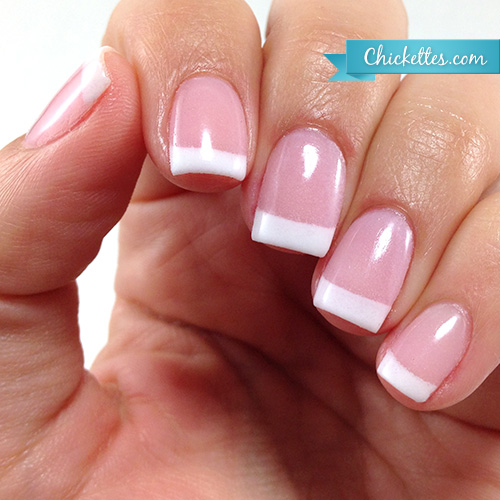
Below is a picture of my very first attempt at the acrylic dip system. It was super easy to use, and my nails felt amazingly strong! My nails felt a little tight and my c-curve was flattened out quite a bit, which made my nails look wider than normal. I actually like it when my nails are a little flatter because my natural curve is very deep. I applied three coats of Isadora to get this look. My nails were gorgeous and sparkly!

One quick thing to note is that the Tack-Free Top Coat is meant for use over nail enhancements (acrylic or gel) and NOT for soak-off gel polish. This is the only product I used that need to be cured in a lamp. The dip system products do not need curing.

I finished this manicure off with the Tack-Free Top Coat instead of the finish gel, and you can see that it has a nice glossy finish.


I think the base color is a little too pink for my skin tone, and a nude color might work better for me. Also, the pink looked a little grainy. That is my fault though because I didn’t have the right ratio of liquid to powder, which I’ll explain more below.


APPLICATION INSTRUCTIONS:
Below is the video by Revel Nail that demonstrates how to do a pink and white French acrylic dip. I watched the video and jotted down some notes. Below are my shortened version of the instructions. Please watch the video at least once before attempting to use the dip system in case my notes are unclear.
- Sanitize hands.
- Remove shine from the nails using a fine grit nail file (e-file only if you are experienced).
- Apply the Prep solution (#1) to the nails.
- Apply the Pro Base (#2).
- Dip the nail into the pink powder.
- Apply Pro Base (#2).
- Dip just the tip of the nail into the white powder to create the smile line, and tap off any excess.
- Dip the whole nail into the pink powder, and tap off the excess.
- Repeat steps 7 & 8.
- Apply another coat of Pro Base (#2).
- Apply the Activator (#3) generously, capping the tips.
- Once dry to the touch, shape the nails with a file.
- Buff the nail and remove powder from the cuticle area.
- Rinse hands in water (no soap), and dry.
- Apply the Activator (#3) again, and wipe off with a paper towel.
- Apply the Finish Gel (#4). Don’t pause, and wipe the brush onto a piece of paper to reduce stiffness.
- Apply another coat of Finish Gel (#4).
- Allow to dry.
- Apply cuticle oil.
Application Tips & Tricks:
These are a few things I learned the hard way in my trials.
You’ll notice in the video that she applies a coat of pink before doing the pink & white. On this initial coat, she doesn’t cover the full nail with the Pro Base. She applies somewhere between 1/2 and 3/4 up the nail, avoiding the cuticle area. I’m told that this helps build strength. I also found that it makes the edges smoother and less bulky.
I had issues with powder getting onto my Pro Base (#2) brush, and now have powder in my bottle. I learned that this happened because I didn’t use enough Pro Base. If you apply the Pro Base generously enough, the powder should have a wet appearance after dipping. If the powder stays chalky/dry looking, you didn’t use enough Pro Base and are likely to pick up some powder on your next layer application. If you do get powder on your brush, wipe it off with a dry paper towel before putting it back in the bottle. This is also the reason that my pink and white mani had a slightly grainy appearance.
As I mentioned previously, if you use acetone frequently you might consider using the Revel Tack-Free Gel Topcoat instead of the Finish Gel (#4) to protect your manicure. Don’t apply it over the finish gel or it will peel off.
If you are doing nails for clients, I have a feeling that dipping into the same container would be considered unsanitary. I would put some powder into a dappen dish or other small container for one-time use and discard any remaining powder after the mani is done. You could also do the sprinkle method, and sprinkle the powder over the nail rather than dipping into the container.
And lastly, my brushes did get hard a few times. I put them into the brush softener bottle and left them sit for a little while and they softened back up. Just be sure to wipe off the softener before placing the brush back into the proper bottle.
Removal
If you’re wondering about removal… it wasn’t difficult, but I did find it to be a little messy. To remove the acrylic dip, soak your nails in acetone or you can use the Steam Off system, which is what I used. The acrylic softens and becomes very gummy, and you scrape it off with an orangewood stick or instrument. I did it little by little until it all came off. I think it took about 20-25 minutes total.
Fills
You can do fills with these instead of soaking-off and reapplying! I have not attempted this yet, so I can’t provide any advice. I believe you would focus on applying just on the new growth and blending it into the existing acrylic.
Acrygel
I also want to mention quickly that these powders are awesome for using with the acrygel technique! They are super fine and hardly require much buffing/filing, and there are tons of color options. You don’t even need to apply polish over them.
Whew! That was a long post, but there’s a lot of info to be known!
Revel’s acrylic dip products can be purchased here: http://www.revelnail.com/dip-powder/