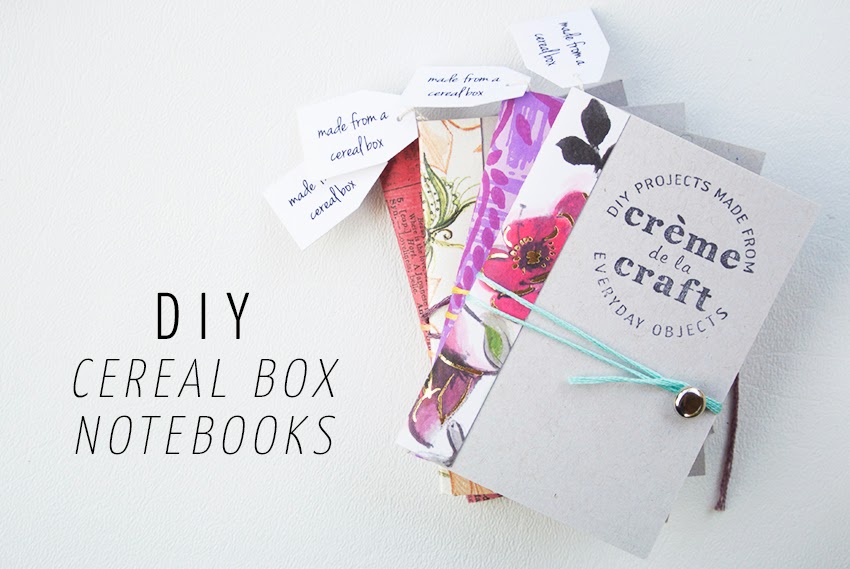
My DIY Cereal Box Notebook Business Cards


Hi folks! I just got back from an amazing week in Salt Lake City for the Cricut Explore launch event and the Alt Summit blogging conference. I'm feeling so inspired after being around a group of 700 incredibly creative people!
I knew that exchanging business cards was kind of a big thing at these events, so I wanted to make mine extra special. I decided to turn one of my most popular DIY projects, the cereal box notebooks, into my business cards! Thanks to the custom logo stamps that Twin Soul Art Studio made for me, I think these came out awesome.
With 25 cereal boxes from the 99¢ Store, I was able to make 200 cereal box notebook business cards. And to answer the question that I got asked the most...they took 2 weeks to make, a few paper cuts, and an assembly line of happy helpers. And to answer the second most asked question...the cereal definitely did not go to waste!

You can find my original cereal box notebook tutorial here, but I created a modified version for these extra mini notebooks below. I think these would be a cute gift idea too! Here we go...
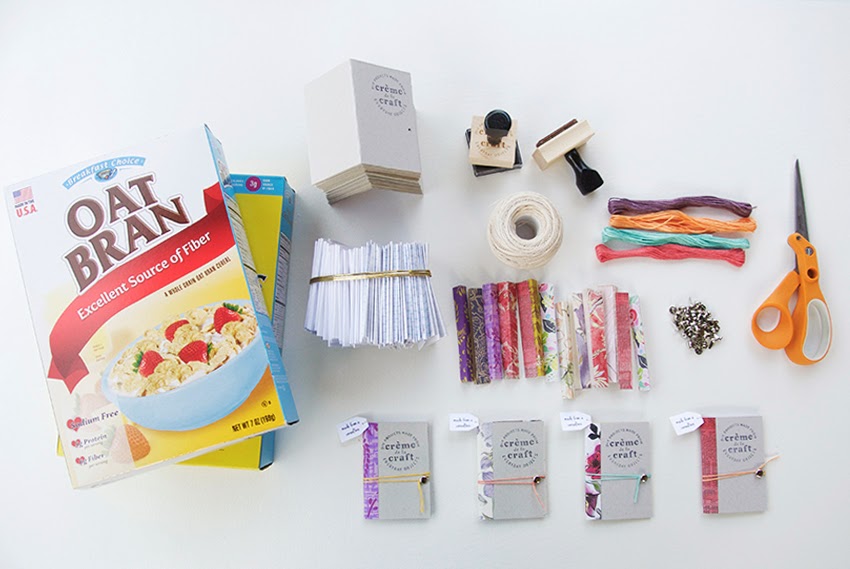
Materials:
• Cereal box • Paper trimmer (since I was cutting several boxes, I used my heavy-duty Fiskars ProCision Rotary Trimmer) • Custom logo stamp (Twin Soul Art Studio makes fantastic ones!) • Ink pad • Hole puncher • Notebook paper • Scrapbook/Decorative paper • Glue stick • Stapler • Paper fastener • Embroidery floss • Optional: Mini hanging tags and twine

Steps: • Using the paper trimmer, cut out a rectangular piece from the cereal box. Mine was 5" x 3.75" and I was able to get 8 notebooks from 1 cereal box.
• Fold in half with the blank side facing out.
• Stamp on your custom logo or add any other embellishments to the cover.

• Trim notebook paper slightly smaller than the notebook cover. I used 7 sheets at 4.75" x 3.6" each.
• Fold paper in half, place it inside the notebook cover, stapling the two together.
• Optional: Add a mini hanging tag, by running twine through the tag and knotting around the notebook to secure.
• For the notebook's spine, cut out a small piece of scrapbook paper and fold in half. Attach it to the notebook with a glue stick.

• Punch a hole in the center of the top cover.
• Knot a piece of embroidery floss to a paper fastener, slide it through the hole, and fold back the prongs to secure.
• Wrap the embroidery floss around the notebook and tuck it under the paper fastener to secure.


More posts from