
Adding Legs to a Mid Century Modern Dresser | How To
It was a great weekend!! We closed on our house (pics soon!), moved some of our things in (the rest is in our Ohio rental) and I took pictures of our dresser that we finished over the Christmas break.
We took a beaten up Mid Century Modern dresser, painted it and lifted it off the ground with legs! Here's how we did it.

A few months ago, my Mom sent me pics from a furniture sale at her work (isn't she the best!?) I think I definitely get my thriftiness and love for taking trash to treasure from her.
My Mom works at a retirement community, and every year the resident's donate unwanted items to be auctioned off (if you're interested, sorry it's employees only:( It's silent bid style, so there's a starting bid and then you write your bid on the paper - at the end of the day, the highest bid wins.
The starting bid for the dresser below was $8, I guess we were the only ones who saw the potential because we got it for $8!! Mom's good at under playing the amazingness in a piece ;) Probably saying, Oh, it's so short, where are the legs? or It's pretty beaten up not sure if that can be fixed or I'm not sure why my daughter wants this ...

The dresser originally had legs (had the supports and mounts underneath) but they were removed .. maybe to fit under a window or act as a bench? It was pretty short, ~20". So my first thought was that it needed legs!
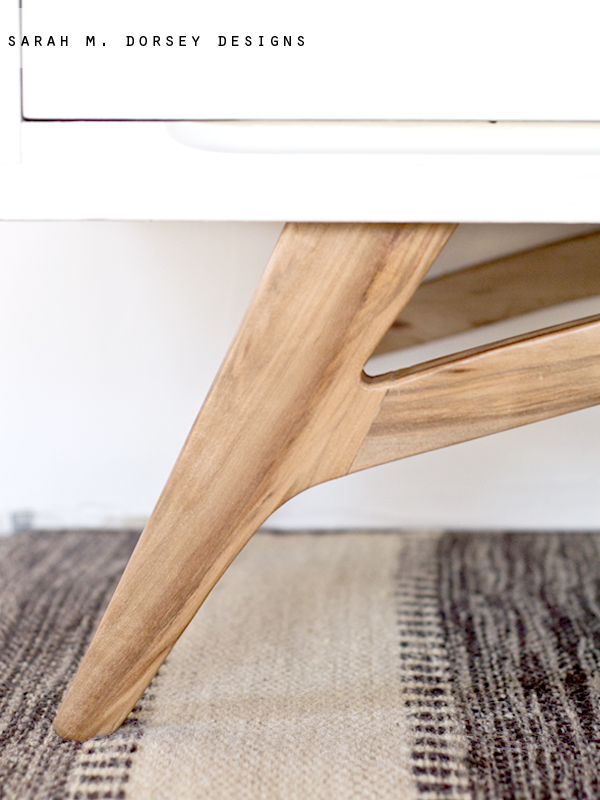
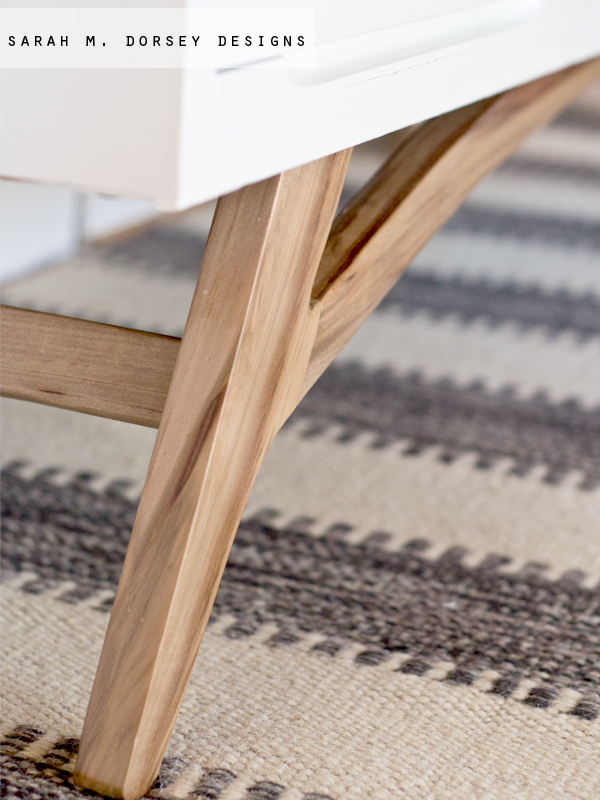
I saw these legs and thought they'd be perfect (with a little modification) for our dresser. So we created a similar style with a little more of a curve.
This is how we David made the legs .. I helped, but David did most of it.
We started with a piece of wood (~1x8) from a tree my Granddad had milled after a hurricane went through. We aren't sure of the type of wood, but it was from South Carolina and Granddad remembers that it has an unusual name, any guesses?
To get the curve, we started with a ridged piece of string, we didn't want one that would flex a lot. We measured the dresser and determined the total length for the curved piece (the legs are attached separately). Then we measured the midpoint of the board (where we wanted the top of the curve) and then the end point of the curve (where we wanted the top of end of the curve). To make sure that the curve was equal, one held the pencil and string tight at the top and touched the midpoint and both of the ends and the other adjusted the string at the bottom. Then we repeated for the bottom curve (about 2" thick). This step took a lot of adjusting to get just right, but once we did, I held it tight at the bottom (taped for photo) and David drew the curve at the top.

Next, with the jigsaw, David cut out the curve. There are two curved pieces (front and back of dresser) So David traced the existing board and cut out a second piece.

Next, David cut out the legs. We determined the measurements and then free handed the design within those guidelines. Then he cut it out with the jigsaw, traced and repeated three more times.
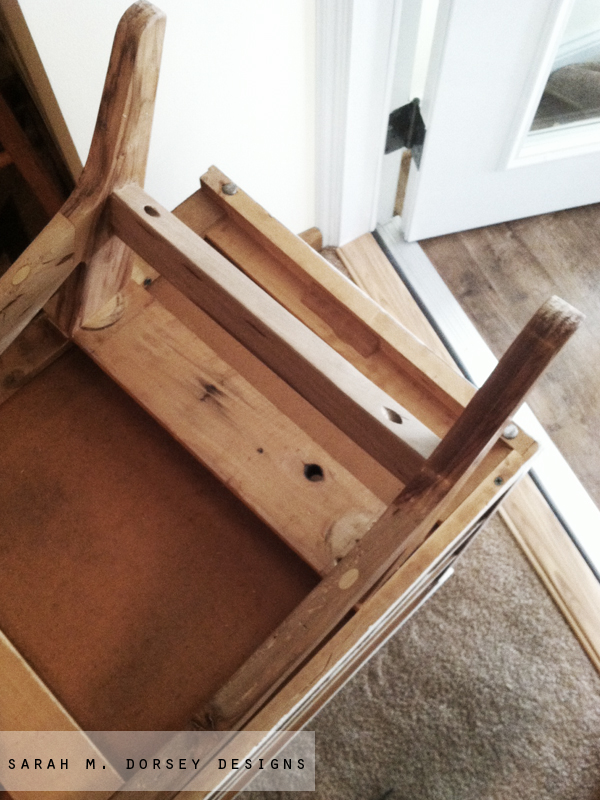
David glued and clamped the curved piece to the leg. After it dried, he drilled through both at an angle with a 3/8" bit, put some wood glue in the hole and inserted a dowel rod and cut off the excess.
Once dry, we used a router (sorry no picture, but examples of routers here) with an 1/8" bit to make the edges slightly round. For the tight corners, we used sandpaper to soften the edge.

Then we used 120, 220, then 400 grit sandpaper (lower number means coarser and higher means finer - good for finishing) to give a smooth finish.
We repeated the steps (but a screw instead of a dowel rod) for the side supports.
To seal the legs, we applied Briwax furniture wax in clear.

Finally, we removed the existing support for the legs and mounted the legs to the supports (using screws from underneath) Then, we reattached the support to the dresser.
I'm not going to lie .. the legs took forever, but SO worth it because I love how they turned out!

I decided to make the top white so it wouldn't compete with the legs (Plus it had a good bit of damage so needed some wood filler). Also, I love how it doesn't need hardware since it has built in pulls. It draws all of the attention to those beautiful legs!!
For the paint, I sanded the entire dresser to remove the gloss (removing all of the dust with a micro fiber cloth) and used Zinsser Cover Stain Primer. It is oil based, so a pain to clean up. I'll typically wrap my roller in plastic and throw away once it is unusable.
I ended up doing three coats, allowing it to dry in between. I've found that if you don't cover all of the stain, it seeps through the top coat once it sets. However, you can spot treat the spots that show through if you want to avoid multiple coats. I decided to do three so that it was extra durable.
I lightly sanded the primer once dry and then applied two coats of Sherwin William Pro Classic Semi Gloss in Alabaster. I used a smooth 6" foam roller to apply both and a small foam brush to reach the tight spots.
Finally, here it is in our new house!! We closed on Friday and I quickly snapped a few pics on Sunday. This will be our bedroom, but the bed will go on this wall instead. I'm planning on moving the dresser next to the closet.

Rug was found at Home Goods about a month ago.
And a few more close ups of the legs since I love them so much :)


SUCH a transformation!!
I'm planning on full house tour tomorrow so make sure to come back for that!!
--
P.S. Don't forget to enter Delta Faucet's New Year, New Room - Bathroom Transformation, if you had issues yesterday, it's been fixed so make sure to upload the best (aka ugliest) photo of your bathroom because the room with the most votes wins!! More info HERE
