Step-by-Step Watercolor: How to Paint a Blue Hydrangea
Everybody loves hydrangeas. They're big and showy, and the range of colors runs from the palest baby blue to deep burgundy and purple. I love them all, but my favorite has always been the traditional blue mophead hydrangea, and I thought you might enjoy seeing step-by-step photos of how I go about painting one.

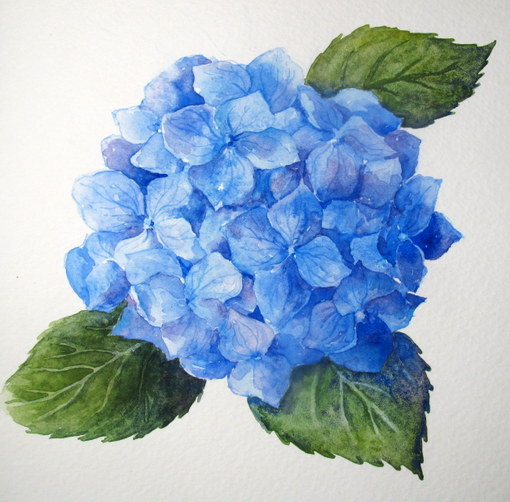
6-1/2" x 6-1/2". watercolor pencil & watercolor in Strathmore Visual Journal
For this sample, I worked in a Strathmore Visual Journal and used artist's quality watercolors from a number of different manufacturers, such as Winsor & Newton, American Journey, and Holbein.

Inspiration photo
It's okay to draw and paint from a photo reference, but drawing from life is even better. When you have the flower right in front of you, it's easier to see its true colors. Since my hydrangeas aren't blooming yet, I used a photo.
Step-by-Step Instructions for Painting a Blue Hydrangea
1 - Make a drawing of your hydrangea flower (and a few leaves) with a blue watercolor pencil. I used a Faber-Castell Cobalt Blue watercolor pencil.

If you're intimidated by the complexity of the numerous blossoms in your hydrangea photo, try this method:
- Lay a piece of tracing paper over your photo.
- Trace the outline of the main shapes onto the tracing paper with a fine-point Sharpie pen.
- Position the tracing paper drawing behind your watercolor paper or sketchbook page. Use a light table or a sunny window to trace/draw the hydrangea with cobalt blue watercolor pencil onto your sketchbook page.

Step 1 - Watercolor pencil drawing
2 - Spatter on some drops of water using a paint brush, toothbrush, or spatter screen. Don't flood the drawing with water. You just want to have some droplets of water which will help to soften edges and blend colors when you add watercolor.

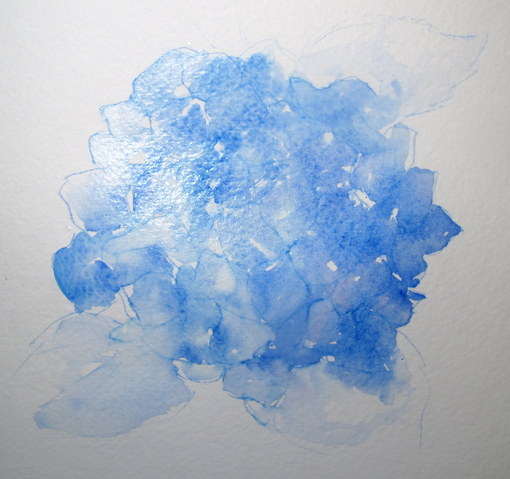
Step 2 - Spatter water
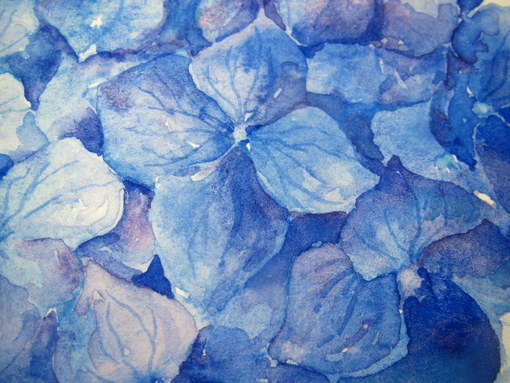
3 - Begin painting varying tones and colors of blue, loosely brushing onto blossom petals, leaving some areas of white. I used the following blues:
- Cobalt Blue (closest tube color to hydrangea blue)
- Ultramarine Blue (good for variety, for darker areas, and to mix purples)
- Cerulean Blue (not as intense as cobalt and ultramarine, good for lighter areas, and to add variety in color tones)
Soften some edges with a damp brush.
Paint darker tones in shadow areas.
Wet the leaf areas and allow some blue to bleed out onto leaves.

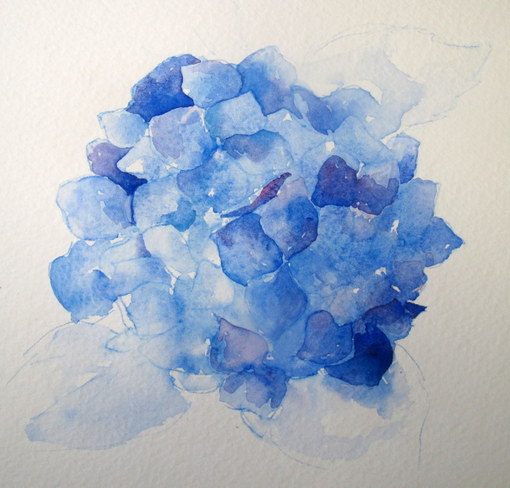
Step 3 - Varied washes of blues
Some blue hydrangeas have lighter white and yellow centers. Use the colors required for your particular subject.
Add touches of pink (Holbein Rose Violet) & lavender (Rose Violet Ultramarine Blue or Cobalt Blue.)


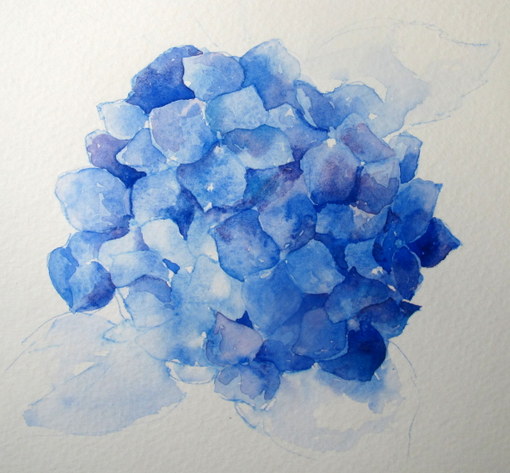
After step 3 - Painting is dry & ready for detail work
4 - Begin to define individual petals using mid-tones of blues. Use areas of violet and pink for variety. Some petals will be painted directly, and some will be painted around (negative painting.)
I like to use hard edges to define shapes and soft edges within the petals to show form.
To soften an edge, use a brush that's damp or wet, but not dripping, and run it along the edge of a painted area to allow the paint to feather out.

Step 4 - Negative painting
5 - Continue painting positive and negative shapes, one petal at a time. Refer continually to your photo or flower to analyze where light and dark edges contrast with each other. Paint the darker side where two edges meet.

Step 5 - Painting positive & negative petal shapes
6 - Keep adding more mid-tones and darks, varying the blues, and adding touches of pink.


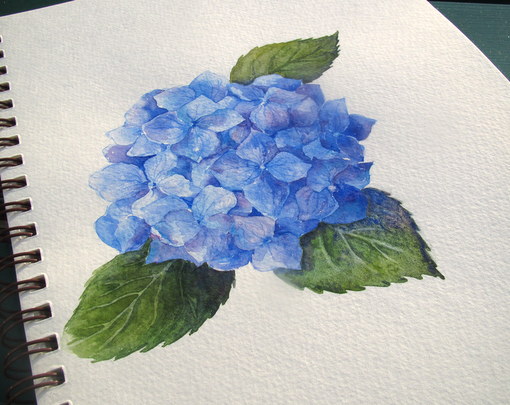
Step 7 - Completed flower
or you may want to add more detail by using a small rigger brush to paint veins on some of the petals.

Veins painted with a rigger brush
You might decide to add a few more finishing touches to the flower later, but it's a good idea to begin painting the leaves at this point.

Flower with petal veins added
8 - Painting leaves:
Greens may be mixed using yellow blue, or start with a base color of green, such as sap green or Hooker’s green, and vary the tone by adding ultramarine blue, rose violet, and/or yellow.
Paint a base color of green on the leaf. Vary the color to add interest. Add yellow to the sunny side of the leaf and blue to the cool, shady side. Then use one of the techniques shown below to indicate the prominent veins found on hydrangea leaves.
Leaf technique #1: Scratching in lines
Use a sharp tool such as a toothpick to incise or scratch vein lines into WET paint. Paint will settle in the scraped area, making a dark line.
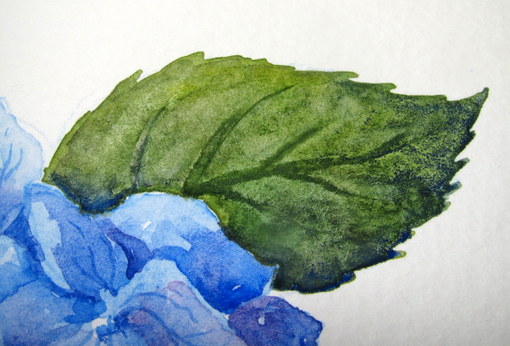

Leaf technique #1
Leaf technique #2: Lifting lines
Use a small brush dampened with clean water to lift paint off the leaf in vein lines. Rinse and blot brush between strokes.

Leaf technique #2
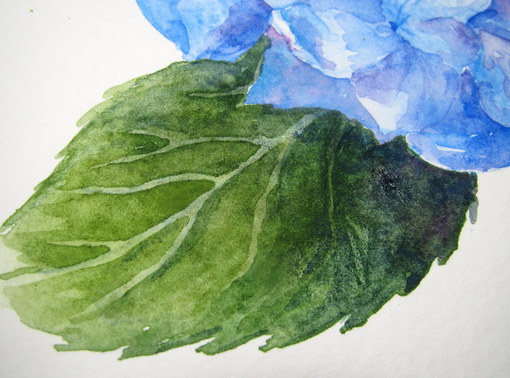
Leaf technique #3: Negative painting
Paint the leaf with a base color of light green or pale yellow. Let dry. With darker green, paint the space between leaf veins. Leave the veins untouched. (You can plan where the veins will be by drawing them lightly with a blue or green watercolor pencil before painting with the dark green.)


It does take some time to paint all those petals and make them look three-dimensional, but if you just take your time and look for edges where there's contrast, then paint the darker side, you'll eventually have a beautiful blue hydrangea blossom!
I hope you'll give it a try, and, if you have any questions, just leave a comment. I'll be happy to help.
More posts from