
UHeart Organizing: A "Pretty" Fantastic Pantry
As I mentioned yesterday, I can never get enough pantry organization. Not to be confused with the often mis-typed panty organization.... that is a different topic all together.
What is it about seeing how others store their food? Creative labeling? Storage containers? Accessibility? Thoughtfulness? I think all of those things intrigue me when it comes to organized kitchens and pantries. And since I am a few weeks out from organizing my own pantry, Karen from A House Full of Sunshine, is swooping in to share her recent makeover. You may remember Karen from her amazing home office nook feature here, I hope you love her work as much as I do because I invited her to come by more often as an iHeart contributing writer!

Hey there, friends! I've been all fan-girl crazy over Jen and her beautiful blog since the day I first stumbled across iHeart Organizing, so I couldn't be more excited to be one of the new gals on the block as part of Jen's contributor team! I'm trying my hardest to be on my best behavior today. Which means I TOTALLY can't believe I'm just about to show you this:

Ohhhhhh boy. Yep, I'm embarrassed. I started out with a sort-of-system in my pantry, and then life happened and I didn't have a place for everything and stuff got dumped in front of other stuff and before you know it, I'm the next hot prospect for a pantry intervention.

Time for a plan. I decided to start by prettying up the outside, because after all it's what's on the outside that counts. (Wait... no. Never mind.)
We had a plain white pantry door, which I decided to turn into a giant chalkboard menu. I started by giving it a quick hand-sand to take off a bit of the gloss. Then I taped up the edges and wrapped the handle in cling wrap.


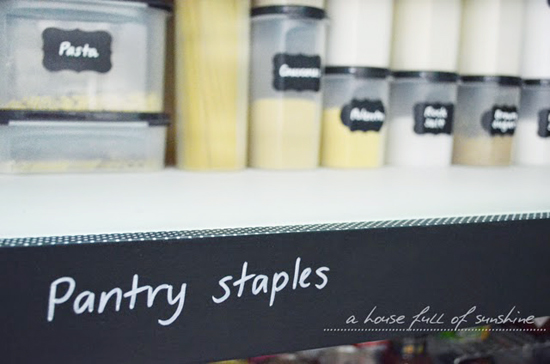
While I was on a roll with the chalkboard paint, I decided to paint the edges of each shelf inside the pantry. This way I could easily label the different zones within the pantry and store food by category.

I decided on eight major categories, or zones:
- Servingware and containers
- Snacks
- Pantry staples (like flour, rice and pasta)
- Canned goods
- Bottled goods (sauces, oils, vinegars, spreads)
- Whole foods (nuts, seeds, etc)
- Stocks and seasonings
- Breakfast cereals

I used a liquid chalk marker to label my shelves, and I love that it doesn't smudge, but wipes off easily with water if ever I want to re-label.
Because I like a touch of pretty, I added a contrasting strip of washi tape at the edge of each shelf.

One of the biggest problems with my previous "system" was that I had nowhere to put boxes and packets that came home from the shops, so they ended up getting piled in front of the storage containers, like this:

I solved this problem by installing a simple door-mounted rack with baskets that can adjust up and down. Plenty of room to corral all that visual clutter, which leaves my shelves looking streamlined and lovely!


We're also trying to teach the kids to get their own breakfast if they get up before us in the morning, so I moved the cereals down to the bottom shelf of the pantry, within easy reach.

On the floor I added some storage crates for bulky goods like juice or long-life milk, and one for lunch boxes - easily accessible by the kids so they can put their own lunch box away when they get home.


I've always used a step-shelf to stack cans so the labels are visible, but this time I purchased an extra shelf so I could also sort my stocks and seasonings. No more scrabbling around lifting and replacing twenty things to find what I'm after!

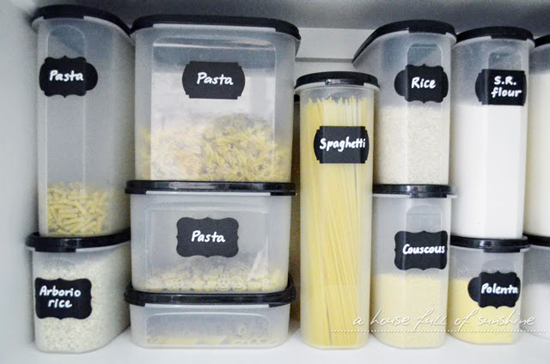
I love Tupperware for storing my pantry staples - the containers stack so easily in a variety of useful configurations - but over the years I'd managed to accumulate a mixture of lids in all colours. I decided to streamline the look of my pantry by ordering all black lids. It didn't cost much to upgrade, and it looks so much smarter.

I also replaced my tired old labels (I had the ones you print from a labelmaker on white vinyl) with some more sophisticated-looking chalkboard labels, which tie in really nicely with the chalkboard door and shelves.

Next, I organised all the loose packets and bags of nuts, seeds and grains into pretty glass jars. I couldn't find a shelf of exactly the right dimensions to hold the jars, so I made my own using a plank of wood cut to size at the hardware store, and pieces of round dowel screwed in for legs.


And lastly, I found some lovely industrial metal storage baskets to conceal the clutter that comes with storing bottles of oil and vinegar, sauces and spreads.


Thanks so much for having me here today. I'm sorry if I scared anyone with my "before" pictures, but hopefully you're inspired by the "afters". If you'd like to see more of my kitchen and home, you can take my home tour here. Until next time, friends!
__________________________

Hi friends, I’m Karen from A House Full of Sunshine. Do you see that grin I can’t wipe off my face? That’s how thrilled I am to be here! I live in Australia where I’m blessed to be a stay-home mummy to my three little people. I’m also a part-time interior decorator and a former teacher of Creative Arts. Basically, I’m happiest when I’m squeezing every drop of creativity out of life – whether that means decorating a room, inventing a fun new activity to do with the kids, thinking up pretty organizing solutions or putting together a DIY project. I believe life is meant to be beautiful, and home is an expression of the heart. My blog, A house full of sunshine, is the place where I share my adventures in creative home-making with kids. The coffee’s on and the welcome mat is out – I’d love to see you there!
More posts from Jennifer Jones