
The arrow jewelry holder DIY.
First, I want to thank you for the HUGE encouragement you all were to me on my previous post!! Thank you guys for your kindness. Your words sink into my heart and my bones and carry me through rough weekends with meltdowns and feelings of failure. God uses you constantly to lift me up and I can never thank you enough for that.

Now, can we talk about jewelry today? Or rather the organizing of it? I have to reign myself in because I have a lot to say surrounding this topic for some reason and I don't want to just go on and on too much.
1) I want to say that for a year I have been searching for a jewelry holder/system that wasn't ugly or cluttered looking and even with the aid of Pinterest, I found nothing that truly spoke to me about who I was, how I decorated and wanted to display my own jewelery on a shoestring budget.
2) I need to say that this project feels very personal for me too, because I have been trying to make an effort with my appearance this new year. I don't want to just throw on yoga pants and settle for what's comfortable and not all together cute because it's easy. I'm not ready to give up, even if I am not coloring my hair any longer. Ya know? (Ha! True story.) (And this admission could become an entire post on it's own which is why I am reigning myself in because I'm here to show you how to make this, not go on and on about how not letting myself "go" before I even hit 40 is a personal mission right now.) My goal is to put on at least one piece of jewelry every day, let myself feel feminine, and know that as I age and change, I can still put my best foot forward. You get this, I know you do.
3) When I said shoestring budget I meant it. This project ended up costing me under $10.00!
4) I had this blank, empty space in my master bathroom, and with a small bookcase that had been moved from another area of the house for towels and tissue storage, I suddenly had an open area for my necklaces. (I had begun collecting inexpensive milk glass last year and using it for my earrings and bracelets. I've found the pieces range from $3-4 typically which is an awesome price in my opinion. My man bought me my first jewelry box from Target, for Christmas this year too.)

5) But back to my necklaces... what to do exactly about those?! My shoestring budget and I went shopping, and we decided to bust something out together. I found a balsa wood craft dowel (7/8") at JoAnns for $2.49. Then I grabbed a thin strip of wood (sized 1/32 x 3x24") for $2.99 but I used a 40% off coupon. This was so thin I could cut it with a pair of scissors. I went to Lowes next and bought a pack of gold assorted screw hooks for $3.97. I had self leveling hangers at home, along with some antique gold paint that I planned to use but neither of those items would break the bank if you needed to purchase them.
I drew a simple triangle for one end of my arrow hanger and then just did an end piece that wasn't too complicated. That's the best way that I can really describe it for you. The first time, the wood split when I cut it but I had plenty of extra wood and finally got both a front and end piece for my arrow.
I drew a simple triangle for one end of my arrow hanger and then just did an end piece that wasn't too complicated. That's the best way that I can really describe it for you. The first time, the wood split when I cut it but I had plenty of extra wood and finally got both a front and end piece for my arrow.

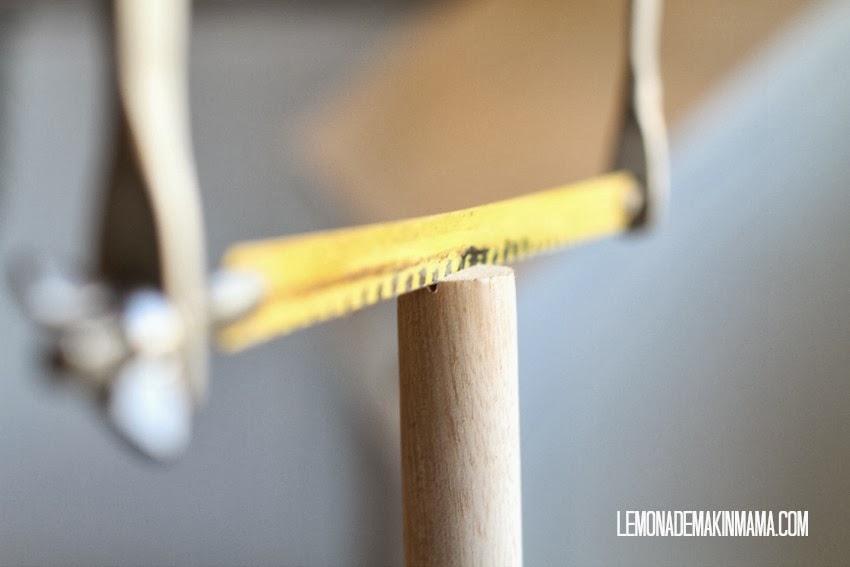
I borrowed my man's hack saw and cut little grooves into the ends of the dowel. (I needed to trim my length a bit but it took about one minute with a larger hack saw.) The grooves don't need to be very deep and the thin wood I used for the arrow ends fit perfectly into the grooves, with no glue needed. (Make sure the grooves both go the same direction.)

This is how it will fit together once your grooves have been cut and you have pushed your end pieces into them. Now do a little dance with me because shoestring budget projects don't always work out this well.

I choose the smallest screw hooks for this and decided to place them 3" apart. It turned out that the dowel wood was so soft I could press it into the marks I'd drawn, then screw them in all the way with my fingers. (Again, time for another little dance. We didn't have to use a drill or anything.)


I can not even begin to tell you my excitement at how easy and quick this project was becoming. Then I attempted to hammer in self leveling hangers on the backside and my thoughts changed slightly. That will be the toughest part of this project and if I'd been smarter, I might have thought to add those before putting in the screw hooks on the reverse sides. It all worked out however.

I wanted a soft antique gold finish, so I used this metallic rub. (I didn't buff it. I painted it on with a brush and let that be that. I even painted over the shiny gold hooks so everything looked even.)


I used some picture hooks that I already had to hang this, and it turned out so well that even though I was planning to post about gluten free baked doughnuts today, I couldn't wait! It's Valentine's week and I felt this arrow jewelry hanger would be very appropriate. (I will post on the doughnuts next, though!)
I can't tell you how much more I am grabbing a little sparkle for my wrist or around my neck, now that I have everything within reach. I love being able to see these items and it's helping me take just a bit better care of myself. So... how do you organize your jewelry?
I can't tell you how much more I am grabbing a little sparkle for my wrist or around my neck, now that I have everything within reach. I love being able to see these items and it's helping me take just a bit better care of myself. So... how do you organize your jewelry?

Oh and don't forget that you've still got a few more days to enter this giveaway! Click here to enter.
More posts from Sasha Brodeur