
DIY Dresser Makeover

Hey guys! If you remember my last post, I admitted to being hooked on browsing Craigslist for furniture and while I do strike out a lot, every once in awhile you strike gold! I've been looking for a dresser for-just-about-evvaaarrr! (because forever just isn't long enough on it's own to emphasize the undertaking of this search)

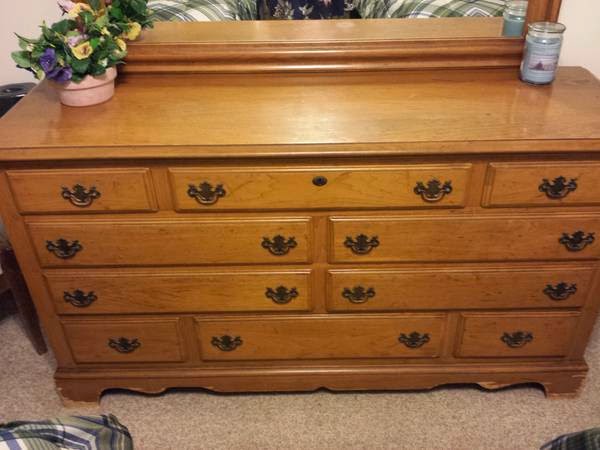
And here it is, I give you... my new dresser! Looking ever so lovely and feminine. (Actually it's old, the original owners, a super sweet elderly couple, thought it was maybe from the 70s. but it's new to me :)


Here's a few pictures from the original Craigslist post. It was $150, which by mainland USA standards probably sounds expensive. But when compared with the average used furniture prices on Maui, it's super cheap for a dresser, let alone a large solid wood dresser... with a huge mirror to boot!

How to score on Craigslist? (No we're not talking dirty here, you dirty bird you!)
I've been asked this several times, and I think it's a great topic that deserves it's own post, which I'll be doing in the near future but one major factors is... Speed.
For example, the night I found this dresser, I was browsing Craigslist, didn't see a darn thing. So I opened a second browser window to check my email or whatevs, then clicked back to my Craigslist window, refreshed the page and there it was! It was literally only posted for 2 minutes before I was on the phone talking with the owner and setting up a time to check it out the next day.
(Oh and yes, it was kinda late, 9:15pm. But since they were clearly still up, having just posted it, I felt it was ok to call. As Michael says, "Fortune favors the bold!)
This is the video of my dresser makeover.


The veneer at the footing was lifting off, so we used a trowel to peel and remove the veneer around the footing.


I used a small foam roller for smooth surfaces and followed up in the details with my Purdy paint brush.

While the body of the dresser was drying, I got to work sanding the face of the drawers with 150 grit purple sandpaper. (I would have got pink or mint but... they didn't have.)


After sanding, I use a 50/50 solution of vinegar and water to wipe away dust and clean the surface before priming.


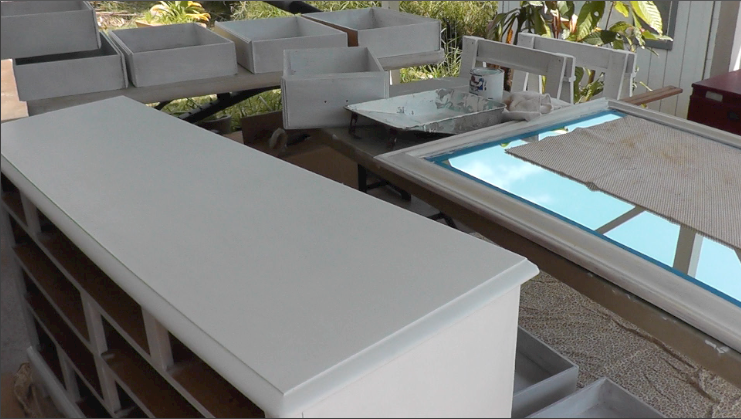
I masked off the mirror and prime the frame.
If you're confident with a steady hand, it's better to "cut in" the paint onto the frame rather than masking off. What is cutting in? It's a method of applying your paint free-hand, with a quality angled brush, no masking off. Instead you work slowly and carefully, as if you're cutting a clean sharp line with your brush. It's a technique professionals use. I may give it a go next time.

Here's everybody crowded into my carport, standing around, primed and impatiently waiting for me to paint them. I did two coats of primer on the body of the dresser, mirror and just one coat on the drawers seemed to be enough for them.


Behr Sea Salt is a natural beachy shade of white, it makes me think of sun-bleached coral or maybe a pure white silica sand beach. (I'm looking at you Whitehaven Beach in the Whitsunday Islands, Australia!)


Immediately after painting the frame, I removed the tape while the paint was still wet, to help avoid ripping any paint off the frame. Again, you could use the "cutting in" paint technique if you prefer.

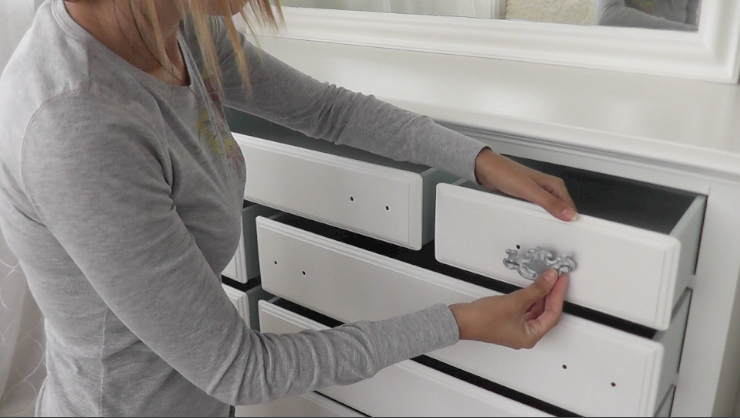
I love the hardware, so no need to swap it out on this project, but I did want to spray paint it. So first I prep it for painting by wiping it down with alcohol to make sure it's clean and dust free.


Then it hit me... that Ah Hah moment! Silver with white buffed into the detail! So I grabbed my Rust-oleum Painter's Touch in Gloss White.


Then used a soft rag (aka piece of t-shirt) to wipe away excess and buff the white into the details. (Tip: This spray paint dries super fast, so you gotta work quick.)

Michael reattached the mirror (it screws into the back of the dresser) and we moved it into my filming room. (Yep, this is where my vanity was, more about that in another post.)

Say hello to my latest paint obsession: Behr Tide Pools, a creamy shade of minty aquamarine. Soft and subdued, it blends beautifully with neutrals. So yummy, you'll almost want to eat it, but don't! (Seriously, not even a taste! Put the stir stick down and go treat yourself to a mint chocolate chip ice-cream after you finish painting instead.)


No matter how careful, I always find a way to get paint in my hair lol. (What would the neighbors think if I wore a shower cap next time?)


I attached the hardware and we're all done! Time to celebrate! (Whose got the mint chocolate chip ice-cream?)
Gallery
Just to recap, here's the dresser before.


This was my inspiration for the choosing the color scheme of my dresser. I found this little tulip bowl at Ross for $2.99, the day I got the dresser. It's handmade in Spain and I fell in love with the colors.


With all the new drawers I have to play with now, I can see this kicking off a whole series on dresser organizing ideas. I know one drawer I'm going to build out for jewelry storage. Woohoo! Can't wait to start that DIY project.
Until next time, happy organizing and DIY'ing! Take care and I'll see you again soon!
xoxo,
Christine
More posts from Christine Kobzeff