
Five Looks Using One Palette | Juvia's Place Masquerade

It was several years ago that I first heard about the Juvia's Place palettes, having read a review of the Saharan palette that was very promising. However, I had enough neautral or copper toned eyeshadow palettes at the time, and didn't feel the need to add to that collection. That said, a few months ago I was perusing Beauty Bay (as one does) and came across this colourful gem. The Masquerade palette piqued my interest immediately; it was bold and colourful but also had more brown tones so it would be perfect to travel with since I could do several different looks.
I've been playing around with it since, and would like to share with you in this post five looks I created using the beautiful Masquerade Palette from Juvia's Place.


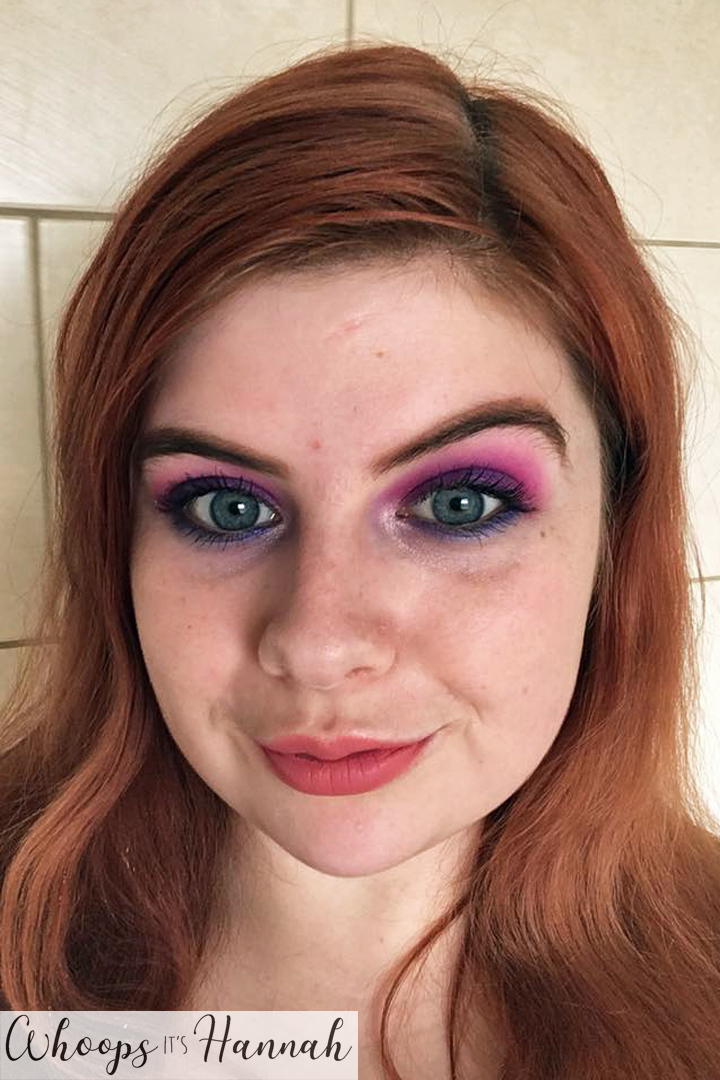
1. This is a look that I whole-heartedly stole from my bestie, because every time she wears this look she looks like a goddess and so I wanted to share it with you. To start with I applied a base of the Urban Decay Primer Potion and set it with a translucent primer.
2. Using a fluffy brush, I applied the shade 'Bori' to my crease and blended it for a softer look.
3. Next, I used a flat eyeshadow brush to apply the shade 'Zola' to my lid. I applied about three layers because I wanted the maximum pigmentation.
4. Using the same brush I used in step 2, I gently blended 'Zola' and 'Bori' together. I love this step, because as you blend them, you get really really gorgeous purple shade in between the two, and it just looks absolutely stunning!
5. I took a black pencil eyeliner into my waterline to add definition to my eye.

6. Under my lower lashline, I applied the shade 'Bori' using an angled brush, and blended it with my finger for a more smokey look.
7. As an inner corner highlight, I applied the shade 'Giza' with a very small brush. I went slightly overboard so I did use my pinky finger to remove a little bit of it, but that step isn't necessary if you control yourself!
8. I applied a black liquid liner and added a nice cat eye flick. My go-to eyeliner is from NYX.
9. Finally, I applied a bit of mascara. I love the Lash Hero Fibre Extension mascara from The Body Shop, and I made use of the fibres that come with this mascara for this look so that my lashes had maximum impact. If you were wondering what lipstick I'm wearing, it's The Body Shop's Lip Liquid in 'Nairobi Camellia'.
LOOK TWO


1. To start with, I applied a little bit of Urban Decay Primer Potion and set it in place using a translucent powder.
2. Following that, I used a fluffy brush to apply the shade 'Zulu' to my crease and blend it thoroughly.
3. In my inner and outer corners, I applied the shade 'Ada' in a circular motion. I then used a fluffier brush than the one I used to apply it to blend.
4. Over the top of the two shades I applied, I lightly added the shade 'Cairo' because I wanted the look to appear more orange than brown.
5. In the centre of my lid, I used a finger to apply the shade 'Casablanca'. If you have hooded eyes or would like to increase the pigmentation, I'd recommend putting down a little bit of eye primer or a glitter glue first so it has something to stick to.

6. In my waterline, I applied a black eyeliner pencil for definition.
7. Under my lower lashline, I applied the shade 'Zulu', and then over the top of it I added 'Cairo' again to make it look more orange.
8. As an inner corner highlight, I applied the shade 'Giza' using a really small brush I have from Real Techniques.
8. I applied a generous coating of mascara, the Lash Hero Fibre Extension Mascara from The Body Shop, which is my all-time favourite! Finally I applied my lipstick, which is 'Wildfire' by Urban Decay. It's a gorgeous metallic orange.
LOOK THREE


1. To begin with, I applied a base of Urban Decay Primer Potion and set it using a translucent powder.
2. In my crease and in my inner corner, I applied the shade 'Zola' using a fluffy brush.
3. In the outer two thirds of my lid, I applied 'Dalia, and blended it to my crease with a blending brush.
4. In my outer corner, I applied the shade 'Chi' and blended it in a circular motion.
5. Under my eye, I applied 'Zola' using an angled brush. Then, on the outer two thirds of my lower lashline, I added the shade 'Dalia' on the same brush. Finally, in the outer corner of my lower lashine, I applied 'Chi'. I tried to keep the proportions of this the same as how it looks on my lid to tie the two sections of my eye together.

8. In my waterline, I applied a white eyeliner pencil. This makes your eye appear larger and more awake, which I definitely needed as I'd done two full days at work in a row, which I never normally do!
9. As an inner corner highlight, I applied the shade 'Giza' using a small brush.
10. Finally, I applied a generous layer of The Body Shop Fibre Extension Mascara, and made use of the fibres that come with this mascara for a more dramatic look.
LOOK FOUR


1. As always, I started with my Urban Decay Primer Potion and set it with a translucent powder. If you were wondering why I always do this, it's because it makes my eyeshadow appear more pigmented and stops it transferring and creasing throughout the day. It also stops things like veins and blemishes showing up through your eyeshadow.
2. I blended the shade 'Burkina' in my crease with a fluffy brush as a transition shade.
3. Over the top of that, I added the shade 'Fulani' from my outer corner to the centre of my crease in order to deepen the shading slightly.
4. Using a dense brush, I packed on the shade 'Calabar' onto the outer half of my lid and blended it with my transition shades for a smokier look.
5. I used a different dense brush to apply the shade 'Dahia' to the inner half of my lid, and blended that with my transition shades too. I took a little bit of time to blend 'Calabar' and 'Dahia' together in the centre of my lid using my fingertip.

6. Under my lower lashline, I applied the shades 'Fulani' and 'Burkina', and then used the shade 'Giza' as an inner corner highlight.
7. I applied a liquid liner above my upper lashline, and decided not to do a flick, although if you'd prefer to I think that it would look fab! I also decided to skip my waterline, since I'd done eyeliner in there for the past week or so and wanted to give it a break.
8. Finally, I applied a generous amount of mascara (it's the Lash Hero Fibre Extension mascara from The Body Shop; surprise, surprise) and some lipstick. The nude shade is 'Naked' and the red is 'Mrs Mia Wallace', both by Urban Decay.
LOOK FIVE


1. As always, I applied a base of Urban Decay Primer Potion for this look. I set in place using a translucent powder and a fluffy brush. One of the benefits I find of setting it with translucent powder is that it makes the shadows on top so much easier to blend. I know some peopl prefer not to set their eye primer but for me that makes the shades more difficult to blend and I do not have time in my busy life to sit there with a blending brush for hours!
2. Next, I applied the shade 'Bori' in my crease and blended it towards my brow bone. When I first got this palette, I thought that I would hardly ever use this shade but I honestly get plenty of use out of it.
3. Following that, I added the shade 'Zobo' a little bit lower down in my crease and at the very top of my lid and blended it with 'Bori' to get a nice transition between the hot pink and the vibrant purple.
4. Lower down on my lid and not quite all the way to the top of it, I packed on the shade 'Makeda' with a flat eyeshadow brush. I then took the same brush I used for 'Zobo' to blend the two shades of purple into a nice smooth gradient.

5. Under my lower lashline, I applied the shade 'Chi' with an angled brush, and smudged it with my fingertip. I did find for some reason that this shade wasn't as easy as some others to blend using my finger, so I put a bit of translucent powder on my finger and tried again and that made it slightly easier.
6. As an inner corner highlight, I applied the shade 'Giza' using a small brush.
7. I personally didn't feel that this look needed eyeliner, but if you feel like applying it, I'd do it at this stage. I have got a gold eyeliner from NYX that I thought might look really cool with this look! Instead, I skipped eyeliner and went straight to a generous coating of mascara! (If you were wondering what my lipstick is, it's a combination of 'Crete Carnation' and 'Tapei Orchid' from The Body Shop.)

So there you have it - five looks using the Juvia's Place Masquerade palette! I use this palette a lot, since it find it perfect for someone like me who enjoys a lot of creativity with their eyeshadow. I'm not afraid to experiment with colour, but at the same time I like more neutral and 'wearable' looks at the same time, and this palette offers both.
There is not a single shade in this 16 pan palette that isn't vibrantly pigmented yet easily blendable and an absolute dream to work with. You don't have to build up colour constantly since it doesn't blend away into nothingness, but at the same time you don't have harsh unblended lines between shades or your skin.

I'd really recommend this palette to those of you looking for something to help you experiment with colours, although if you're into more neutral shades, they have other palettes that aren't as colourful, and I'm sure they perform to the same high standard!
I hope you've enjoyed reading this post and have found it informative and inspiring for your future eye looks! Thank you so much for reading, be sure to follow me using the social media links in my side bar to see more posts like this one.

More posts from Hannah Jayne Usher