
DIY Spinning Top Game Boards

Turn all the bottle caps and lids you collect over the summer into super fun spinning tops! Your kids will love collecting the parts from the recycling bin and creating their own game boards. This is a fun and easy craft– perfect for a summer afternoon. Let’s get started!
Note: This project is for children 3 because of small parts.


SPINNING TOPS
WHAT YOU NEED
- Plastic bottle caps
- Lids from drinking bottles with valve
- Small straws
- Lollipop sticks
- Toothpick
- Game pieces from Mosaic or Mastermind
- Wooden beads (have to fit straw, toothpick and sticks)
- Scissors
- Reamer/punch

INSTRUCTIONS
Step 1
Use the reamer to make small holes in the middle of the caps. The straws and mosaic pieces have to fit tightly.
Spinning cap 1 structure: toothpick — lid — wooden bead
Spinning cap 2 structure: mosaic piece — cap — straw — wooden bead
Spinning cap 3 structure: mosaic piece — cap — lollipop stick — wooden bead
Note: The wooden beads are for stability. Some of the tops will spin fine without them.
Your spinning tops are now ready for action!
Board #1

WHAT YOU NEED
- Envelope cardboard
- Notice paper with different colors
- Scissors
- 2–3 inch reamer/hole punch
- Tape
- Black and white markers
Instructions
- Open up the envelope and punch some holes in it. Turn it and tape the color paper over the holes.
- Mark the starting point in the middle. Test the board with a spinning top and mark the holes from 1–5.

Rules
Start in the middle. Twirling the stem with your fingers, try to get your top into the field with the highest points.
Board #2

Board #2 is made for a battle. Whoever reaches the other side first wins.
This one didn’t work the first time because spinning tops make spirals. My son found a way to play it: Begin in the start circle and then blow carefully in the direction you what the spinning top to go.
Board #3

WHAT YOU NEED
- Paper in different colors
- Circle cutter
- Glue Stick
- Marker black and white
INSTRUCTIONS
- Cut 3 circles in different sizes and glue them together. Mark the start in the middle and points.
- Make at least two for a contest.

Rules
- Start in the middle and twirl your top. Wherever your top stops determines the number of points you get.
- This game works best with the toothpick tops.
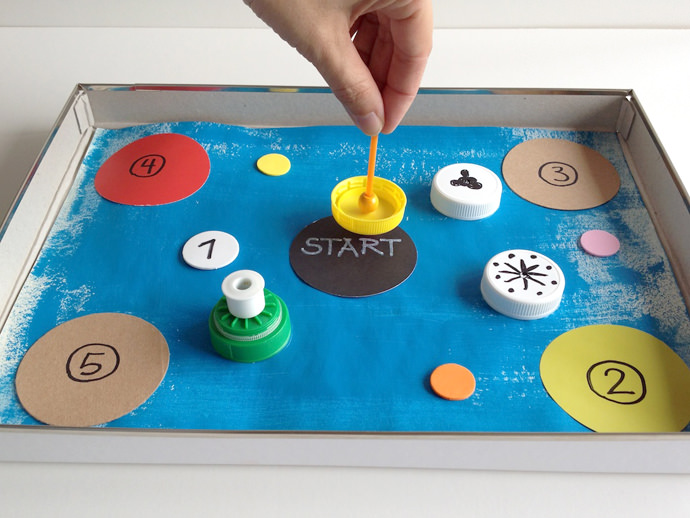
Board #4

WHAT YOU NEED
- Lid from a box (shoebox works fine)
- Paper, fitting the inside from the lid
- 3 lids
- 4 craft foam circles, small
- 5 paper circles, 2–3 inches in different colors
- Glue
- Black and white markers
INSTRUCTIONS
- Glue the circles and lid on the paper and let it dry. Mark the start in the middle and the surrounding points.

- Start in the middle. Twirl the stem of your top and try to get it to the field with the highest points.
- Tip: Use the boarders for ricocheting advantage.
- Every spinning top has its own qualities. Try them all and find the best for each game.

This easy upcycled craft is guaranteed to bring smiles!
Happy crafting :)
This is an article from Handmade Charlotte. Read the original post: DIY Spinning Top Game Boards
