
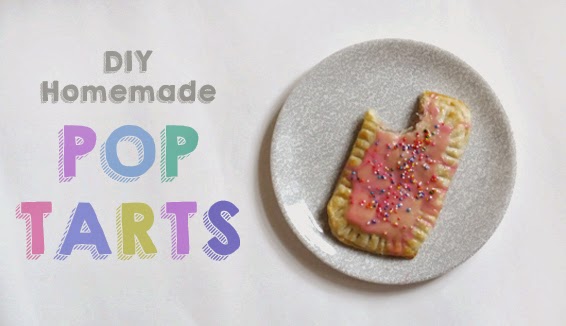
DIY: How to make Pop Tarts {in any flavour!}

Last week on twitter I mentioned that I intend to instigate Pop Tart Thursday, where no-matter what happens in your week, you get to have Pop Tarts for breakfast! That got me to thinking... we have quite a limited range of Pop Tarts available in the UK (unless you're willing to spend over £5 on the imported American ones!), so what if I got fed up of chocolate and strawberry Pop Tarts? What about all of the people who don't like those flavours? Something needed to be done stat...Someone had to learn how to make their own Pop Tarts!

(my first giff!)
Believe it or not, Pop Tarts are SUPER easy to make. All you need is some shortcrust pastry, jam / chocolate spread / peanut butter / flavoured fillings, a little bit of egg, milk, icing sugar and food colouring or sprinkles should you be as obsessed with them as I am!
Ready to discover your new obsession?
1) Preheat your oven. My packet of ready made storebrand shortcrust says preheat the oven at 160 degrees celsius.
2) Roll out (or unroll!) your pastry till it's only a couple of mm's thick. You don't want them too fat or the pastry to filling ratio will be off! Cut into an even number of rectangles, and try to keep them as similar in length and width as possible as they need to be paired up.
3) Choose your flavours and spread a little pile of it into half of your rectangles. You can add as much or as little as you like, but remember you need to be able to seal it so don't spread it too high!
Remember to leave a pastry border all the way round so they don't leak out the good stuff in the oven. Try to leave as near to 1cm as possible.
4) Whisk up an egg and brush it all around your little pastry border, right up beside your filling.
5) Carefully put the top piece of pastry on, lining up the edges as best you can. With a fork (or the blunt end of a table knife) mark all the way around the edges - this will combine so it seals in the filling. Lightly brush egg over the tops and sides of the pop tarts and finally, when that's done, poke a few holes over the top of where the filling is so the heat can escape - no one wants a Pop Tart explosion!
6) Place on a rack and tray (it'll cook the bottom of the tarts more efficiently with the rack) and bake in the oven for 15 - 20 mins until the tops are golden (and the bottoms aren't soggy!)
Take the out of the oven and let them cool down for 10 minutes. Don't freak out! I know they smell amazing!! Focus on the topping to keep you distracted!
7) Mix up 2-3 tablespoons of icing sugar with a little splash of milk for the icing. It's best to dribble in the milk as slowly as possible because you'll find it gets watery REALLY fast! You can alway add more (of either) if you need to as you go along. I like to add a few drops of vanilla essence and food colouring too, but that's entirely up to you :)
Once the pop tarts are cooled down, you can pour out your icing on top. Add a few sprinkles and you're good to go!

*Ta*Da*
*BLUEBERRY* *CHOCOLATE & PEANUT BUTTER* *RASPBERRY* *HONEY* *LEMON CURD* *CINNAMON*
Gee... you could even try savoury ones!
I hope you have a lot of fun experimenting with {and chowing down on} your homemade Pop Tarts! What flavour would you try?
I know one thing for sure ...I'll be seeing you on Pop Tart Thursday ;)
Happy Eating! xox
More posts from Vivid Please