
Making a Foam Cup Bra: Part 3
Today I’m going to finish my bra!
At this point I have two sets of cups–the foam cups and the outer coverings–and have also assembled my frame and band, including putting in the hem elastic. Most of the remaining steps are the same as your normal bra construction. If you need to fill in some gaps on constructing bras, check out the Bra-making Sew Along.
Covering the Cup
1. Before I start assembling the cups, I like to finish the neckline and underarm area of the foam cup with either narrow serging or a zig-zag. This helps to flatten the edge of the foam.

Some bra-makers like to zig-zag around the entire edge of the cup but I’ve never had trouble with these edges being too thick. Experiment to find what you like…
2. To join the fabric cup pieces, line up the necklines with the right side of the outer cup fabric against the inside of the foam. Stitch 1/8″ away from the edge. (The distance between the needle and the toe of my presser foot is 1/8″, which makes this easy.)

Turn out the outer cup piece to the front of the foam. It should look like this on the inside:

3. Now we’re going to baste the cup fabric to the foam so the cup can be treated as one piece. Arrange and smooth the cup fabric gently so it lines up well around the foam cup and pin close to the edges.

While you’re pinning, check the cup occasionally by rounding it over your your fist. This helps to make sure you haven’t pulled too hard on the outer fabric, and potentially flattened the cup. Depending on how stretchy your fabric is, it will sometimes go past the edge of the foam–that’s ok! You’ll trim this off later.
Once this is pinned and smoothed out, baste the fabric and foam together, keeping your stitching inside of 1/4″. (I stitched about 1/8″ away from the foam edge.) You are only going to baste the wire seam–the seam that goes into the cradle.

After basting, trim away the excess fabric that hangs over the foam. I do this by running a rotary cutter around the edge of the foam:

Man, that looks close to my finger…
Inserting the Cups & Channeling
1. Now it’s time to insert the cups into your cradle. There aren’t any special tricks here, but I wanted to show you what my hands are doing when stitch these in, because I don’t use pins when sewing in cups.

I hold the top layer (the cup) slightly above the bottom layer (the cradle) until just before the two layers go under the presser foot. If you have a few notches that match the cup to the cradle, it will help as you are sewing. Sewing convex to concave curves are so much easier without pins!

2. Once the cups are in, stitch in your channeling and topstitch as you normally do.

3. Close your channeling in front and insert your wires. You’re almost done! All that’s left is putting in the underarm elastic, straps and hooks.
Underarm Elastic
There are a couple of different trickeroos to underarm elastic and foam. First, you don’t want to fold the foam cup back on itself in the underarm area and create bulk. That’s why we cut off the underarm seam allowance from the foam. (Note that a foam bra don’t necessarily need elastic in the underarm area–some RTW foam cups don’t have it–but the order of sewing is a bit different than what I”m doing here.)
1. Begin sewing your underarm elastic as usual. When you get to the cup seam, stop and backtack a couple zig-zags.

Fold the excess cup fabric over the foam and pin it smoothly into place. Tip: Wonder Tape is genius for “basting” temporary little seams like this. For some reason I couldn’t get it to stick to the silk so I went with pins.
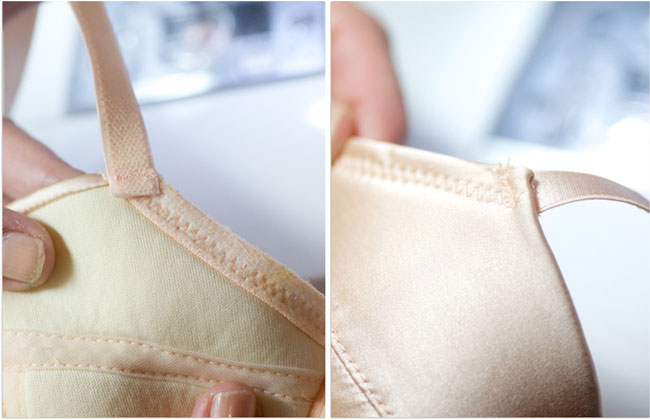
2. Now do your second pass of stitching. I do this from the right side so I can keep the cup fabric secured at the neckline.

When you get to the cup seam, keep the elastic lined up underneath. Continue to zig-zag the same distance from the edge till you get to the end, and backtack a couple of stitches to secure.

The finished arm elastic:

Finishing Up
Time to put in your straps and hooks! I’m assuming you have a favorite method of inserting your straps.
Normally, I like to put the adjusters in front and often use a technique I described in this post to stabilize the ring “loop”. However, I did a dumb-dumb and forgot to cut the arm elastic long enough for a loop! Ah well. I put my adjusters in back, and secured the edge of the strap on top of the strap elastic to hide it neatly away.

Stitch in your hooks and eyes, and you’re done! Annnd here is my finished bra:

In case you are wondering, silk makes a lovely bra material! For some eye candy and silk bra inspirations (many with foam cups), have a look at Stella McCartney, Fleur of England, or the Rolls Royce of silk bra design, Carine Gilson. I’ve been wanting to knock off one of her bras for years. Her designs got me wanting to make bras in the first place… I’ll just have to practice a bit of applique first!
Credits: All Photos by Stephanie Press
See more posts in the series Make a Foam Cup Bra.
The post Making a Foam Cup Bra: Part 3 appeared first on Cloth Habit.