
BIC Mark-It™ Challenge and #BICMerryMarking Project #RambunctiousRed #DeepSeaBlue #ad
This is a sponsored post written by me on behalf of BIC®. All opinions are 100% mine.
In our home we’ve always loved writing, art journaling, paper-crafting and making cards with various pens. As an artist, crafter and mom I have tried many different types of materials, supplies and pens for my diy projects. We are always using permanent markers on craft projects for school or home. I was challenged to participate in the BIC Mark-It™ Month of Merry Marking! Today I’m sharing my project along with where you can grab some BIC Mark-It™ Merry Marking inspiration to take the challenge yourself!
I am nominating Cajun from BloominginBedlam, my daughter Krissy and my Facebook fan Amy Huse for the Merry Marking Challenge and hope you join in too! The great thing about this challenge that I am passing it onto you is you can pick from various projects! Whether you pick my Merry Marking project or another project (*link for pdf at bottom of post) I am challenging you to grab a pack of pens and get creative! I mean we all want to make someone’s holidays a bit merrier and bright! Right?!
These pens can work on a variety of papers easily. For my card project I used a card stock paper of 98lb. after all it is a card I made. But, you could even use computer paper. Just try with various papers and see what you like.

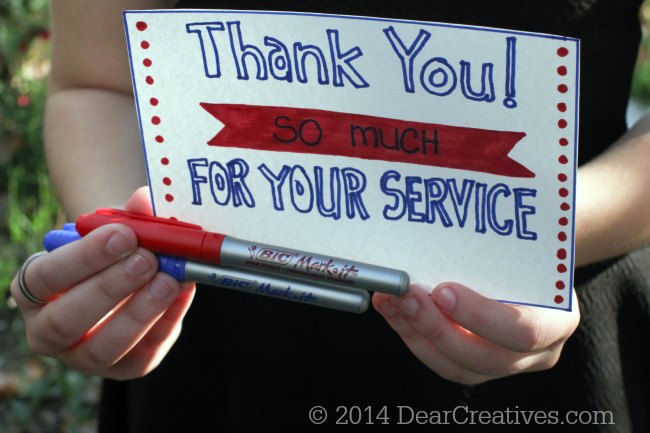
What you need for the Merry Marking Project I tried;
- Card Stock paper 98 lb. or optional other paper
- pencil
- ruler
- BIC Mark-It™ Pens The two used for this project were: #RambunctiousRed #DeepSeaBlue (red/blue) Included in the 36 Pack of Fine Tips

Here’s the steps for making my Merry Marking Project;
- Next Take a ruler and measure an envelope (5″ x7″ or other size) that you’ll be placing your card in or just trace around the edge of the envelope using the ruler as a guide like I did! ‘
- Next just inside the penciled lines mark the center, and make three lines for where you want your lettering
- Just inside the penciled lines use your ruler and mark a blue line all the way around
- Then just inside the drawn outside blue lines make red dots on each side
- Lightly Pencil your lettering for word placement and placement of center ribbon
- Color in the center ribbon red
- Go over your penciled words or make them chunky like I did

- Cut out your card just around the blue line
- Next send it to a Veteran (or give to a Veteran or service worker you know) and make their day brighter with #BicMerrryMaking

We all have someone we are thankful for this time of year! Why not let them know. When it comes to pen tips I love versatility of the BIC Mark-It™ pens!
BIC Mark-It™ Permanent Markers come with various pen tips;
- Ultra Fine
- Fine
- Bold
- Chisel
- Retractable Fine

These BIC Mark-It™ pens come in packs of assorted colors in a 36 pack! Available in both fine tip and ultra-fine bold. These are the kind of pens you’ll love for yourself and for your family.

The metallic pens are available in 8 packs! They are bold, fade-resistant ink that is low odor and acid free (no added acid, no measurable pH) so you don’t need to worry!
Keep writing and creating this season with awesome products like BIC Mark-It™ permanent markers and BIC Mark-It™ Month of Merry Marking – inspirational ideas to make the holidays bright. We hope you enjoy them as much as our family does! PS: The booklet is free!
What types of projects do you enjoy making with permanent markers?
