
A Makeshift Megaformer Ab Workout You Can Do at Home

Speaking of megaformer workouts, I wanted to share a makeshift one I did while traveling. When I was in Australia, we were eating healthily and being constantly active during the day (walking around, snorkeling, swimming, hiking, etc.)—so active that I didn’t worry much about fitting in workouts. My boyfriend and I did, however, go on several scenic runs (one of my favorite ways to explore a new area) and I snuck in a few quick at-home workouts on mornings I woke up earlier than everyone else.
Our hotel in Port Douglas had hardwood floors, so I grabbed a towel to recreate the sliding motion of a megaformer for a quick ab workout. It’s no Btone class, but it did the trick!
A Makeshift Megaformer Ab Workout You Can Do at Home
Equipment I Used:
- Dish towel (plus an extra one for knee padding) – if you have sliders at your gym or in your home gym, those are great. Also, sliders used for moving furniture = awesome. If you have carpets, try DVD cases or an overturned Frisbee. Get creative!
Do each exercise for 1 minute before moving right into the next. If you’re a beginner, you might want to start by doing each exercise for 30-45 second instead Try not to rest in between exercises—transitions should be quick. You can set an interval timer for 14 rounds of 60 sec work and 0 sec rest so that your timer beeps at you every minute, signaling the next exercise. You could also just watch the clock. Full descriptions below the pics!
If these exercise names sound like Jibberish, welcome to Lagree Fitness. I realize that this might be a confusing routine for those who haven’t taken a megaformer class, and admittedly had those familiar with the machine in mind when making it.
I’ve placed an asterisks (*) next to exercises that can be modified by doing them from your knees. Fourteen minutes is a long time to go without resting, so don’t hesitate to modify! Always better to modify than to stop moving altogether. I finished a couple of the moves with crossbody holds. Count to 10 in your head and then move on to the next exercise—it’s fine if the hold makes the next exercise a little less than a minute.

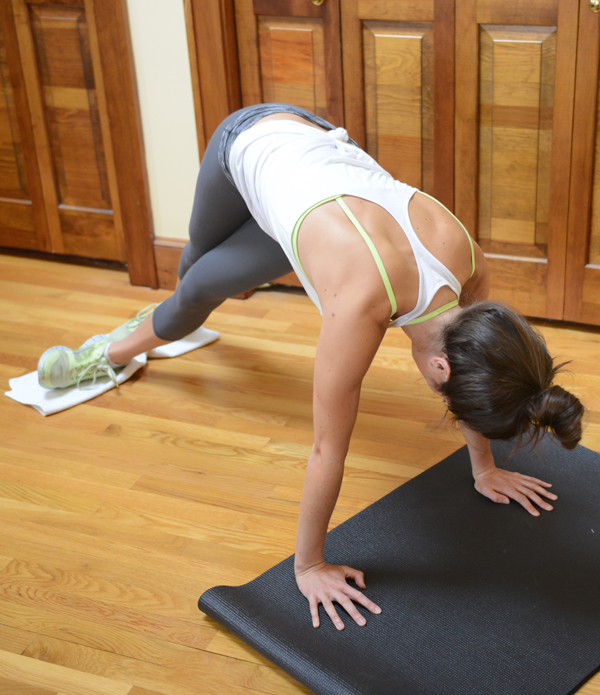
Feet on a towel, hands on the floor (or exercise mat) …
- High Plank*
- Plank to Pike | Keeping your legs straight, pike your hips up into the air, bringing your body into an upside down “v” shape. Try to keep your heels lifted as you do this, sliding on the balls of your feet. Once you hit your peak (if you have tight hamstrings, you may not be able to get your hips up very high—that’s ok!), slowly lower back down into plank position. If your wrists bother you, you can do this from your forearms (I find this to be more challenging than from my hands).
- Bear—end with crossbody holds | Keeping your hips level with your shoulders, back flat, slide your feet forward, bending your knees in towards your elbows. Slide feet back out, straightening your legs into plank position. Two most common errors while doing this are lifting the booty up as your feet slide in and letting the low back arch down towards the floor. Pull your abs in tight the whole time, maintaining a flat back. For the holds at the end, slide your feet out to plank and from that position, bring your left knee across your body to your right elbow—really pull it forward, trying to make contact. Hold it there for about 10 seconds then switch sides: right knee to left elbow.
- Forearm Plank*
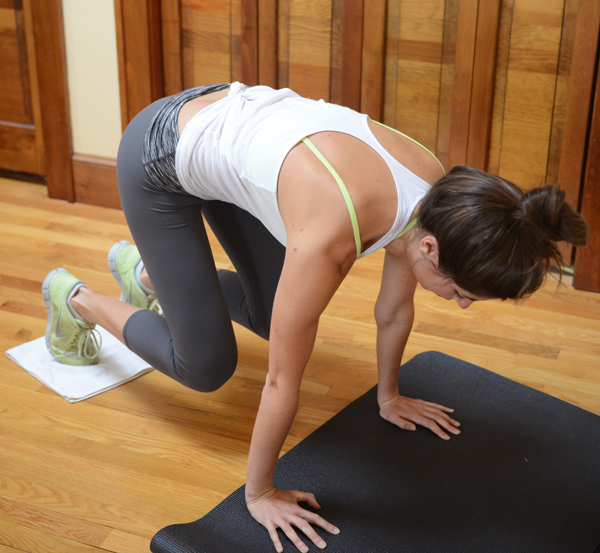
I’m about to make things confusing with the next two moves (I’m sorry!). I did the workout as pictured: knees on mat, hands sliding out on towels. Then I realized that if I just padded my knees with an extra towel, it was way easier to keep my hands on the mat with knees sliding. I’m going to describe what’s pictured for simplicity’s sake, but you may want to try the other way (especially if your floors are a little sticky). It’s the same thing as what’s pictured/described; you just slide your body away, rather than sliding your hands away.
- Wheelbarrow | Start with your hands on the towel shoulder-width apart and knees on an exercise mat. Lower your hips so that from your knees to top of head is one straight diagonal line (as if you were about to do a push up from your knees). Keep your abs held in tight and arms straight (but not locked) as you hinge from the shoulders, sliding your hands out in front of you. When you reach your farthest extension, press into the hands, sliding them back in underneath your shoulders to the starting position. It’s almost like an ab roller. If you feel this straining your low back, stack your hips over the knees and your wheel from that tabletop position.
- Cobra | Start with your hands on the towel shoulder-width apart and knees on an exercise mat. Lower your hips so that from your knees to top of head is one straight diagonal line (as if you were about to do a push up from your knees). From here, you’re going to slide your hands out in front of you. As you do, bend your elbows so that you slowly lower onto your forearms into a sort of kneeling plank. Next, reverse the motion, pressing up into your hands to slide the towel back in as you rise up to straight arms and your starting position. It’s tough! To make it easier, lower onto one forearm at a time and press up onto one hand at a time (just make sure to alternate you leading hand each time). As you do these, resist the urge to turn it into a cobra stretch (bending the spine and lifting your chest). Keep the abs in tight the whole time, maintaining that straight diagonal with your torso. If you feel any strain in your low back, stack your hips over your knees (rather than having them lowered) and do it from this tabletop position.
- Twisted Pike (right foot in front of left) | In a plank position, feet on a towel, hands stacked under shoulders on an exercise mat, cross your right foot in front of the left and drop your heels so that you’re heel-to-toe with toes pointing towards the left. You’ll twist through the waist, slightly lowering your right hip to do so. This is your starting position. Maintaining this leg position and keeping your knees straight, pike your hips slowly up into the air. When you’ve reached your peak, slowly lower back down to that twisted plank starting position. You are targeting your right oblique with these.
- Snake (right foot in front of left)—end with crossbody hold | In a plank position, feet on a towel, hands stacked under shoulders on an exercise mat, cross your right foot in front of the left and drop your heels so that you’re heel-to-toe with toes pointing towards the left. You’ll twist through the waist, slightly lowering your right hip to do so. This is your starting position. From here, start bending your knees in towards your left elbow, sliding your feet forward. When you’re in as far as you can go, slide the feet back out, straightening your knees back into your starting position. As you do these, try to keep your hips level with your shoulders (don’t sit your bum onto your heels as you slide the feet in; engage your right sidebody to keep them lifted). For the crossbody hold at the end, from that twisted plank position, you’ll pull your right knee across your body towards your left elbow (try to make contact!). Hold it there for about 10 seconds.
- Side Forearm Plank (right forearm on the floor)*
- Forearm Plank Hinges* | Maintaining a forearm plank position, just rock your shoulders back and then forward slowly. This isn’t a huge motion, you’ll slide back and forward about 3-6” each direction. Pay attention to your core as you do this: is your low back sagging down towards the ground? Is your butt piking up into the air? Don’t let either happen! Pull the abs in tight with a micro upper tilt to the pelvis to keep your body straight.
- Side Forearm Plank (left forearm on the floor)*
- Twisted Pike (left foot in front of right)
- Snake (left foot in front of right)—end with crossbody hold
- Push Ups* | Keep these slow—they’re not explosive (think Vinyasa yoga flow speed).
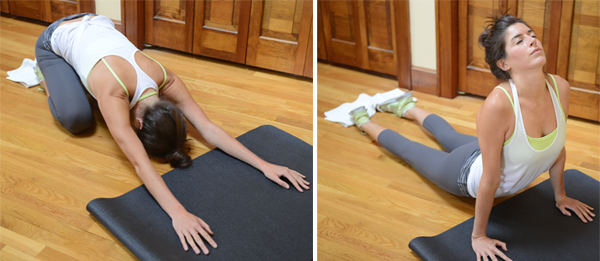
When you finish, relish a long Child’s Pose. Then take it to a gentle Up Dog (or cobra) to stretch out that core.

This workout would be a fun one to turn into a real-time video, right?? I played around with making videos and GIFs on Monday and worked some of the newbie kinks out. Really excited to start putting a few together! Don’t worry—for those of you who like the pictorials, they won’t go anywhere.
Lagree Fitness lovers—try this ab workout next time you have to go without a megaformer for an extended period of time! (What an embarrassing #firstworldproblem, huh?). Count how many times you need to take a break during the 14 minutes (modifying doesn’t count as a break—stopping does). Next time you do the workout, try to reduce the number of breaks you take. I took three breaks, two during left side Twisted Pike and one during left side Snake (I was dying). I did about 20 seconds of the forearm plank hinges modified from my knees, and the last 30 seconds of push ups also modified on my knees.

WEARING | Sevan Sports Bra and Salar Capri Foldover Capri from Fabletics // Tank from LF Stores (similar) // Nike Free 3 Sneakers (similar)
SHOP A SIMILAR LOOK
