
Halloween craft {Photo display}
Hi! I’m Corey from TinySidekick and I’m excited to be the newest contributor here and share some fun projects! I hope that by being here I’ll get to make some new friends and inspire some creativity!
So one thing Jamie and I have in common is our love for taking pics of our cute offspring! It dawned on me the other day that I spend time coming up with really cute Halloween costumes for my little ones, take a ton of pictures, and then…nothin’. Once Halloween is over and done, we rarely ever look at them again and they aren’t typically pictures that I would keep up year round.
My solution? Let’s make a special place to display past Halloween photos as part of our Halloween decor! A super simple Halloween craft that you can have done in one nap time! (That is if you aren’t the one napping!)

Here’s what you will need:
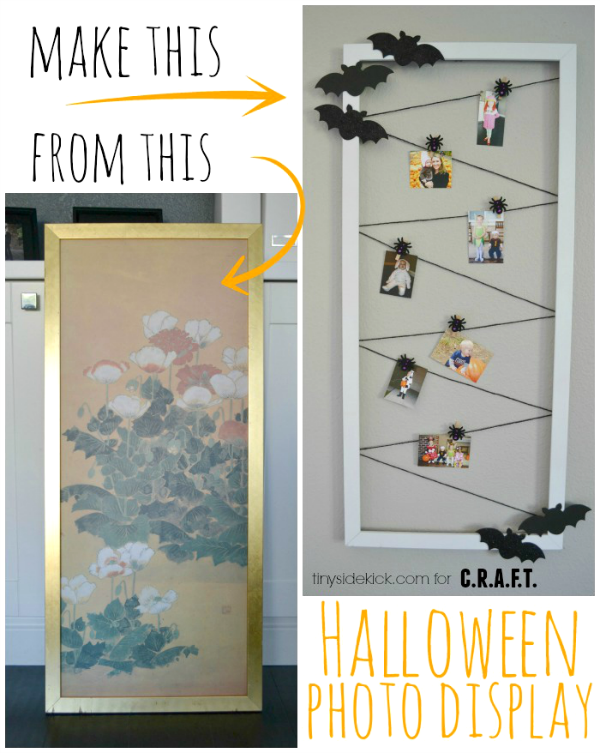
- A frame (I picked this one up at a thrift store for 6 dollars, and it turns out that I think I can sell that painting in there for about $45 on Ebay! -SCORE!)
- Some string or paper rope. (I used paper rope that I found at Michael’s)
- Mini clothes pins


Let’s get started!
The first thing you will want to do is get rid of the insides of the frame so that you have just the frame. If you spray paint it, be sure to give it a light sanding and a few light coats of spray paint and let it dry completely.

Next, you will attach the paper rope or string in what ever pattern you wish securing it with a staple gun on the back side of the frame. To start and stop the string use 2 staples and bend the extra rope or string down at a 90 degree angle and then staple again. This will keep the rope or string from slipping out. (see the circle photo)
Once the string is attached, plug in your hot glue gun and arrange your cut outs how you want them on your frame. Once it is hot, attach the cut outs to the frame with a small amount of hot glue.

To add a little flare to my mini cloths pins, I attached some foam spiders to each cloths pin using the sticky dot already on the spiders. If you find some of these cute little things that don’t have a sticky dot, or if the sticky dot isn’t sticky enough you can use hot glue here too.

In order to get my photos to be a bit smaller than the standard printing size I opened up a word doc and inserted images all over a page, then took my file to FedEx Kinko’s and had them printed on thicker paper with their super duper color printer. When I got home, I cut them out and clipped them to my new Halloween Photo Display!

Now I get to enjoy the memories of past Halloween fun all month long and I have to say my little girl who is 4 1/2 (she would be so mad if I didn’t say the 1/2 part) loves looking at the pictures too. I’m sorta impressed with how much she remembers about each year and it is so much fun to reminisce with her.
I’d love for you to come over and visit me at TinySidekick.com and see the rest of my Halloween decorations!


The post Halloween craft {Photo display} appeared first on C.R.A.F.T..