
Free Crochet Pattern...Napa Valley Wrap!

Last summer, a wrap I designed was published on the Stitch & Unwind Blog. I loved using the yarn and wrote a review on it as well, and now the wrap pattern in full is available here on Fiber Flux too!
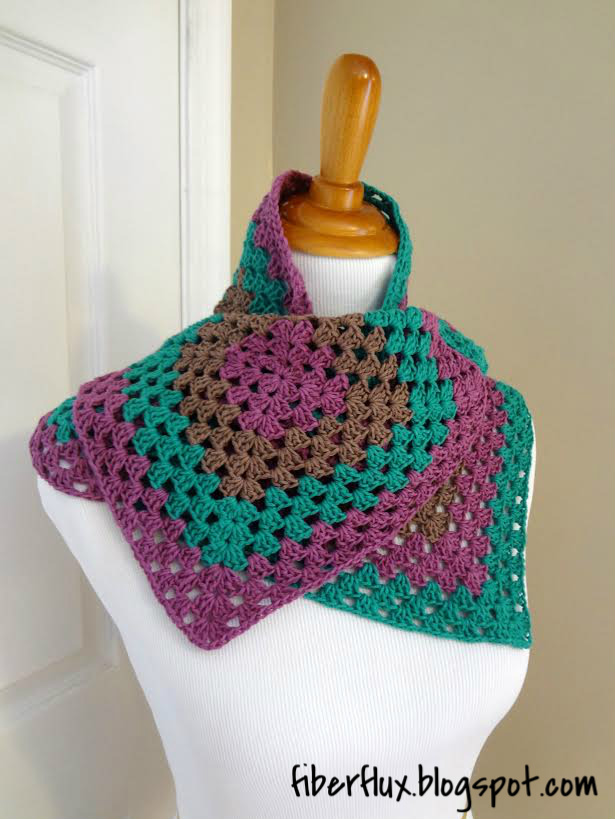
The colors are reminiscent of wine country...grapes ripening in the sun, cool green leaves, and winding vineyard branches. The wrap is constructed with four classic granny squares joined together to make a lovely wrap; a perfect project for crocheters of all experience levels.
Napa Valley Wrap
By Jennifer Dickerson

Materials:
- 1 Ball Bernat Cotton-ish By Vickie Howell in “Cotton Gin”
- 1 Ball Bernat Cotton-ish By Vickie Howell in “Jade Jersey”
- 1 Ball Bernat Cotton-ish By Vickie Howell in “Coffee Filter”
- G Crochet Hook (4.25 mm)
- Tapestry Needle for seaming and weaving in ends

Sizing:
- 12 inches wide and 48 inches long.
If a wider and longer shawl is desired, simply work more rounds of each square. You could also add to the length if needed by adding more squares.

Instructions:
Granny Square (Make 4) Note: For the color sequence shown, work three rounds of each color.
Chain 4, join into a ring with a slip stitch.
Round 1: Chain 4, work (3 dc into center of ring, chain 1) 3 times, then 2 dc into center of ring. Join to close with a slip stitch.
Round 2: To work the corner of round 2, first chain 4, then 2 dc in same space, then chain 1, then 3 dc in the same space. Chain 1, then work the next corner by working 3 dc in next space, chain 1, then 3 dc in same space, chain 1, repeat two more times to complete the round.
Round 3: Work the corner in the same manner as the previous round: chain 4, 2 dc in same space, chain 1, 3 dc in same space, chain 1. To work the sides, simply work 3 dc in the next space then chain 1…repeat until you reach a corner again.
Keep working in this manner, with two clusters in the corners and one cluster on the sides until you finish the round. Just be sure there is a ch 1 in between each grouping of 3 dc as you work each round.
Repeat round 3 until your square measures 12 inches across.
A note about making multicolored rounds:
To begin a new round in the same color, simply slip stitch until you reach a ch 1 at the corner and begin the new round. To begin a new round in a new/different color, cut yarn, leaving a tail, and fasten it with a slip stitch. Join the new yarn at one of the corners as shown and tie securely. Continue to the next round.

Finishing & Assembly: Weave in all ends of the squares. Seam together either by slip stitching them together or whip stitching them together with a tapestry needle.
To view these seaming techniques,
click here to watch a helpful video.
© Jennifer Dickerson 2014
For more fun projects and pretty patterns, be sure to follow us on Facebook, Google , Twitter, and Pinterest for the latest updates!
© Jennifer Dickerson 2014
For more fun projects and pretty patterns, be sure to follow us on Facebook, Google , Twitter, and Pinterest for the latest updates!

var pfHeaderImgUrl = '';var pfHeaderTagline = '';var pfdisableClickToDel = 0;var pfHideImages = 0;var pfImageDisplayStyle = 'right';var pfDisablePDF = 0;var pfDisableEmail = 0;var pfDisablePrint = 0;var pfCustomCSS = '';var pfBtVersion='1';(function(){var js, pf;pf = document.createElement('script');pf.type = 'text/javascript';if('https:' == document.location.protocol){js='https://pf-cdn.printfriendly.com/ssl/main.js'}else{js='http://cdn.printfriendly.com/printfriendly.js'}pf.src=js;document.getElementsByTagName('head')(0).appendChild(pf)})();
More posts from Fiber Flux