Tutorial Origami Ball

Cari amici buon lunedì! Come primo post del mese di Novembre c'è un bel tutorial! Vi piace come inizio?! :)
Ormai è noto a tutti che le "geometrie" sono di gran tendenza nell'home decor, e devo dire che anche a me affascinano molto! In realtà sono sempre stata attratta dal rapporto "matematico" che c'è nel piagare la carta... Faccio origami da quando sono bambina; un giorno mio papà è tornato a casa con un libro, Origami Modulare di Tomoko Fuse. Niente mi è sembrato più magico di poter piegare tanti foglietti, unirli insieme (senza colla) e formare meravigliose stelle, dodecaedri, scatole... E' un libro che non mi ha mai abbandonato nel corso degli anni, e se adesso sono qui, capiterete che è anche grazie a questo!
Fare una pallina plissettata è un po' la stessa cosa dell'origami modulare, nel senso che dovete piegare nello stesso modo diverse volte, ma la magia sta proprio nel veder nascere piega dopo piega dalle proprie mani questo piccolo gioiello di carta!
Vediamo come si fa?! :)
Dear friends good Monday! As the first post of November there is a nice tutorial! I like the way you start ?! :)
By now everyone knows that the "geometry" are all the trend in home decor, and I must say that fascinate me very much! In fact I have always been drawn to the report "mathematical" that there is folding the paper... I do origami since I was a child; one day my daddy came home with a book, Modular Origami by Tomoko Fuse. Nothing it seemed more magical to be able to fold many sheets, join them together (no glue) and make wonderful stars, dodecahedra, boxes... It's a book that I've never been abandoned over the years, and if I'm here now, you will understand that it is also thanks to this!
Make a pleated ball is a bit the same thing of origami modular, meaning that you have to fold in the same way several times, but the magic lies by seeing come fold after fold from their own hands this little gem of paper!
Let's see how?! :)

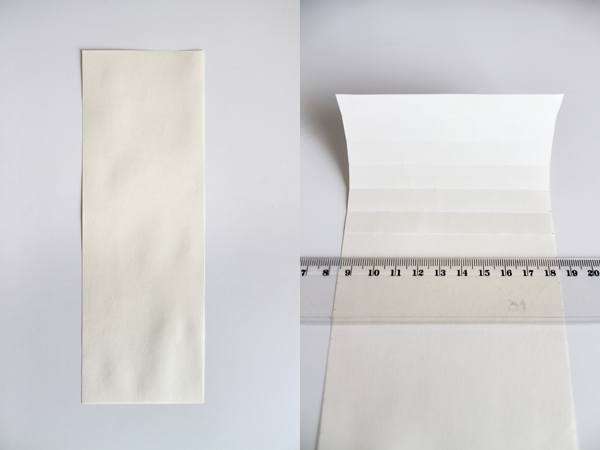
-Procuratevi un foglio di 10x35 cm di carta leggera. Io per fare pratica ho usato un foglio A4 (quindi più corto) ma dopo aver imparato, utilizzate le misure esatte.
-Con l'aiuto di un righello, dividete la lunghezza ogni 1 cm e piegate.
-Take a 10x35 cm sheet of thin paper. For practice I used an A4 sheet (therefore shorter) but after learning, use the exact measurements.
-With the help of a ruler, divide the length of each 1 cm and folded.

-A sinistra vedete il foglio completamente piegato.
-Importante: voltate il foglio (come se doveste girare la pagina di un libro) e piegate a metà nel senso della lunghezza.
-To the left you see the fully folded sheet.
-Important: turn the page (as if you were turning the page of a book) and folded in half lengthwise.

-Sempre nel senso della lunghezza, piegate ad un centimetro sia dalla parte destra che sinistra.
-Con l'aiuto del righello, partendo dall'alto piegate il foglio diagonalmente ogni 2 righe orizzontali (osservate bene la foto per non sbagliare! ;) )
-Always In the direction of the length, fold at one centimeter from both the left and right sides.
-With the help of the ruler, starting from above folded sheet diagonally every 2 horizontal lines (look carefully at the picture to get it right! ;) )

-Una volta aver completato il foglio con le diagonali in un verso, procedete con le diagonali nell'altro senso, ottenendo un reticolo di pieghe.
-A questo punto tutte queste pieghe vi serviranno come guida per rendere tridimensionale il foglio così come vedete in foto.
-Once you have completed the sheet with the diagonals in one direction, proceed with the diagonals in the opposite direction getting a grid of folds.
-At this point all these folds will serve as your guide to render three-dimensional sheet as seen in the pic.

-In questa immagine potete vedere come si deve iniziare a piegare.
-In this picture you can see how you have to start folding.

-Per capire meglio come si deve presentare il foglio una volta completamente piegato osservate anche questi punti di vista.
-To better understand how you have to present the sheet when fully folded also observed these views.

-Utilizzate una perforatrice a pinza per forare tutte le estremità del foglio plissettato: questa operazione può anche essere fatta prima di piegare.
-Fate passare un filo attraverso i fori e legare. Prendere un nastrino, chiuderlo con un nodo ed inserirlo all'interno della pallina. Far passare il filo sottile anche attraverso i buchi nella parte inferiore e legare.
-Use a pliers puncher to punch to all the ends of the pleated sheet: this can also be done before folding.
-Pass a wire through the holes and tie. Take a ribbon, close it with a knot and place it inside the ball. Pass the thin wire through the holes in the bottom and tie.

-Con un pennello stendete della colla vinilica sulla parte del foglio piegato, chiudetelo su se stesso facendo combaciare i lati e... -La vostra pallina decorativa è pronta! Vi ricordo inoltre che potete trovare il diagramma delle pieghe nell'allegato Decor di CasaFacile di questo mese... Non perdetevelo!!! ;)
Prossimamente saranno anche disponibili nel mio shop in diverse misure e con splendide carte decorate. Io la adoro, e voi?
-With a brush lay the glue on the folded paper, close it on himself by matching the sides and...
-Your decorative ball is ready!
I remind you that you can find the diagram of the folds in CasaFacile Decor this month... Don't miss it !!! ;)
Soon will also be available in my shop in different sizes and with beautiful decorated papers.
I love it, and you?
More posts from