
{Tutorial} How to Convert Recessed Lights to Pendants

Up until last week, electrical work intimidated the heck out of me. And, well, it still kind of does, but I am one huge step closer to feeling confident in my ability to produce a working light fixture that neither electrocutes me nor burns the house down.
And why this sudden surge of confidence?
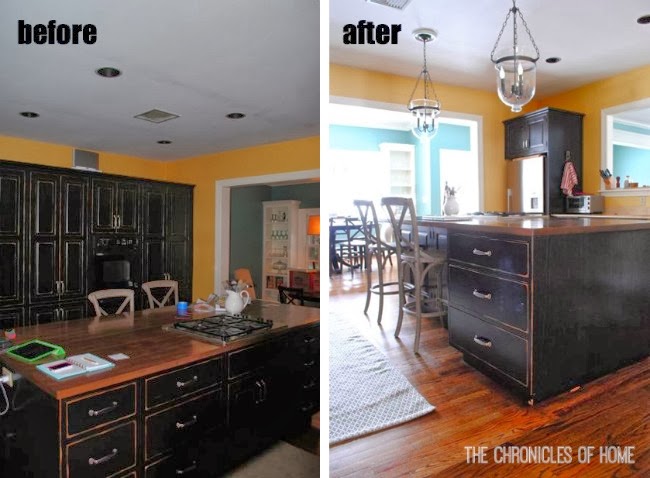
Because I managed to convert the recessed lights above our butcher block kitchen island to hanging pendants!
The first conversion took me about four hours. Don't throw your hands up and walk away! The second one only took about twenty minutes. So hopefully, with this tutorial, you can knock out this project in about half an hour.
Here's what you'll need for each recessed light conversion:
- recessed can light adapter
- ceiling medallion
- Phillips head screwdriver
- wire cutters
- electrical tape
- pendant light fixture (mine are the Hundi pendants from Pottery Barn, though I bought mine on EBay)
You will also want to adjust the length of the chain for your light fixture so it hangs where you want. Check and make sure all the cords and wires run through all the openings of your fixture. I got all the way to the end of installation and realized I hadn't done this and had to take it all apart and start over!
* * * * * * *
When you've completed the above two steps, unscrew the lightbulb from the recessed light socket and remove the recessed casing. If you peek up inside you should see clips or springs that are holding it in place and easily detach. You'll be left with an opening like this.

Take the recessed can light adapter out of the box and thread the long bolts through the two holes closest to the outside edge. Twist the butterfly bolts onto the back side with the bent edge facing as shown.

Take the screw-in piece from the can light adapter kit (it will have a black and a white cord coming out of it) and screw it into the socket in the recessed light opening as you would a light bulb.


To attach the adapter to the recessed light opening, slide one of the butterfly bolts up and over the clips that stick out on the sides of the recessed opening. Apply downward pressure on the clips/adapter while using a screwdriver to tighten the bolt. When it's somewhat secure, repeat on the other side, then finish tightening both bolts so the adapter sits snugly against the ceiling.

Take the cords and wires of your pendant and feed them through the ceiling medallion, making sure that the right side of the medallion is facing the pendant.
Attach the crossbar to the can light adapter using the included screws and a screwdriver, then feed the cords and wires up through the hole in the middle and downward again so you can work with them.

There are three different kinds of wires you'll be working with - a grounding wire, which is bare copper, a hot wire, which is black, and a neutral wire, which is white. The hot and neutral wires on your pendant may be marked differently - mine had grooves in the plastic for the neutral wire and smooth plastic for the hot wire. Just read the materials that came with your pendant and it will tell you how to distinguish.

You may want to use wire cutters to shorten the wires if they're very long.
All you need to be sure of is that you twist like wires together - start by twisting the ends of the copper grounding wires (one from the can adpter kit and one from the pendant light) together then push a cap onto the ends - the caps are included with the can adapter kit.

Then twist the ends of the hot wires together and the ends of the neutral wires together and add caps to them as well.

Wrap them with electrical tape to hold the wires and caps together - you don't want any bare wire ends exposed.

All that's left now is to neatly tuck the wires up into the recessed opening and screw the end cap of the pendant up into the center hole of the can adapter kit. The pressure holds the ceiling medallion in place.
Add light bulbs and switch your circuit back on to test that the lights are working.
What a difference!

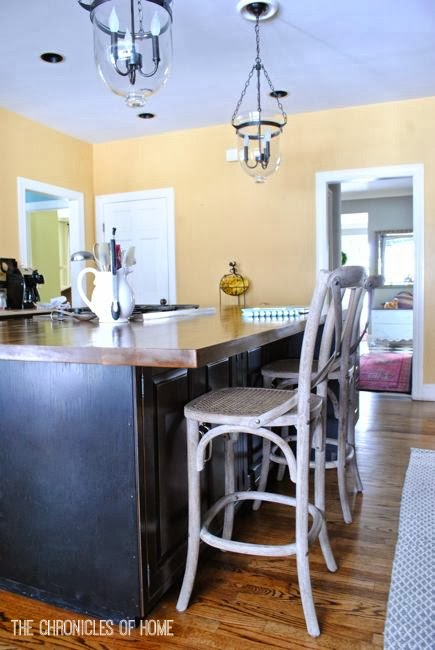
I love everything about this look - that the pendants draw attention to the island and define it as a special spot in the kitchen; that they throw more light on the counter because they're closer to the surface; that they add a little bit of elegance and drama to the space.

The ceiling medallions are necessary to cover up the holes left from the recessed lights, but I love the extra detail they add to the tops of the pendants.

The lanterns themselves are traditional but contemporary and are just the look I wanted over the island.

So tell me - are you an electrical novice like me, or do you know your way around the wires?? If not, would you give this a try? I think it's a great beginner project and has huge impact!

More posts from Jennifer Bridgman