
DIY Lacquered Grasscloth Coffee Table
I have been so excited to share the tutorial for my new lacquered grasscloth coffee table with you all, and today is the day!
I've been seeing coffee tables with lacquered woven coverings a few different places lately, like Bungalow 5 and Serena & Lily. They carry a pretty hefty price tag, though, and I could not get the idea of making one myself out of my head.
I know this is very shocking. When you have recovered we'll continue. ;)
It pretty much combines my two biggest DIY loves - building and upholstering, even though the upholstering in this case is done with paper.
You got your first peek of the new table last week when my Home Depot Holiday Style Challenge went live.


I took design inspiration for the legs from this Worlds Away coffee table, as well as pieces a couple of my blog friends have made recently - nesting marble coffee tables by Sarah Dorsey and an emerald green bar cabinet by Kristin Cadwallader.
The building of the table was really pretty simple. I was even a little surprised how quickly I had it ready to be covered!
To build the table I purchased:
- Three 8' 2x2 pine boards
- Two 8' 1x2 pine boards
- One sheet of 3/4" plywood cut to 48" square (I had this done for me at Home Depot)
I used a Kreg jig and pocket hole screws to assemble everything.
The cuts are all really simple too, though you will want them to be as precise as possible to make sure the table is level and sturdy. I made the following cuts with a miter saw, though they're all straight cuts with no angles.
1x2s 4 pieces @ 45" each
2x2s 2 pieces at 45" each 4 pieces at 4" each 4 pieces at 5" each 4 pieces at 19 1/2" each
For the assembly, I drilled pocket holes using a Kreg jig, keeping the pocket holes on what would be the underside of the table, then attached the pieces with pocket hole screws, as shown below.


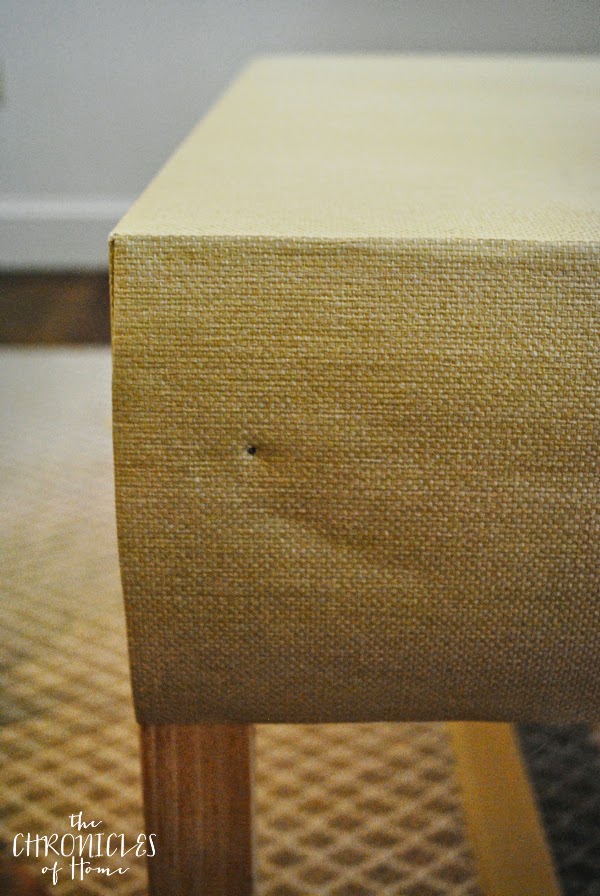
I flipped the frame upside down to attach the plywood top using pocket holes and screws, then turned it right side up again and used an electric pad sander to sand the heck out of it. Remember that this is going to be covered in paper and bumps and lumps will show through, so you want it as smooth as possible. Everywhere.

Okay, easy part is over :)
Not to say the upholstering with paper is hard necessarily, but it takes some finesse and time and is a pretty precise job. Tools and supplies I used for this part were grasscloth wallpaper, wallpaper paste (use heavy duty - it's MUCH stickier and easier to work with), a foam paintbrush, a plastic wallpaper smoothing tool, wet and dry paper towels for wiping excess wallpaper paste, clamps (for any stubborn bits that don't want to stick right away), sharp scissors, a staple gun, and liquid lacquer (not spray lacquer).
I covered the parts of the table in the following order.

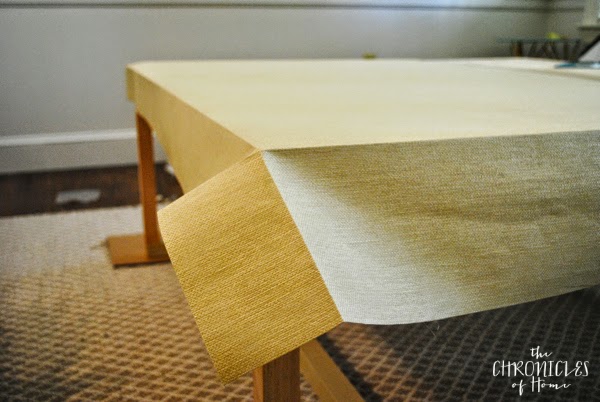
I took pictures of the shapes I wound up using to cover each section but do not try to eyeball these or cut them freehand. For each piece, I folded and creased around the part to be covered and marked where my cuts and folds would go. Then I took it off the table and carefully made all my folds and cuts before actually attaching the grasscloth. Your goal is to make the grasscloth fit the table as smoothly and snugly as possible with sharp, neat corners.
The first section of the table was covered in a piece that looked like this:

To apply, I used the foam brush to spread wallpaper paste over the section to be covered, then pressed the grasscloth into place and smoothed with the plastic smoothing tool. I added staples to the undersides of any hidden sections as well. I used this same process for each section.

Once those pieces were attached on all four legs, I moved on to the next section (refer to numbered photo above) and cut and attached the pieces for those.


Moving on to the top, I started by laying my paper over the surface. Since my table was so wide, I had to use two side-by-side pieces to cover all the surface area. I really love the way the Serena & Lily coffee table has four interlocking triangles on top but I hadn't thought to do it this way. If you're careful lining up your seam, however, it's practically invisible.


Once the first top piece was attached, I repeated with the rest of the top, then moved onto the last part of the legs.


I let the table dry overnight then coated the entire thing in lacquer. I'm actually thinking of adding another coat or two, even though I applied it pretty thickly the first time. I don't want to have a heart attack every time someone sets a drink down on the table.
And even though I first showed you the table in my living room with the Style Challenge decorations, I always intended for it to end up in our family room.


No matter how hard I tried to pull the chairs close to the old rectangular coffee table to create a cozy seating area, they always managed to slide their way back against the wall (the gray chairs on the left). You know what they say - if you can't beat 'em...build a new coffee table. Right? Isn't that how the saying goes?
The grasscloth adds just the perfect amount of subtle texture.

And I loooooooove how the open style has completely opened the feel of the room. Nothing is blocked by the coffee table now.

It's substantial but airy, modern yet classic, interesting yet subtle. A total study in contrasts and I absolutely adore everything about it. I also have a totally unique piece, which I love, and I saved myself thousands over the cost of any of the ready-made lacquered woven tables out there. A total win in all aspects!

If you're in the Boston area and are interested in having a custom piece built, send me an e-mail at [email protected] and we can talk!
* * * * * * *


More posts from Jennifer Bridgman