
Knitting a new version of something old
I thought I’d share a little bit of details on a kind of fun project I’ve been working on lately!
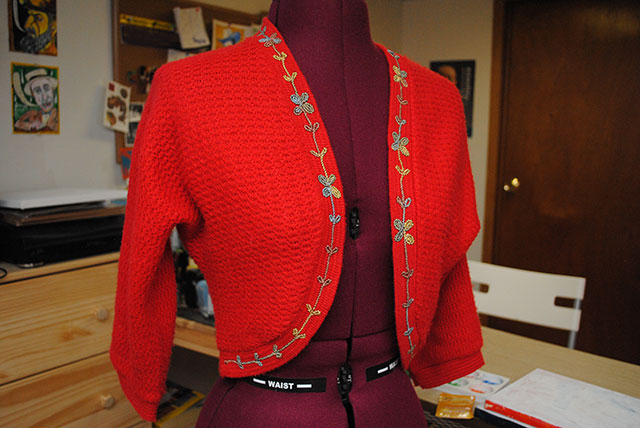
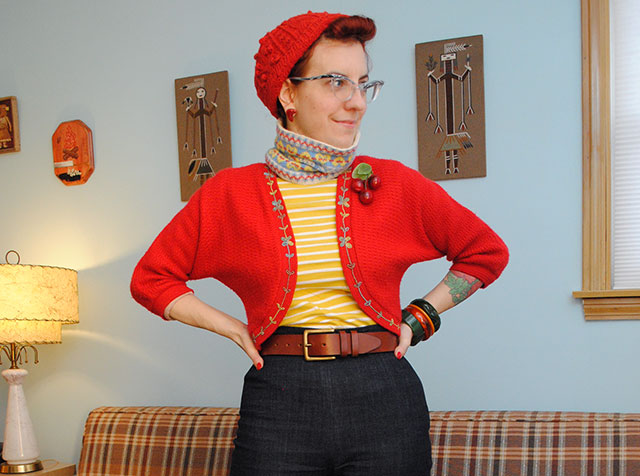
I’ve owned this red 1950s bolero for at last four years, and it’s probably one of my most frequently worn articles of clothing. I wear it in the summer to cover up when I’m chilly or just want my shoulders covered without getting too hot, I wear it in the spring and fall, I sometimes will even wear it in winter with long-underwear sleeves rolled up. I seriously love this thing.

I easily wear this once a week in anything but the dead of winter. Though I did even wear it earlier this week with lots of inner and outer layers (although ironically changed clothes before going out—don’t you hate when you get all dresses up but suddenly change your mind??).

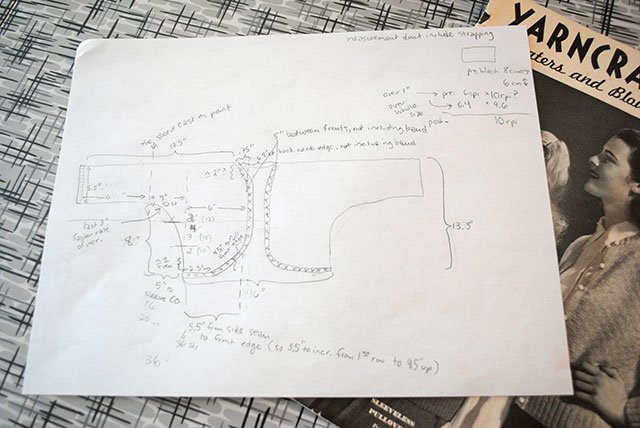
For years I kept telling myself I want to recreate this thing. It’s not hand-knit, but I wanted to essentially take the measurements and turn it into guidelines so I could knit at least one new version. When I’m doing something like that I skip all the formalities and just write the bare bones of what I need, since it’s just for my own eyes. Usually starting with a crude drawing that’s not to scale (I suck at drawing) and numbers and arrows, like this.

In the case of this red bolero, I had an idea of how I wanted to construct it for at least a couple of years before I even owned this particular bolero, because I have a similar-shaped dolman-sleeve bolero that I also wear to death. I even mocked it up with a little paper cut-out and drawn instructions when I was discussing this with my friend Elisa, and drew the below drawing, then, too. That was probably about 6 years ago now!

I can see my original thoughts were to start at the bottom back edge, knit up to the sleeves, increasing at the side seams, shape the neckline, then decrease down both fronts. The only thing I felt fuzzy about was not knowing if the lack of shoulder shaping and seam could pose a problem. Theoretically I didn’t see why it would. But most of the vintage bolero patterns I perused had a shoulder seam. I never did act on my idea, so I just sat on it, occasionally thinking “oh yeah, I should really do something about that”.
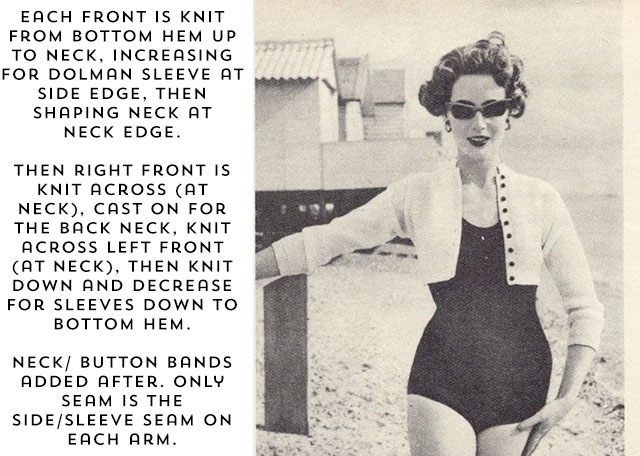
Then recently I got a bug up my ass to actually do it. I was spurred on by finding a 50s pattern (Quick Cover Up, available free, and I pinned a week or two ago), and while it has a different look (for one, the dolman sleeve shaping obviously isn’t as deep), the way it was constructed was exactly like my idea! Here’s roughly how it’s knit:

No shoulder seam or shaping. Bingo. That was a good enough kick in the pants to get me started again. I pulled out one of my favorite books, The Knitter’s Guide to Sweater Design, a fantastic resource with details, charts and easy formulas to create basically any sweater shape you could possibly fathom. (Sadly it’s out of print and rather pricey for a used copy—I think I spent about $50 on it a few years ago and it’s been worth every penny. The only caveat I’d say is you have to be willing to get really technical; it uses excruciating detail but leaves no stone unturned in telling you how to get to the end result. But it can sometimes take flipping back and forth between sections and pages to get there.)
Anyway, right in the dolman/tee section of that book, it explains the very thing I was trying to do, in exactly the way I’d plotted it out in my head all those years ago! Whether you start front or back, you increase/decrease for the sleeves, shape the neck, and have no seam over the shoulder at all.
Why hadn’t I noticed this ages ago? So that was it. The game was on.
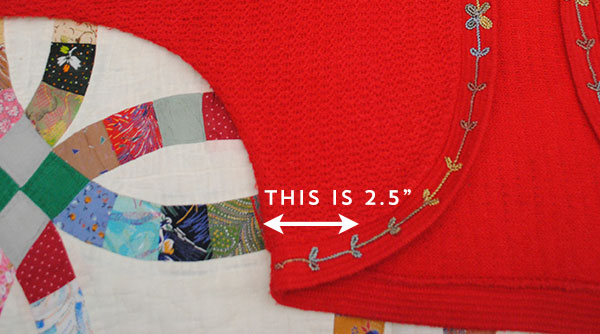
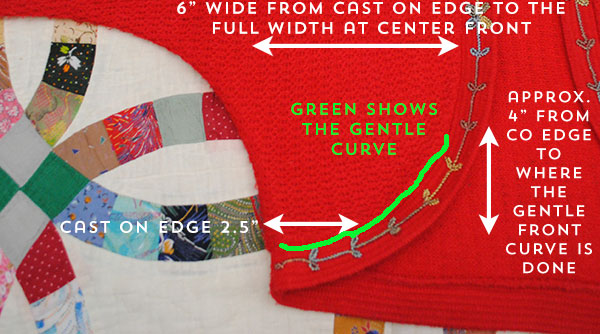
I laid the bolero flat and then took every measurement I could. Height, sleeve length, depth to where the sleeves started, width between the gap at the front (since it doesn’t close fully), how wide it was at the lower front edges. You name it, I measured it. Lots of numbers and arrows. On the actual bolero, it looks a little bit like this (although even more arrows than I showed):
Then I had to decide on a yarn and stitch pattern, so I could swatch first. Because if you don’t know your stitch and row gauge (and row gauge is really important for dolman sleeves as you can’t just knit longer to get the result or the shape will be different than you planned), you can’t plot out how to knit it.
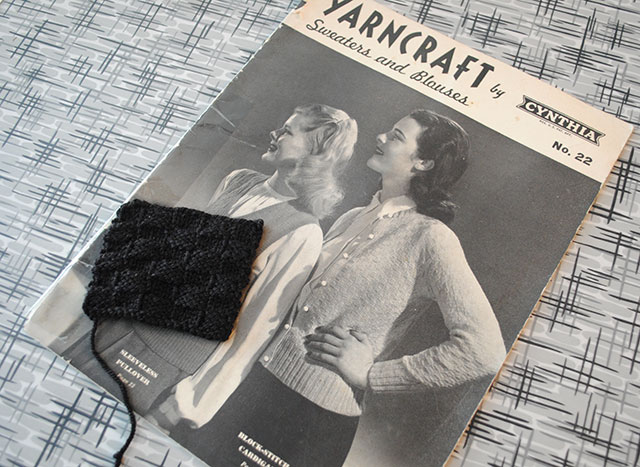
I really wanted a black bolero and I had more than enough black Sanguine Gryphon (now Verdant Gryphon) Bugga sock yarn in my stash (a merino, cashmere, nylon blend). But black… ugh. What a pain to knit with! I didn’t want to make it so complicated that I’d want to jump out a window with each new row. I needed something with a little bit of a texture but easy enough that (a) I wasn’t going to get lost knitting in dim evening light and (b) with all those increases, I would easily be able to maintain the stitch pattern.

I flipped through some vintage patterns and finally settled on a really simple basketweave stitch pattern: (k4, p4) for 4 rows, then switch to (p4, k4) for 4 rows. Repeat until the end. Easy to knit, a texture that can be seen in black yarn pretty well, and dead simple to keep the pattern while increasing and decreasing.

I washed and blocked my swatch, noted my stitch and row gauge, and then carried on building my pattern around those measurements. That worked out to be along the lines of this…


Those are just a couple of examples. The sleeve edge was a little messier to figure since I could tell it wasn’t just an “increase every other row X times” kind of thing (also confirmed by having looked at many dolman sleeve patterns over the years). So there was some every-other-row increasing, then a section where I CO 2 sts at the sleeve edge a number of times, then a section where I CO 4 sts at the sleeve edge a number of times to make the increases even more dramatic, and finally I CO a big ol’ number of stitches for the rest of the length of the sleeve after the dolman “gusset” (not really a gusset but kind of works that way).
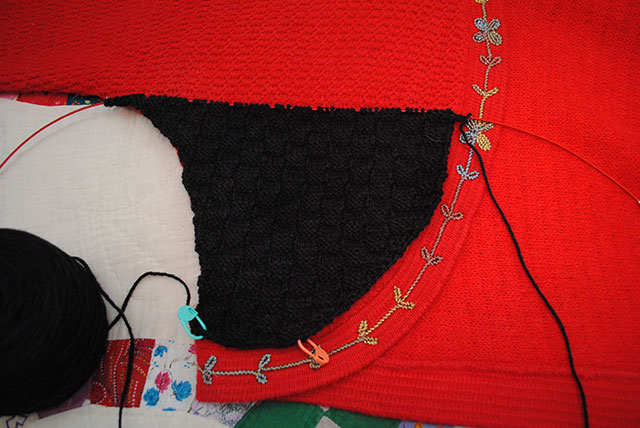
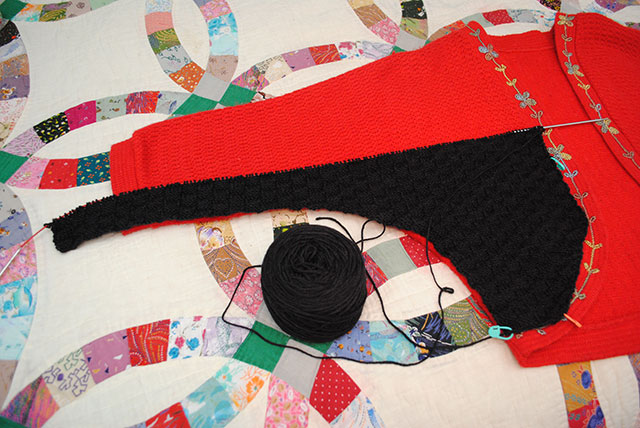
So onto the knitting! Sorry it’s so difficult to photograph bright red and black this close up, but you can tell my plan has been working:

I must say though, knitting different shaping on both the center front and side seam edges simultaneously isn’t for the faint of heart! Kind of like if you’re shaping the front of a sweater as well as, say, the waist or the armhole. But with such a small little piece of knitting I was constantly having to double-check if I was on the front or the back (caveat of a reversible stitch pattern). That’s why I have two different colored markers at the front edge—orange means center front, green means side seam.
I had to be really meticulous about keeping track of each row in two places, because I was increasing at different rates on both sides of the front. But once the center front edge was curved, it’s been a lot easier. If that sounds intimidating, you could easily have the front edge with no shaping (like the Quick Cover Up pattern), so the bottom edge would be squared, and is just as attractive! It just happened I was trying to recreate a bolero that curves at the bottom front.
So here’s where my knitting stands today, below. It progressed really fast at first but once I got to the full length of the sleeve, those rows are pretty slooow. And when I finish the right front, then do the left, and then join it all at the back of the neck, boy, those are really going to be some long rows! I even bought an extra long cable for my needles in preparation.

I’m not sure yet how I’ll finish the sleeve edges and the front edge. I’m contemplating doing a faced band and sewing on a ribbon or trim around the edge. I think the curve is gentle enough I’ll be able to steam a ribbon to shape without it getting too wrinkly (remains to be seen, though). What do you think?
Anyway, I often get asked how I plan to make changes for knitting projects. And obviously, I do it a lot. But honestly, it’s not really easy to give you a set of specific guidelines that I use. If it’s something you’d like to try, I thoroughly encourage you to add a sweater design book to your knitting library. The book I referenced above is out of print but there are many others that are extremely helpful (and probably less intimidating!), like Maggie Righetti’s Sweater Design in Plain English. Read, plan something out, put a lifeline in your knitting before you go off on uncharted territory, and you’ve got nothing to lose but ripping out some knitting and learning from your mistakes!
But, that all being said: I do enjoy sharing with you how I plot out knitting changes on specific projects. That’s why I did my 40s pullover project the fall before last, or a few years ago my Briar Rose knit-along. I find it much easier to show you with a specific project like those series, or like this bolero. So for those of you knitters out there, hope you’ve enjoyed today’s post!
Now, back to knitting in annoying, inky black yarn. Oh, for the love of knitting…