
Easy and Pretty Nail Art with Barielle Gentle Breeze Collection
**press sample/affiliate links**
Today, we are going to explore creating an easy and pretty nail art design featuring the Barielle Gentle Breeze Collection for Spring. As you all probably know, if you read here with any regularity, one of my beauty goals for 2015 is to do more nail art. And, if you read here with any regularity, you know that any nail art above rudimentary level is completely beyond my scope of ability. Gentle reader, mama isn't a talented creature. Just. Isn't.
But I like nail art and I enjoy doing it. So every now and again, I haul out my few supplies and I get down to decorating my nails. The last time I did nail art, I actually remembered to take a few pictures during the process and I thought that you might like to see a few of them. This isn't a tutorial, proper. It's just a few shots showing my process.
Let's get on with it, shall we?

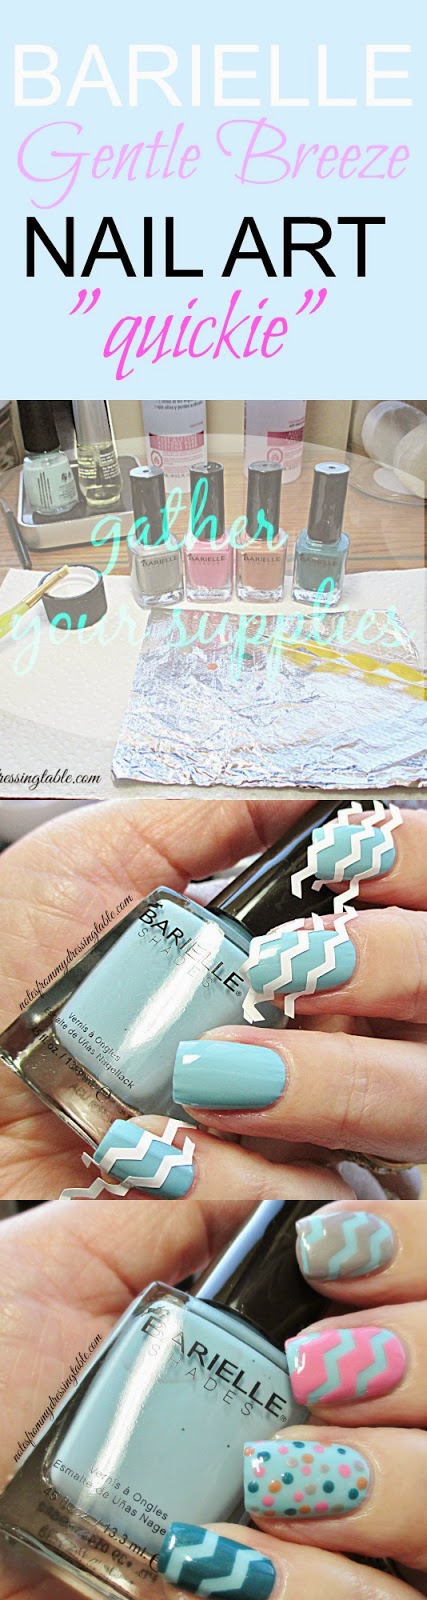
We begin by gathering our supplies. I did a simple combo design of ziz - zags and dots so I needed some things to help me make those patterns happen. For the zig -zags, I used chevron nail stickers and a tweezers.
For the dots, I needed a palette, of sorts on which I could put out dollops of polish. I just use small squares of hair foil. I have a big box of them, you can use a piece of scrap paper, a little paper plate... Whatever you have on hand.
Okay, this is morphing into a tutorial, isn't it? I can roll.
For painting the dots, you will need a dotting tool. You can also use a home made dotter; a toothpick, a glass head dressmaker's pin stuck into a pencil, a bobby pin straightened out... Again, whatever you have on hand that will paint dots will do the job. But if you want to do dotticures on a regular basis, why not treat yourself to some dotting tools? They're not expensive and nice to have. And not just for nails... Like to do crafy type things? Dotting tools will come in handy for those projects, too.
A little acetone safe vessel and brush for cleanup if you are so inclined. I use a lid salvaged from an empty acetone bottle and my ancient, busted cleanup brush.
To start, polish your nails a base colour. You can do all ten one colour, do accent nails, do ombre, whatever turns you on. Apply a fast dry top coat and let your polish dry for a good... Ten, fifteen minutes or so.


Once my nails had dried for about fifteen minutes, I started applying the chevron tape guides to paint my zig - zags. Pick one up from the end with tweezers, lay the tape on the back of your hand, really quickly to take down the tack a little then position it where you want it on your nail. try to line up the peaks and dips so that they are locked in with each other and try to get their spacing as even as possible. Gently but firmly smooth the tape down so that there are no gaps under which polish can run and ruin the clean line of your design.
I put the chevron tapes on three nails and left my ring nail free for dots. Once my tapes were down and secure, I polished over the tapes. Under the Sea on my pinkie, Pink Parasol on my middle and Grey Sky on my index, Champagne Bubbles on my thumb. I polished the first coat on each over the tapes. then left them to dry for a few minutes while I put out a drop of the pink polish on my foil palette and grabbed my dotting tool and dotted it randomly on my ring nail. Then I cleaned off my dotting tool and repeated with the other four polishes in the collection.
After I was finished dotting, I polished a second coat of the top colour on the taped nails, starting with my pinkie, as soon as I finished polishing that second coat, I used my tweezers to grab the end of a tape and immediately pull it off of my nail. Pull the tape up and back and quickly. It should come off cleanly. Remove any remaining tapes on that nail, then polish the next nail, remove the tapes and finish the other nails the same way. Do any cleanup you may need or want to do. Let your nail art dry for a few minutes to reduce the chance of smearing and top with a nice, thick coat of glossy, shiny, quick dry top coat. And sit back and admire your fancy-schmancy nails.
Kind of a tutorial. Kind of a story. Kind of a mess.

The finished product. What do you think? I'm pretty pleased. My chevrons weren't as perfectly lined up or spaced as I could have liked but I think I did a pretty good job, for a first time out with the chevron nail stickers. I love how well this collection works together and makes pretty nail art.
Do you think you will try this or something like it? Is there something not too devastatingly difficult that you think I should tackle next? I picked up some little tiny Solo Cups. No really! Mini red Solo Cups! I may get crazy and try water marbling.
Or maybe I'll just make a bunch of Jello shots with really good vodka. Ooo! Jello shots and water marbling!
Okay. I think I need to wrap this up, now.

**press sample/affiliate links**
More posts from Erika Costello