Chocolate Champagne Genoise


January clockwork. This time of year always seems to bring out the optimist in me. I am hopeful. No other word can describe it better. Hopeful.
2014 was a year filled to the brim. It was a year of baking and recipe testing and a whole lot of avoiding dirty dishes. It was the year I wrote a new book for you. I know it seems like forever ago when I first told you about it, and I'd considered keeping it a secret until closer to the release date, but ultimately I decided to spill the beans. I want you to know what I'm up to, especially when blog posts seem sparse. I would love to be the kind of blogger who can simultaneously write a book of recipes and also post blog recipes regularly, but I am not that person. It's slow and steady for me, and I'm learning to accept my inner tortoise. Now the finish line is in sight with a fall publish date for the book and I could not be more excited. It was certainly a year of hard work, and for that, I'm grateful beyond words.

I had trouble deciding what to make for the first blog post of the New Year, and I'd considered nearly a dozen recipes before settling on this one. My motto is, when in doubt - chocolate. Plus, genoise cake is something every baker and baking enthusiast should know how to make. If you're looking to expand your baking abilities in 2015, then this classic cake is a great place to start.
Genoise is a sponge cake that has no chemical leaven, and instead relies on the air whipped into eggs to give it rise as it bakes. The cake's dry spongy texture is made for soaking up delicious flavored syrups and it's sturdy enough for layering, so it's no surprise that this recipe is a common building block in patisserie.

This cake is often baked in a thin sheet or in a standard 9-inch round, but I decided to use a Savarin Mold.

I love how this pan makes cakes look like one big doughnut (note to self: make One Big Doughnut Cake).

What do you think of this cake with quills? I'd seen a similar cake in a bakery, and decided to make my own version at home. It reminds me a little of the winter treescapes right now - a whole lot of bare limbs jutting towards the sky. Chocolate sticks can be purchased online, but because this cake requires quite a lot of them, I made my own. It's not difficult, and if you have the tools, it's totally beginner friendly. Another great thing to learn in 2015 (if you haven't already) is how to temper chocolate. You can find my tutorial here with last year's Etsy post for Red Velvet Bonbons. But if you're not inclined to temper, then an excellent substitute is Ghirardelli Chocolate Melting Wafers.


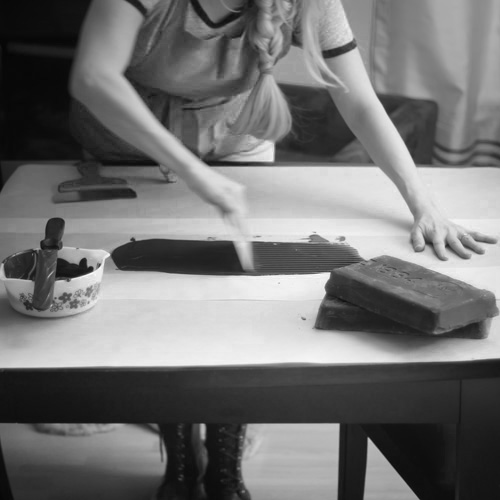
You can find the tools I use for making the chocolate sticks here. It's relatively inexpensive and the comb can be used to texture the edges of frosted cakes, too.

In the picture above, I've spread the chocolate to about 1/4-inch thickness, then run the pastry comb straight through it. You can tidy the edges by running the scraper across each end.

After the chocolate stands for a few minutes and the surface becomes matte, you can cut it into even lengths with the scraper. This particular scraper has a very flexible knife, which is important for removing the sticks from the paper. It glides underneath the sticks easily without breaking the thin pieces of chocolate.
-10.jpg)

This cake was given a generous soak of champagne syrup and then left to absorb overnight. This is an important step if you're using the chocolate sticks as decoration. If the genoise cake isn't properly saturated, then the chocolate sticks will not insert easily and because they are so thin, they'll break.
I really loved the flavor of sweet champagne syrup with chocolate cake. It tastes like a celebration. And with that, I'll bid you a very Happy New Year!
Chocolate Champagne Genoise Cake
(click for printable version)
Yields one 9-inch cake
Plan ahead, this cake needs to stand for at least 3 hours or preferably overnight.
Chocolate genoise 3 large eggs plus 3 large egg yolks, at room temperature 3/4 cup/150 g granulated sugar 1/8 tsp. salt 1/3 cup/40 g cake flour 1/3 cup/40 g cornstarch 1/4 cup/35 g unsweetened alkalized cocoa powder
Champagne syrup 1 cup/240 ml champagne or prosecco 1/2 cup/100 g granulated sugar
Decoration 10 ounces chocolate sticks (about 120 pieces) Unsweetened cocoa powder, for dusting
Preheat oven to 350°F. Grease and flour a 9-inch round baking pan or a 9 3/4-inch Savarin mold. In a heat-proof bowl (preferably stainless) beat together whole eggs, egg yolks, sugar and salt, using an electric hand mixer at high speed. Place bowl over pan of simmering water and continue beating with the electric mixer until the mixture is warm. Remove bowl from water. Continue to beat until mixture is cooled and increased in volume; this will take 5-7 minutes, and the batter should be thick and leave a trail when the beaters are lifted from the bowl.
Sift together cake flour, cornstarch and cocoa. Sift dry ingredients over the beaten egg mixture, gently folding with a rubber spatula. Pour batter in prepared pan. Bake for 30 minutes or until cake springs back when touched with finger. Cool in pan on wire rack for 10 minutes. Loosen edge with knife and invert cake onto a rack. Cool completely.
For the syrup, combine the champagne or prosecco and sugar in a small saucepan. Simmer over medium-high heat, stirring constantly, until the sugar is melted. Remove from heat and let cool until just warm, about 20 minutes.
Place the cake upside down on a large sheet of plastic wrap. Poke holes in the bottom of the cake using a fork. Using a pastry brush, liberally brush half the syrup all over the bottom of the cake. Turn the cake upright and brush with the remaining syrup. Be sure to use all the syrup so the cake is thoroughly saturated. Loosely wrap the cake in the plastic wrap, and then in a layer of aluminum foil and allow the cake to stand at least three hours or preferably overnight.
To decorate the cake, press the chocolate sticks into the cake at a 45 degree angle, beginning at the center. Do this gently, as chocolate sticks are fragile. Avoid holding the sticks in your hands as you decorate because they will become soft. Keep them on the counter top. Continue pressing more sticks into the cake, moving outward, until the entire cake is covered. Dust the cake with unsweet cocoa, if desired. Store the cake in the refrigerator, covered with plastic wrap, for up to 3 days.
Note: This cake is excellent brushed with Kirsch (cherry) syrup. Just replace the champagne with Kirsch liqueur and serve with whipped cream. Add a few Morello cherries and you've got Black Forest Cake.
Edit 1/6: Someone asked how this cake is sliced. If you cut between the chocolate pieces at an angle, you'll get a clean slice.
More posts from