This month, I am SO excited! In general, I avoid travel in January and February because planes and trains and cars and ice and snow are not a good mix! What I love about staying in town is that I have a lot more time to design and stitch... and this month I've been in heaven. I can't put enough exclamation points in my paragraphs!!! I'm going to show you a mix of a bunch of different quilts - some from the 2013 Houston International Quilt Association (IQA) quilt show, one favorite from this past year's quilt show, some quilts that my friends have been working on, how I do some machine quilting, and some that I have been working on. It has been a great month, despite enormous family challenges. I think quilting and friendship are all that has kept me sane. But enough about that - let's start looking at quilts! Grab your coffee... I thought I'd start doing shorter posts but I think this one turned out to be another really long one.
First of all, here are five quilts that were in the 2013 Houston IQA quilt show, in the exhibit called "In the American Tradition." I still have more 2013 and 2014 pictures to show you, but I'll dole them out slowly across my blogs. In the American Tradition celebrates vintage quilts - but quiltmakers often take the vintage designs and bring them into the current century.
Below is Texas Gold by Vickie Owen of San Antonio, Texas. Her quilt was based on an antique quilt she saw pictured in an old magazine. Vickie's first quilt, made over thirty years ago, was a Texas Lone Star. She says that it "wasn't too bad" but that her color choices have definitely changed over the years. She was excited when she saw the old quilt in an old magazine, as she loved the cheddar and navy combination of colors. She machine appliqued the setting blocks. Vickie believes that the Lone Star quilt design is one of the oldest and most recognizable designs - and hence, was most appropriate for a quilt made "in the American Tradition."

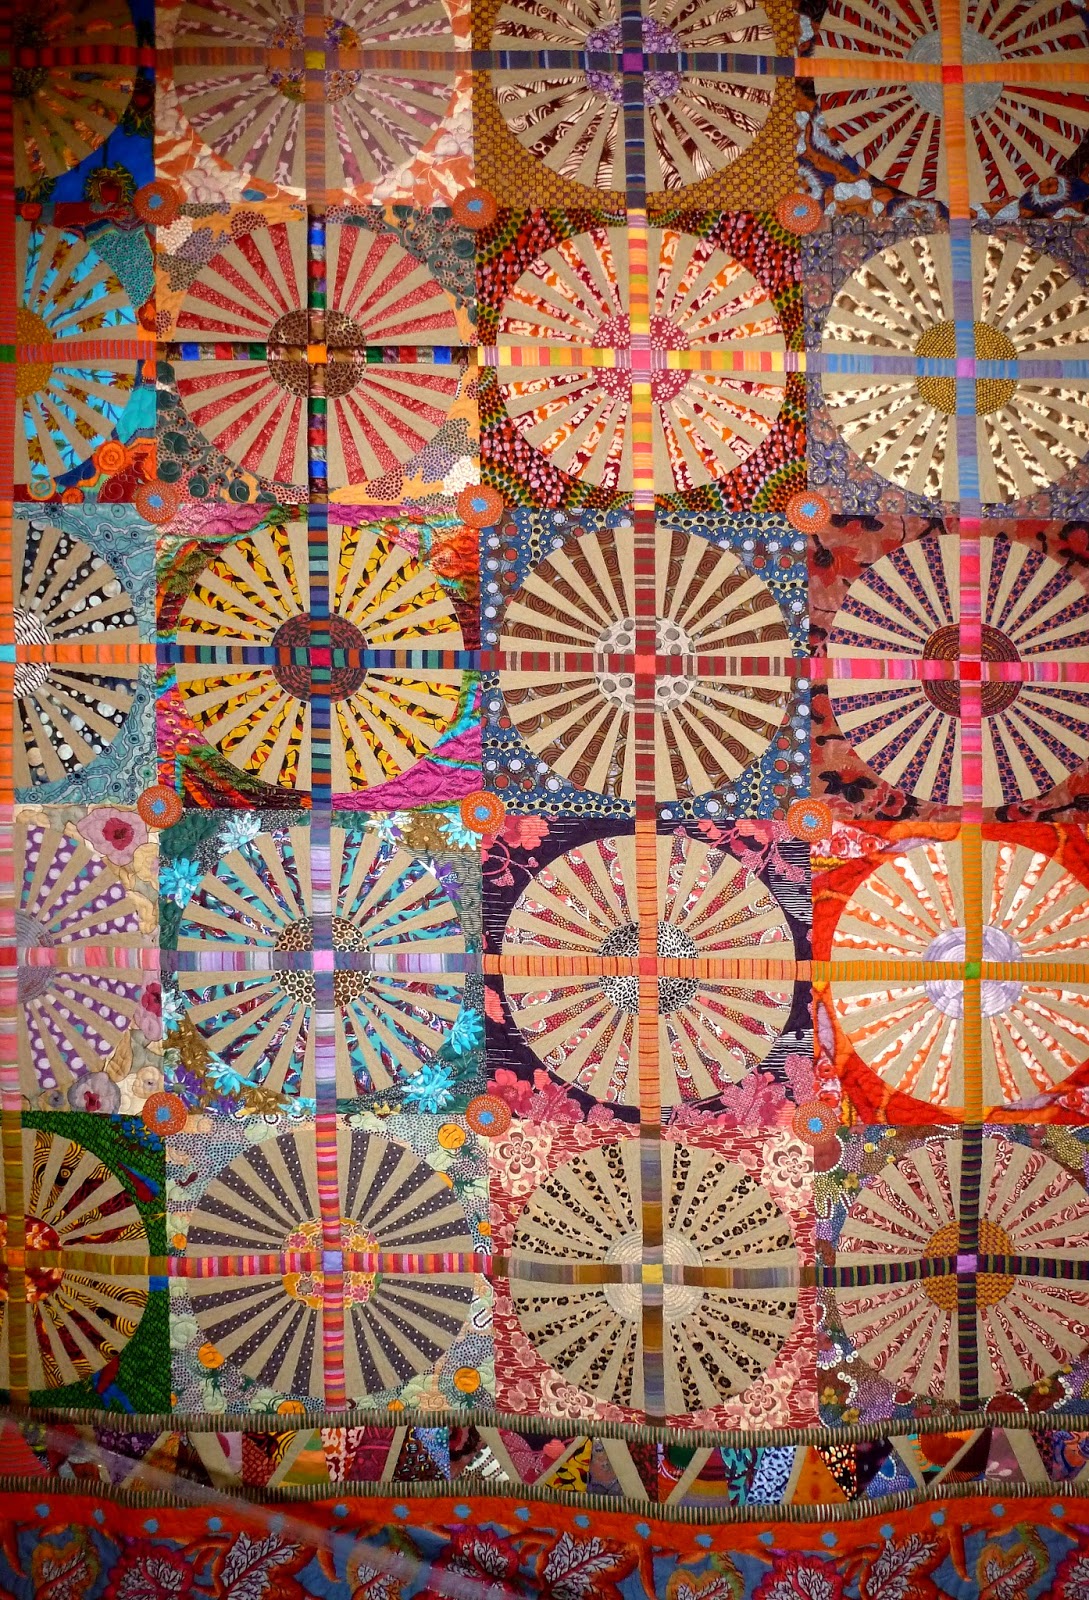
Dandelions was made by Kathleen McLaughlin of Groton, Connecticut, and quilted by Debbie Loeser. The quilt was hand-embroidered, hand-appliqued, and foundation-pieced. The orange circles used Texture Magic. The quilt was based on an antique fan block, and the border was one designed by Jill Hovel; it appeared in the Spring, 2002 issue of American Quilter. Kathleen's design came to her as she thought about what her daughter was thinking when, as a young child, she gleefully blew handfuls of dandelion seeds all over her dad's pristine green lawn. Kathleen chose the Fan block as the dandelion metaphor for the matrix of her quilt. The quilt was reinterpreted using contemporary and ethnic fabrics from Japan, India, Africa, Australia, and Indonesia. I apologize for not having a photo of the complete quilt, but sometimes my camera lets me down. I didn't want to ignore this delightful quilt, so bear with me!

Here is a close-up of a couple of the blocks in the quilt. Note the use of pattern and color - and the lovely quilting. Sometimes a quilt with so much color and pattern in it is extremely difficult to quilt.


Quilter Jo Ann Kilgore of Golden, Colorado made Flutter Garden. The applique is beautiful and nobody would have guessed that it was raw-edge fusible applique. For her In the American Tradition entry, Jo Ann wanted to make a lone star quilt that was surrounded by flowers. She saw a Jinny Beyer article in the McCall's May/June 2012 issue and used her method to create the center. Jo Ann likes butterflies... so she created them using flowers - I think that's pretty creative! Jo Ann says that her use of contemporary fabrics and colors brings the traditional quilts into the 21st century... and I have to agree!

Part of the beauty of this quilt is found in the wonderful quilting done by Jessica Jones Gamez. She complemented all of the applique with her own unique flair.

In The Compass Quilt, made by Kathleen McLaughlin of Groton Connecticut, and quilted by Debbie Loeser, you can find hand applique and foundation piecing, as well as trapunto and embroidery. Kathleen's quilt is based on the Muncy Compass pattern created by D. Grick, B. Neff, and J. Youngman. Kathleen says that, "Much historical research and contemplation went into finding the perfect pattern, until I stumbled on The Muncy Compass pattern. That challenged me to utilize some of the long-ago techniques I had learned as a beginning quilter, while at the same time remaining true to the simplicity of its design. I kept the areas of the design in the original 1855 quilt that were most appealing to me and I expanded on it to create a contemporary version of a lovely historical quilt." I don't know how true Kathleen's colors are to the original quilt, but it hardly matters - her quilt is a visual treat!

Here, you can see some of the work involved in making her quilt; she carefully placed a circle-on-a-circle between all of the compasses.

Chieko Shiraishi of Saitama-shi, Japan, created Irish Crochet Lace using hand applique and hand-crochet. Chieko loves both quilting and crocheting and here you can see that she effectively combined the two arts.

* * * * *
The next quilt was shown at the Houston quilt show this past year. Called The Four Founders, it was made by Gail Thomas of Vernon, British Columbia, Canada. This quilt was a wonderful tribute to the four women who founded the Houston IQA quilt show -- two sisters and two daughters: Karey Bresenhan, Nancy O'Bryant, Jewel Patterson, and Helen O'Bryant. Gail said, "This quilt was a joy to create. It was something I hope to complete to say I am grateful to the IQA founders.... Thank you for all you have done for the IQA family." Below, Gail is standing in front of her quilt.

And here is the photo that the quilt was based on. Gail sought permission to use this photo as the basis from her quilt; it took a couple of years... but we should all be so glad that she was persistent. In particular, Karey and Nancy should be thrilled... at the award ceremony preceding the opening of the Houston quilt show, Gail surprised them when she received her ribbon for this quilt: she GAVE the quilt to Karey and Nancy! It was such a wonderful surprise, and such an incredibly generous gift. But that says a lot about Gail and her rich and full heart. She is an angel.


You can see in this close-up that Gail used hand piecing - but also hand painting, hand applique, machine quilting, and hand embroidery.

The fabrics in the "quilt" pictured in the quilt were unique: Gail hand-painted the fabric with Angel fabric paint. Oh my - creating your own printed fabric? But Gail wanted to be true to the photograph.

Here's another close-up of the painted fabric. It is just wonderful how she has reproduced vintage fabric from the 1980s, when the photograph was taken. Gail is a very distinctive woman - she stands out in a crowd with her silvery curls, and her friendliness will charm your socks off. Gail rocks!

* * * * *
Now, I'll show you some pictures of what my friends have been working on. My guild has some of the most amazing quiltmakers in it (all guilds do, in fact) - and they inspire me to no end. I'm lucky in that many of the guild members are in bees, where I learn so much from their talents, valuable criticism, inputs, and more. So what are my friends working on? Below you can see Georgann Wrinkle finally finished an old quilt that had been sitting in her closet a long time. She is in the same UFO Club that I'm in, where we committed to finishing five unfinished objects (UFOs) over the next ten months. Our guild is already benefitting because we have seen a LOT more quilts in our show-and-share time at the guild meetings, with over 50 members signing up to finish five or more UFOs.

Here's a close-up of the block in Georgann's quilt. I remember when this quilt first came out and how I loved the mix of pattern and color in the design.

One of the things I miss in my "regular" quilt bees... is time to machine piece. Let's face it: most of our bees are set up to meet for a few hours, but never long enough (after show and share, eating, chatting, and setting up) to do some power sewing. So... I talked to some friends and now on a quarterly basis, I am hosting The Piece Core. We meet for two days of power sewing. I live in a big house and my dining room and entry hall are large enough to accommodate 8 people at long tables. Do you know how much sewing you can get done on a machine when you sew all day for two days straight? LOTS! Here was our first meeting, below.

At our first meeting, I stitched 26 blocks!!! You'll see them in next month's post -- this post got too long, but you can see my letter A on the corner of a table. All I have to do now is assemble the blocks.
Sharon Meyer, above on the left, was busy this past month and finished an Oak Leaf and Reel quilt top. This quilt is so beautiful - I wish I could capture the true colors of the fabrics; she made the quilt in rich, rich reds and a deep and rich olive green. Once the quilt is quilted, you'll see it again.

Sharon also made a Woods quilt using flannels. This will go to her grandson as a comfort quilt. She came over last week and quilted it on my longarm - she's a quick learner, and used a simple "groovy board" to put Baptist Fan quilting motifs across the quilt.

What is wonderful about this quilt is that it was quick and easy to put together - and is very masculine. Her grand son will no doubt love it.

I must confess... I can't remember who made this quilt and showed it at one of our bees. So until whoever you are comes forth... I'll just say I love triple-four-patch blocks! They are great exchange blocks, as you get lots of variety in colors when you swap them with friends.

Here's a close-up of the blocks -- the four-patches are strip-pieced with each little square finishing at 3/4 inches. The light color is a shirting in all the blocks in this quilt.

And... again... I can't remember whose quilt this was! I believe it's a Karen Stone pattern but I'm not even sure about that.

And here's another anonymous block - it is beautiful in my eyes - because I absolutely love cheddar-colored fabrics and civil war fabrics.

Jerrianne was busy working on her New York Beauty quilt. She had most of the cornerstone piecing done, as seen below.


She was also working on the quadrants of the New York Beauty block. This is a quilt I never get tired of seeing.


And I'm not sure, but I think this might be one of Becky's little quilts. At her guild, they make little quilts, put them in old jars, and sell them as "Jar Quilts." It's a good fund raiser and repurposes scraps and jars, both.

Jerrianne was also working on double nine-patch blocks. She's going to use these to set a bunch of small oak leaf and reel blocks that she's making in red and green fabrics.

Jerrianne is a perfect piecer. Look at the back of her block. I mean...how do you get this good?!! I'm certainly not! But I guess I could be if I measured, cut, pressed, and stitched with more care!


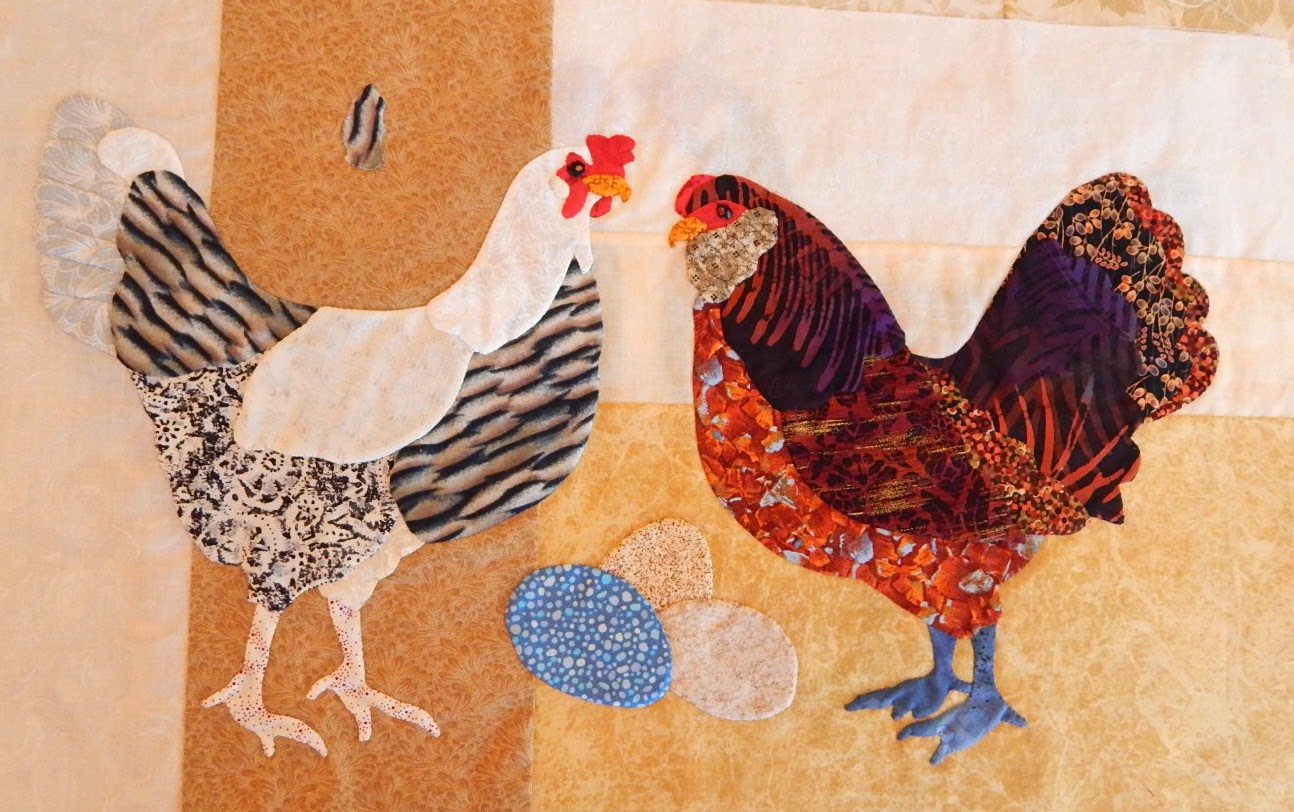
Marsha inherited a set of chicken blocks from a dear friend that passed away last year. Feast your eyes on these...


I put a close-up of the above chicken here so you can see the wonderful fabric choices in these blocks!


At another bee, my friend Helen showed all of us a label she had made for her grandson's quilt. She had done it, using her printer. But oops... it bled when it got wet.

So she went back to the drawing board and re-made the label using a blue Pigman pen. Oops... it bled, too!


And look at the small print on the pen! This just goes to show that we need to test our products when we use them. Helen said the pen bled even when she set the ink with a hot iron. I had heard that some black Pigma pens bleed but I've never seen it. I guess I need to check things a little more closely when I'm using any products with fluids like pens and markers....

But what, in the midst of all these quilts my friends have been working on, have I been working on? Here's a clue: a corner swag.

But I worked on a lot more this month. I finished up my Cowboy Quilt. You've seen this quilt (or one like it, I should say) before. Last year, my friend Becky Stephenson made one for my guild's auction and I quilted it for her -- you can see pictures of how to quilt a "rope" motif if you check out the March 2014 blog post. My friend Sharon Meyer and I fell in love with Becky's quilt - Sharon wanted to make one for her ranch in Bandera, Texas, and I wanted to make one for my daughter's ranch outside of Columbus, Texas. After all, nothing says Texas like a cowboy quilt does! So... we hunted down the blocks, which are based on paintings by Lynn Brown. We found them at the Prairie Girls Quilt Shop: http://www.e-prairiegirls.com/ and we each bought a set of the blocks. Next, Sharon and I hit the local quilt shop together, planning the fabrics we wanted to use in our own quilts. We differed a bit - which just makes it all that much more fun. Sharon is not a longarm quilter... and I am always short on time... so we cut a deal: she pieced my quilt and I quilted her quilt.
First, here is the quilt I quilted for Becky last year. Note that the outer border is quilted with feathers and cables - and that the cowboy blocks are quilted with large cross hatching. I changed those quilt motifs when I did my own quilt.

Here's Sharon's quilt - before it was quilted. I love the fabric she chose for her border - it has the red dun horse color in the batik print, which pulls it all together.


I have a picture of Sharon's quilted quilt... but I can only say it is stored someplace very safe. And unfindable. In the meantime, here is my quilt. I quilted my border and the blocks a bit differently than Becky's quilt; I did a rope border with piano keys, and in the blocks, I just did wavy lines and outlined all the cowboys and horses and cattle.

Here's the back of the quilt. I don't know why I'm including it - I just thought it was pretty! I didn't have enough of the Texas toile for the entire quilt back, so I carried the border fabric over to the back.


In this picture, you can see the quilt templates I dug out of my box to use for the block frame and the sashing strips.

How do I mark my quilt when using templates? I use a pounce pad - it's got chalk in it and I just bounce it a bit atop the template and it makes the marks on the fabric.

I used diamonds (squares on point) in the block frame. In Sharon's quilt, I changed it up a bit and I did just some geometric straight lines. I really like the look on her quilt better. Too bad the pictures are hiding from me right now!


It took me about 12 hours to quilt the whole quilt. It's kind of hard to justify hand quilting when the machine quilting is so pretty AND quick!

The rope border I used in the sashing is different than the rope I used in the outer border. Here's the sashing rope...

And here's the rope I put in my border with the piano key lines behind it. I love how this looks, though one might argue that it looks more nautical than western. But I like it no matter what!


I like them both!
It was interesting... while I was quilting these quilts, a box came to my front door. In it was my Barrel Racer quilt. It had been on tour around the country for a year and a half... and yes, I really MISSED this quilt! It's one of my favorites. My niece is a wonderful barrel racer with the prettiest horse.

I love the movement in the quilt - I don't know how I did it but someday I want to make another rodeo quilt. Batiks are just incredible when you're making a realistic pictorial quilt.

* * * * *
The past few weeks, I've been under some pressure to move all my quilts out of my storage room and into another room. I had some renovations done in my house that required the swap... and the only good thing (because it was otherwise just a LOT of work!) was that I got to see some of my quilts that had been hiding in the stack of 150 quilts for a long time. Here's a pictorial quilt of my grand daughter, Dahlia. Several years ago, my guild had a challenge to make a quilt with "fruit" in it and this was my offering. I had taken a picture of Dahlia down at the beach, carrying a bucket of shells and I used that picture as the structure for a girl holding a bucket of apples.

Dahlia was only about 3 years old at the time - she's a young lady of ten now. But she's still the apple of my eye... along with three other grandkids.


Here's another quilt that was buried in the stack. I was a Girl Scout leader for 7 years, and was inspired at some point to make this quilt. I don't even think any of my friends have ever seen this quilt! The poem around the outside was a round that our troop sang all the time.

I think my favorite part of this quilt is the dolly the girl is holding. What girl didn't have a Raggedy Ann when she was growing up? Well, come to think of it, my grand kids haven't had one... times are different now, aren't they?

Now - do you remember the picture of the swag I showed you a bit ago? It was part of this quilt, below. Originally, I was going to set the blocks in this quilt with sashing strips that had two rows of flying geese. But... after I did one sashing strip that way, I changed my mind. It was pretty, for sure, but it didn't captivate me enough to continue. So... I changed up the layout COMPLETELY. I decided that I would put a lot of pretty quilting in this quilt and leave it with a lot of open areas. The Lemoyne Star cornerstones were a last-minute choice but I love how they turned out. In case you think you've seen this quilt before... you haven't, really. But you've seen SOME of the blocks before. The same blocks were used in my Simply Baltimore quilt - the blocks are twins, though I had to modify some of them (e.g., the harp, cherry wreath, and basket blocks) so that they coule be put in a straight-set layout instead of my Simply Baltimore on-point layout. Which one do I like better? I like them both - I can't play favorites with these twins!


Quickly, I'll give you a little eye candy with a run-through of the blocks in my new quilt, which is called "Baltimore Squared." I have to work on the pattern - it should be done in a few weeks.


What I love about this quilt is that it is VERY doable - a confident beginner could tackle this and not feel completely overwhelmed. The swag border is a fun-looking border on this quilt - so dainty and cheerful. And the Lemoyne Stars are paper-pieced.

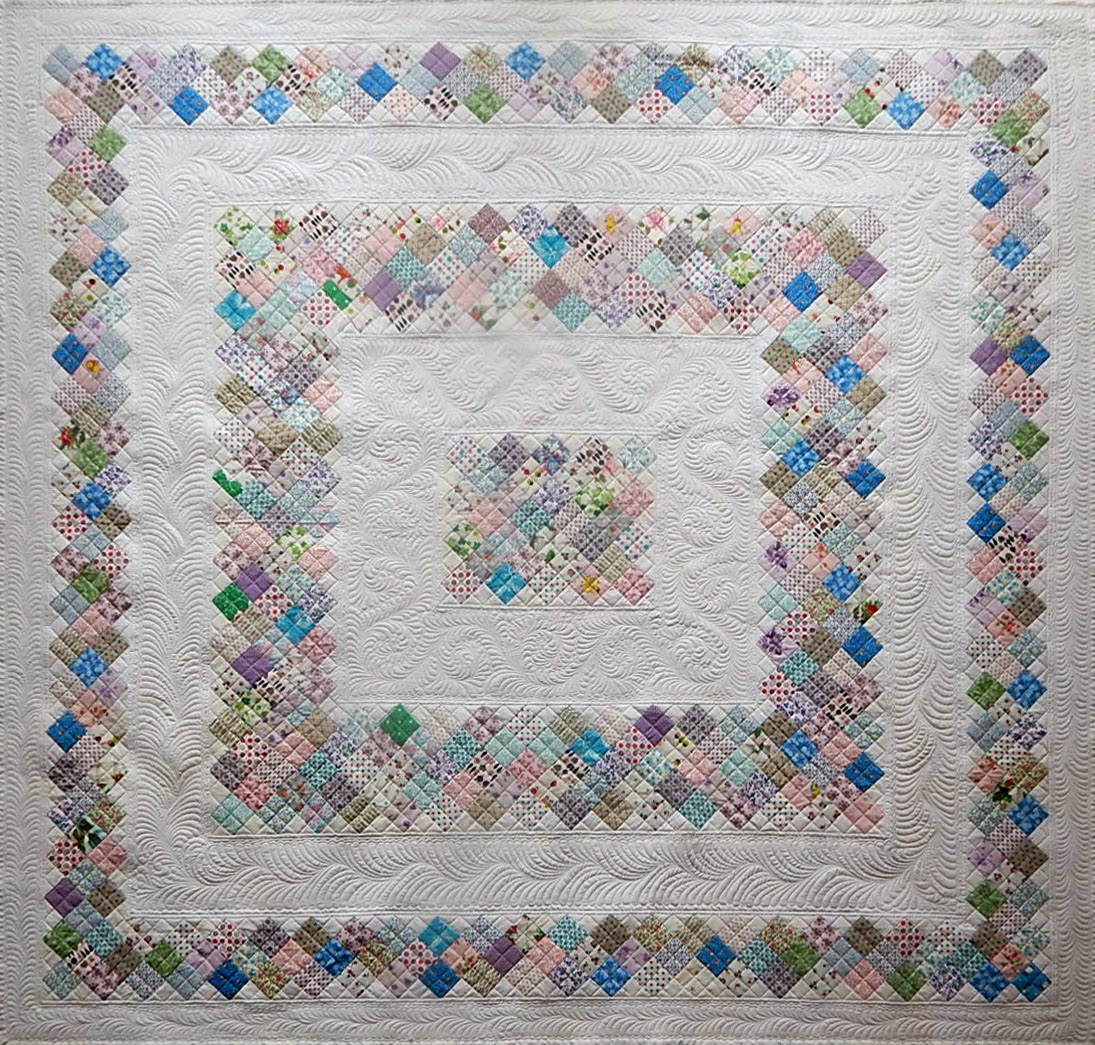
Now I'll show you another quilt that I spent several days quilting. I bought a quilt top on eBay several years ago, thinking that it would be a good one to practice long arm quilting on. When I did the room swapping at my house, I ended up with a great place to hang a quilt rack with a quilt on it... and this quilt seemed to be the perfect quilt. Here's the finished quilt (almost - it still needs binding).

I fell in love with this quilt when I started quilting it. The design is incredibly simple - just 2-1/2" squares set on point/chained together, making frames around the quilt. The outer border on the old quilt was uneven -- about 4" wide on the long sides and 10" wide on the short ends. I decided to make all the borders the same size, so the first thing I did was to run a stitch line around the entire quilt to indicate where the edge of the quilt would be. That helps keep my borders from wobbling all over the place. Below, you can see that I tried one line, didn't like it, and stitched another line, which I've marked with a pencil (an arrow points to "cutting line").

So here is the first border I quilted - a meandering feathered vine - and the second border - the 2-1/2" squares with cross hatching across them. Honestly, quilting does not get much easier than this!

But once I finished the first feathered vine border and the cross-hatching on the squares in those two borders, the next "empty" border was ahead of me... and it had a LOT of ripples in it. Hmmm... should I be worried?

Not in the least! I marked another meandering feathered border line and started putting feathers on it, one side at a time. The beauty of feathers when you have ripples or unevenness in a quilt, is that your feathers can go out and "capture" that unevenness and take away the ripples. You can see below that the ripples have already been subdued on one half of that wide border.

And now, below, you can see that the other side of the border has been quilted and the feathers have each similarly captured and subdued al those ripples. Yippee!!!

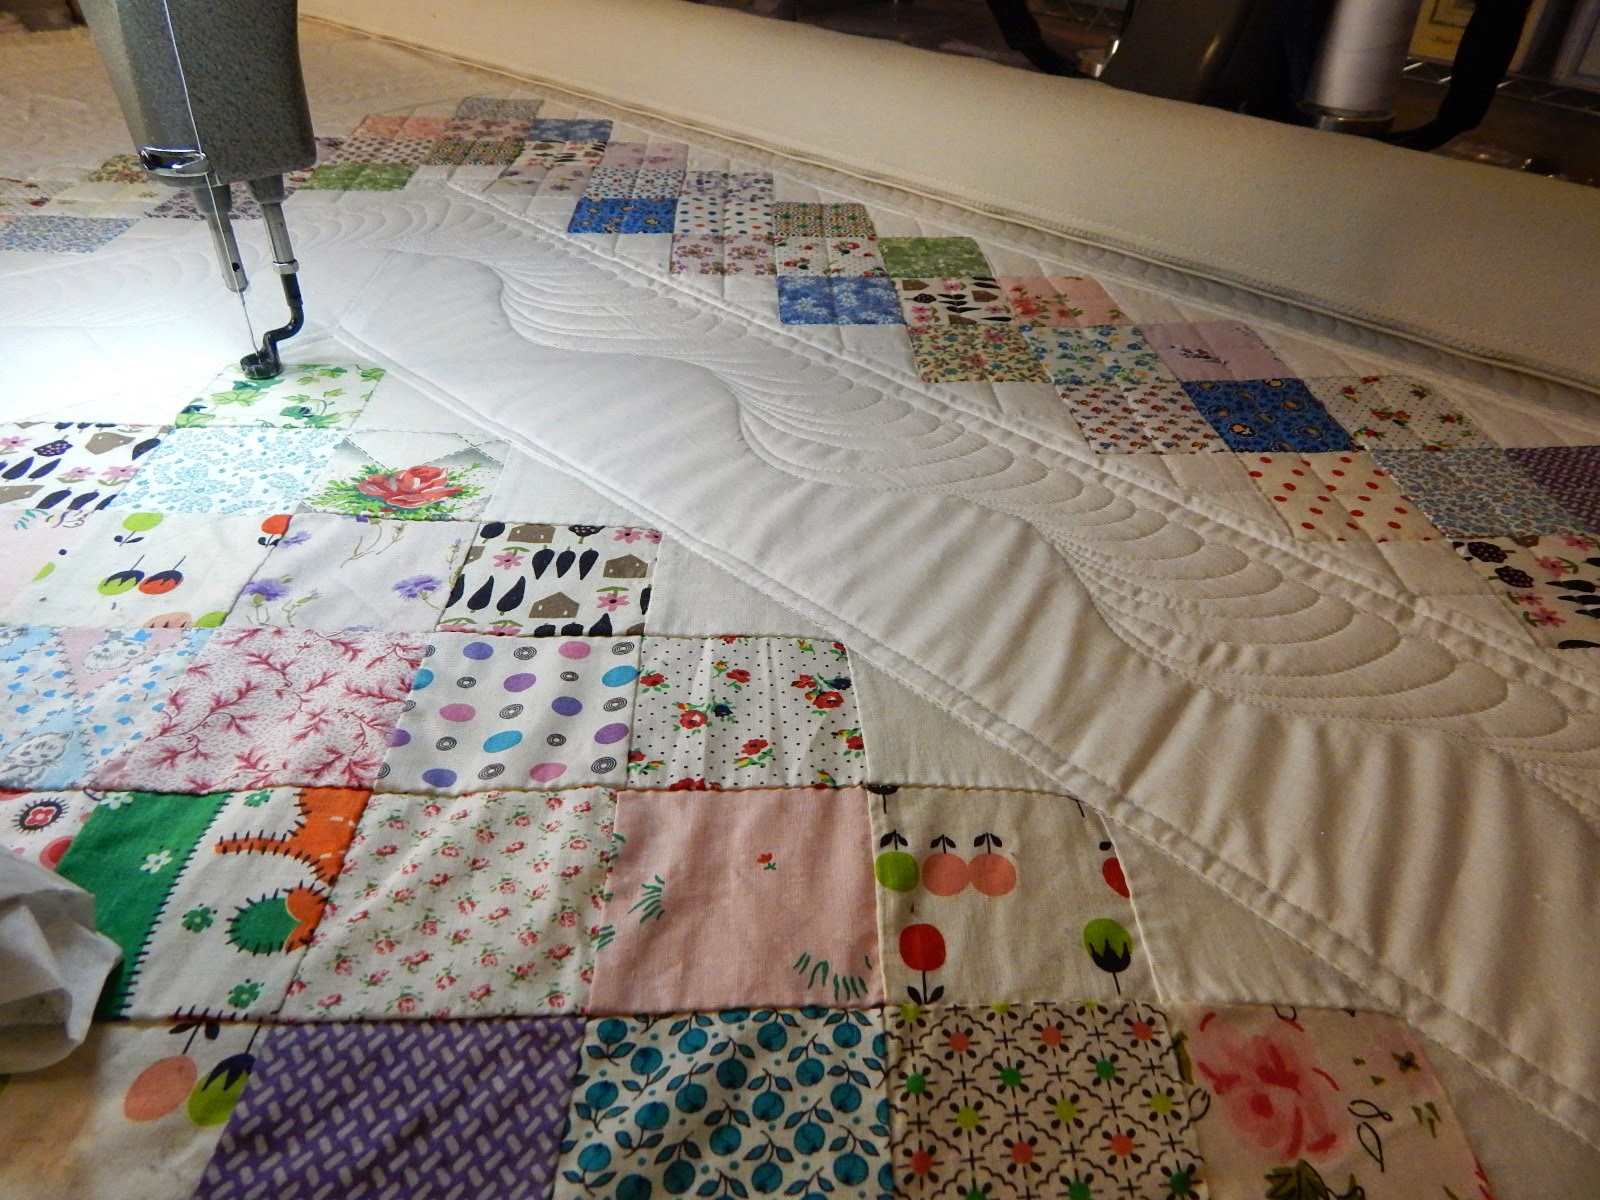
The next border to be quilted is a wider border of 2-1/2" patches. Easy, peasy... just cross-hatch across them all.

And voile - the cross-hatching is done! I like how the cross-hatching makes the simple patchwork squares look more complex. But wait... do I have the same issue facing me... more ripples and an even WIDER border to put a feathered vine on? Hmmm... what's the plan NOW?

First of all, my thought is that putting a meandering feathered vine in that border presents a problem. The feathers are going to be enormously long... which I didn't think would give good results. In fact, the feathers might even look creepy when the feathers look like long skinny fingers. What's a gal to do?

I decided that I needed to do more than a simple meandering feathered vine... I needed to do an old and gorgeous Amish meandering feathered vine. Those vines wander up and down with their hills and valleys, but they have splits that come back to fill the valleys. Below, you can see that I started to do the Amish vines... based on a penciled-in stem line that I drew. You can barely see it in this photo below.

Here, I've drawn dashed lines so you can see where this Amish vine is going. Now is it starting to make sense?

How do I know what size to make those stem lines? Well... find something circular (a roll of tape, a saucer, a glass...) that fits across your border. You want it to be small enough that you can make feathers on both sides of the circle (inside and outside). If you have to squish the feathers, the circle is too big to use. Here's my roll of tape sitting on the border.


I mark my border with a pencil but sometimes the pencil lines are darker than I want. I use a Staedtler Mars Plastic eraser (get them at an office supply store - sometimes with pencils/erasers and sometimes with the drafting supplies) for a couple bucks. These are the BEST fabric erasers EVER. Once I erase any lines that show up after the quilting, I use a lint roller to pick up the eraser bits.

I use a simple and inexpensive pencil. Nothing fancy. Tip: always use a very light hand when marking with a pencil! If you mark too dark, erase a bit before you do your quilting, as it is really hard to erase pencil after you've quilted across a bunch of lines. Below you can see that I've quilted the border... except I still need to finish part of it on the left.


One thing I like to do on the outer edge of feathered vines is to add a little outline. This fancies up the feathers a bit and gives them a sense of grace... and also removes any of the unevenness of the feathers. You can see below that some of my feathers are higher and some are lower. The outline evens them all out. Love it!

So now that the Amish vines are done... I just have the center to cross-hatch, which I have done below.

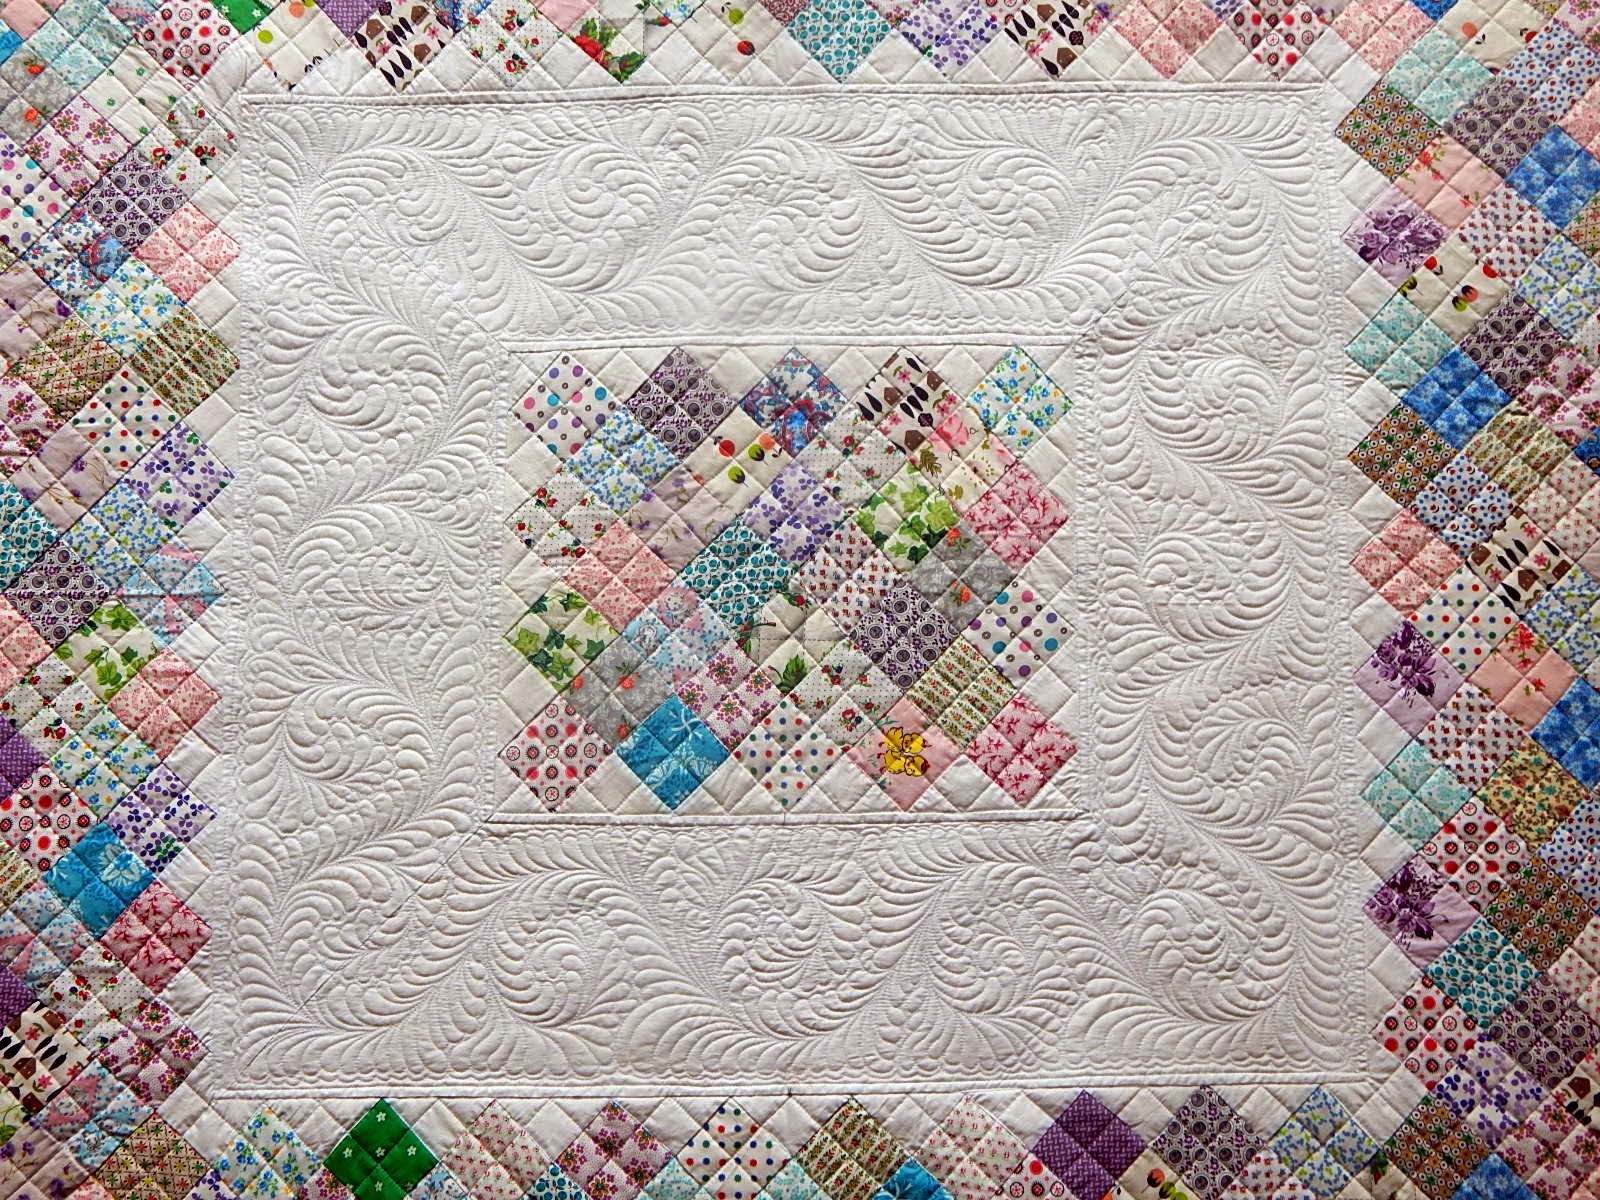
I just LOVE the simplicity of this quilt! The borders are all different sizes... and beautiful in their own simplicity.


And here's the front... before I trimmed it down to size. It's just like I like it: flat as a pancake after it's been quilted.

And here it is, trimmed to size. The maker of this quilt used almost 50 different fabrics. I think I need to make a pattern for this quilt -- it's a great utility quilt. Or perfect for a guild auction. Or more than perfect for my guest bedroom wall. Yes... that's where it will be hung once the binding is done!

Now some of your are pretty doggone smart but you're still thinking: how did she do those Amish feathered vines? I'm going to assume (rightly or wrongly...) that you can do feathers. It's the stem line you want to know about. Here's a simple tutorial for you. The Amish vine is SO simple to do!


Note: if you are working with a longer or a shorter border, you will add more or fewer circles, as required. Similarly, your circles may be bigger or smaller - but you want to make them a size that leaves you enough room to quilt feathers inside and outside of the circle.


Then add the feathers.... and you'll be all set. If your border is longer or shorter, add or subtract circles. Then quilt away! I adjust the size of my feathers to fill the entire border - just make them longer or shorter as needed.

* * * * *
On a sad note, because I love teaching and meeting other quilters, I have decided to limit my travels for lectures and workshops in the future. I have become the default caregiver for three people in my family, so my time has become extremely limited. As such, I will finish out this year's travel (twice a month, every month) and next year's (once a month)... and not make many commitments beyond that for a while. I need to see how life plays out - things could get easier... or not. The only other thing I'll say about all of this is that I am ever thankful for the friendships and blessings that have come my way.

In the meantime, however, I thought I'd let you know that by mid-March, you can sign up for a couple of workshops at Applique Away on Galveston Bay where I'll be teaching two workshops next February: Red Twirly Balls (a fun appliqued spiral block quilt) and a Baltimore album block called Love Birds. Above is a group picture from this year's set of workshops; I went to their banquet earlier this week and all of the students were clearly having a wonderful time! Check them out at http://www.appliqueawayongalvestonbay.com/ - they will have the 2016 classes listed by mid-March.
I will also be teaching a more complex Baltimore applique block at the Empty Spools Seminar out in Asilomar, California, in April of 2016. At that retreat, you have five luxurious days of stitching on a single project; you can actually make progress instead of just "starting" something and going home! They will list classes later this year and I'll let you know when. And you can always check my website (www.comequilt.com) calendar.
I am more than certain that I have left out many, many things that I wanted to include in this month's post. Here are a few, though, that I really MUST share before I close:
- Stephanie Leuthesser finished her Ladies of the Sea quilt and sent it to Margaret Gunn for quilting. Oh my goodness... it is too unbelievable to describe. You can check it out, yourself, by going here: http://www.quiltsoflove.blogspot.com/2015/02/much-awaited-reveal-of-ladies-of-sea.html. While you're there, check out the other lovely quilts that Margaret has made. Stephanie did a beautiful job making her quilt and spent months trying to find the right quilter, and one that would take her quilt and do it justice. Stephanie's husband was on a NOAA ship during the Vietnam era and saw Tahiti, Galapagos, Easter Island, etc. and loved being at see. They retired and bought a boat and have cruised over 24,000 nautical miles so far - from Alaska to Hualtulco Mexico. Stephanie hung her first quilt on the wall and her engineer husband said, "I don't like quilts on the wall. They aren't straight enough. Can't you stretch them over a wood frame?" She was crushed, as quilting is all she does since she retired. But then, she saw Ladies and started working on it. He nagged her and nagged her until it was finished. It was his idea to hang it from a harpoon. You must go see her quilt in the blog, above!
- Kerry, a Canadian quilter who has a wonderful blog called Simple Bird Applique, just finished Friends of Baltimore. I have watcher her (through her blog) making this quilt for quite some time... and her quilt is stunning! You can check it out here: http://simplebirdapplique.com/2015/02/13/finished-2/. Her choice of blue for the half-square triangle sashing is very striking - I love it! I can't wait to see this quilt quilted.
- On Friday, I helped judge the quilts in the West Houston Quilter's Guild. If you're near Houston on March 6 or 7, check out their quilt show. You can get more information from their website: http://www.whqg.org/2015whqgquiltshow.htm. As a plus (I hope), you can also see some of my quilts there, as they invited me to be their featured artist this year. I hope I see some of you - I'll be going back to see the quilts all hanging, on Saturday. I'll definitely have my camera with me - and so those of you who can't make it to the show will still get to see some of the quilts.
Until next month... happy quilting!
Sue Garman
(c)2015 Susan H. Garman
www.comequilt.com

More posts from