
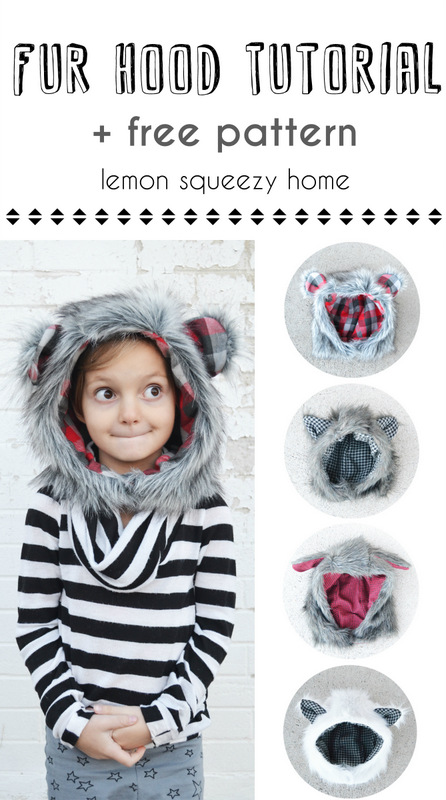
Faux Fur Hood Tutorial + Free Pattern in 6 Sizes!

update: *for anyone who downloaded the pattern before 11/18/2014, please disregard the sizing and click HERE (aff link) for the correct sizing. It was a pattern from an earlier stage and though the pattern did not change, the sizing labels did. I simply uploaded the earlier pattern instead of the finalized one. Hopefully the sizing in this tutorial helped you to choose the correct size already. Thanks!*
I’ve been really looking forward to posting this! A few weeks ago I decided I wanted to make a pattern for a faux fur hood, with ears.

I drew up some patterns for the Fur Hood, not really knowing what I was doing as far as grading the pattern, but doing the best I could and the pattern worked. I spent a few hours doing this, even color coding my patterns. I have to give a huge shout-out here because I was going to just settle for a hand-drawn pattern until Adrianna (Hey June Patterns and Crafterhours blog) was amazing and said she would digitize them for me! She’s one cool chica.


Because noggins come in all sorts of shapes and sizes, I wanted each size to fit generously so a wide range of heads could wear it ;). I like that if you choose a larger size, the bigger hoods protect their cute faces from the wind and cold better. I asked Bailey (my 6 year old) if she preferred a snug fit after trying on a size Small, or if she preferred size Medium. She prefers to wear the Medium because she likes to cover her face with it when she is cold and even hide her face in it. And I think it's pretty fun that the sizing can work from a baby clear up to a grown-up. But of course it all comes down to personal preference, which we will go into more detail than you ever wanted to in a second.

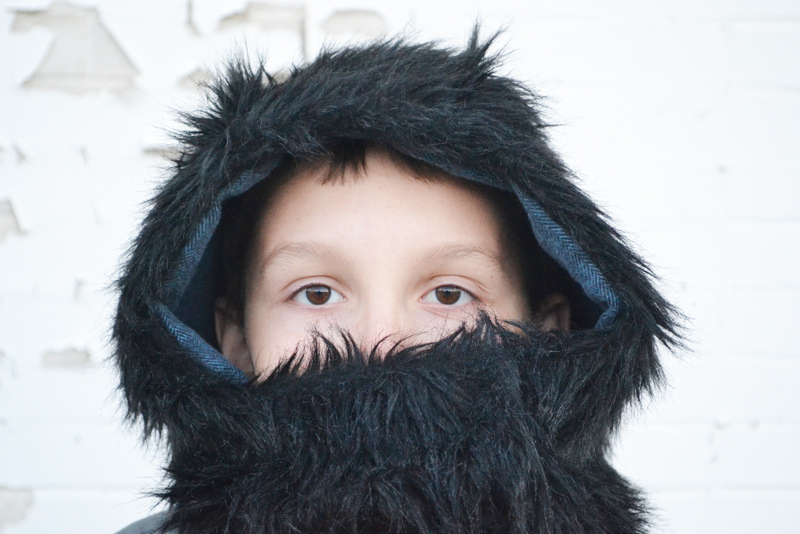
If she wants to see better, the hood can easily slide back on the head and allow for better vision—Bailey will switch hers back and forth. When she’s cold she pulls it forward and when she’s doing stuff, she will let it rest further back on her head. And if she doesn’t want it on her head, it’s so great with the snap at the neck...it turns it into hood that still warms the neck.


Let’s compare sizes on my kids and talk about how you might like to choose the size to make. My kids have slightly smaller than average head circumference. They all fall in the 30%-40% for their head circumference.
Here are Bailey (age 6) and Ruby (age 1 1/2 but she’s like the 20% for head circumference) wearing the same hood—the size XS.


You can see that it's nice and loose and roomy on Ruby, and a nice snug fit on Bailey. Either way it's great!
Here are Devon (age 9) and Bailey (age 6) wearing the same hood—the size Medium.

It's a bit big on Bailey but the fit is pretty good on Devon.
The largest two sizes will likely fit any teenager or adult. I made Devon (age 9) the XL and though big, he also loves having the extra room. But I would probably make him the Large next time.


And lastly, here is Carson (age 11) wearing his own version he wanted—because he is too cool for cute bear/wolf/dog ears, or something. So a furry ninja was requested. You can just skip the ears and the extra cutting on the fur pattern pieces and just use the lining pattern pieces for teenagers and adults.

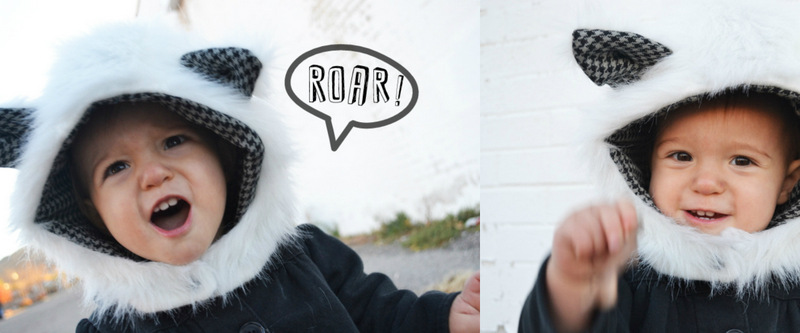
My kids are thrilled with them. Ruby typically hates anything on her head—hoods, hats, etc. But these, she comes running to us and barks like a dog, letting us know she would like to wear it NOW! Ruby is wearing the size XXS in the picture below. Tighter fit but I prefer the looser look the size XS gives her.

Moral of the story? If you are afraid the size you are looking at will be too big, then size down. And if you want an even snugger fit, size down two sizes. **I strongly encourage making a muslin with some scrap fabric. No need to make the entire hood. Just cut out the lining pattern and sew it up (seriously, it would take maybe 10 minutes total) and try it on a human and see what you think. Loosely speaking, I think this is what will fit whom, but ultimately it is up to head size and preference:
XXS: 6-12 months loosely, 1 to maybe 2 years more snug
XS: 1-2 loosely, 3-4 more snug
S: 3-4 loosely, 5-6 more snug
M: 5-6 loosely, 7-8 more snug
L: 7-8 loosely, 9-10 more snug
XL: 9-10 loosely, teen on up to adult more snug
I hope that all helps explain the sizing efficiently! Whoosh! That was long-winded!

And really, it’s just so cute no matter how you decide to make the fit. I love these hoods! And the best part is that my kids LOVE LOVE LOVE them and were so excited when I’d complete a hood for them. They haven’t had such a response on things I've sewn for them in months ;). Always makes me feel so good to sew for pleased recipients!

Ok, bases covered. Let’s sew! These come together from cutting to finish in less than an hour, in my opinion. I’m down to 45 minutes on mine after sewing up a few.
What you will need:
-the pattern pieces—you can get the free download for the pattern HERE (aff link). This picture shows the layout of the pattern pieces:

-1/2 yard of faux fur fabric (it is wide so a 1/2 yard will be plenty. You can get away with a 1/3 yard for the smallest 2 sizes) **I much preferred the faux fur that did not hold is shape. The white fur hat Ruby is wearing is much stiffer than the other fur, so it doesn't drape and look as cute to me. So choose a nice soft faux fur that is able to drape well and move around for the best look.

-1/2-3/4 yard flannel or other lining fabric, like cotton. You can squeeze the whole pattern out of a 1/2 yard, HOWEVER, you will have to cut the center hood strip NOT on the fold if you do this—see left picture below. Just remember to add 1/2” seam allowance on the pieces you cut if you only had 1/2 yard for the lining.
-two 2” squares of iron on interfacing.
-two 2” squares of iron on interfacing.

-KAM snaps (aff link), Velcro, button...any of these that you will want to use as a closure under the neck.
-SEAM ALLOWANCES ARE 1/2” FOR THE ENTIRE PROJECT, and that includes the ears. I wanted larger seams because sewing with fur adds bulk and I wanted to make sure that your fabric didn’t shift too much with a smaller seam allowance.
A word (er..words) about the ears—have fun and experiment! If you think they are too big or not big enough, just choose one and test out the different sizes to make sure you love them! The wolf ear could also be a cat, or a different kind of dog. The bear ear is adorable but maybe you want a baby bear and they aren't small enough. The puppy ears could double as bunny ears if you sew them on differently. All are super cute. The seam allowance is 1/2" on the ears as well, so you can even mess with the seam allowance to get what you are going for.

OK! Print off that pretty pattern and cut out the size pattern you want. You'll notice the hood pattern pieces say mirrored pair. Just make sure you aren't cutting two pieces identical--you need to either fold your pattern and cut double layers, or on the fur (since two layers is iffy when cutting), cut your pattern on one side, then flip the pattern OR the fabric and cut out the other side.

Now here’s where you need a warning: Cutting all that faux fur is MESSY! And you’ll look like a cat exploded in your house, or so says my husband. First I get as much of the mess in the garbage when cutting—I’ll cut one pattern piece and then go right to the garbage and pull at the edges getting all the loose fur that isn’t attached anymore. This helps with the mess greatly. Other tips: sweep and vacuum right after cutting your pattern pieces—there will be a little more mess as you are sewing but nothing like the initial cutting. A lint brush is helpful to get the fur off your cutting mat. Or tape wrapped around your hand with the sticky side out. That works too. Also, sewing with a walking foot is helpful, thought not required. Just make sure that you use a LOT of pins when pinning the pattern pieces together. The fur shifts and actually stretches rather easily. So pin pin pin!


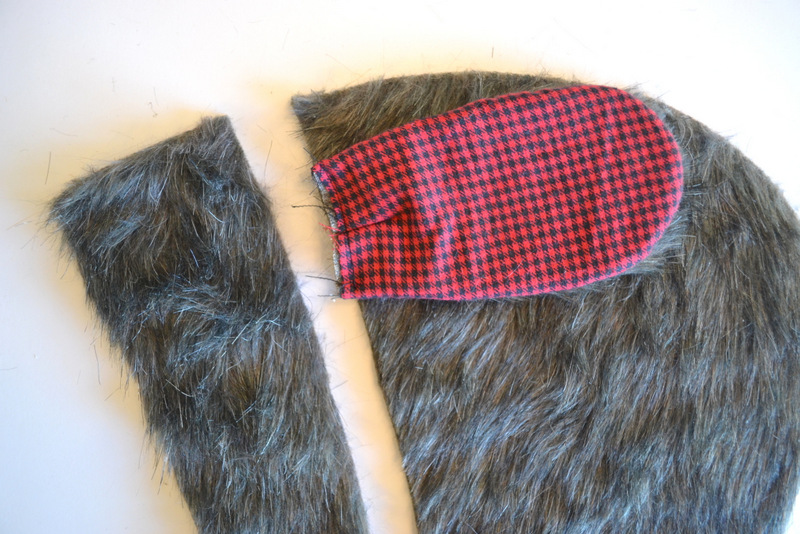
Let's start with the ears! Place right sides together and pin all around the ear except for the bottom straight edge. Leave that open.


Use a 1/2" seam allowance and sew around the ear. It's helpful to start at the middle and sew down towards the bottom of the ear, and then start in the middle again and sew down the other side. That way you get it nice and lined up and no bunching at any part of the ear.


Pinch the ear in half towards the lining. Decide how you want your ear to look by adjusting how far in you pinch.

Sew about an inch from the bottom of the ear even with the folded edge. This will create some dimension to your ear and allow especially the wolf and bear ear to hold itself upright better.


Baste stitch a 1/4" from the bottom of the ear to hold the layers together. Push the fold on the fur side of the ear to one side while you sew.


Lay the ears aside and grab your lining pieces. Take the center hood strip and start pinning, right sides together, starting at the TOP of the hood and working to the back.

Sew 1/2" seam all along, again starting at the top front of the hood and ending at the bottom back of the hood.


Depending on how well you cut and how well you pinned and how well you kept the layers together...sometimes there is a little excess fabric from the center hood strip. Just trim it off to be even.

Iron the 2" square interfacing pieces to the wrong side of the lining on the fastening tabs of the hood.


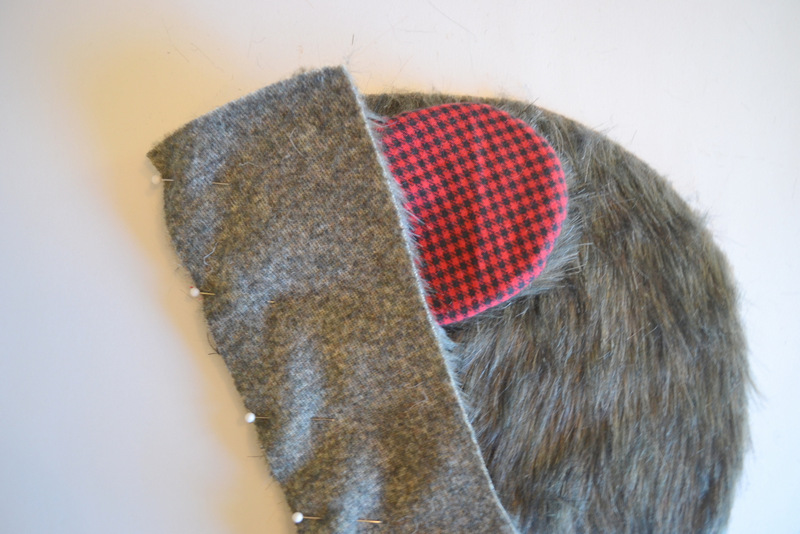
There are two ways to sew on your ears.
FIRST WAY TO SEW EARS (and preferred way in my opinion): My son wanted puppy ears on the top of his head, so technically I could have skipped the fur pattern pieces and just used the lining pieces for both the fur and the lining. But I wanted to show you how to sew on the other ears. Actually, I really liked how these ears would have looked had he let me do it my way ;). Anyways, pin the ear about 1" from the top of the hood, as shown below.

Next, pin the front fur piece to the back hood piece right sides together, sandwiching the ear in the middle. Sew.

**The picture below is how the pattern intended the ears to be sewn on. So follow the three pictures and descriptions above to get this look.**

SECOND WAY TO SEW EARS: Since my son declined the ears sewn the way above, I pinned them to the top before sewing on the middle strip and carried on, so please note that my ears will look different on the rest of the tutorial.


Almost finished! Take the lining and place the right side of the lining on the fur (right side) of the outer hood.

Now you will pin around the entire hood, just leaving a 5" opening at the bottom of the hood, on the back. So start sewing where my finger is pointing in the picture below. Pivot your needle on the corners of the hood fastener portion.


Here's the opening. Turn right side out and push everything out completely--especially on the under chin fasteners.


I think snaps are so perfect for this hood. I use KAM snaps (affiliate link) but you could use buttons, Velcro, whatever you want. Joann has a great selection of metal snaps which I would probably even like better, but I already had these and they are perfect, especially with the fur.


This step is optional, but the lining has a tendency to come away from the fur so I like to secure it really quick. Pinch the fur on top of the hood, at one of the seams.

Now stay on the seam better than I did and sew just about a 1/2 inch line, going back and forth a couple times to secure it. Repeat with other seam on the center hood strip.


You are totally DONE now! They are fairly quick and ultimately adorable. Hope you like it! I'd love to see what you do with it, so be sure to share with me!

It is important to note the two sources of inspiration for this Fur Hood. First, the hat I made Bailey HERE is one of her favorite things I've ever made her and was based off a tutorial on Suburbia Soup—which you probably notice that sadly, the blog has not been up at least since the beginning of the year, so I can’t link you to the tutorial or the blog, but HERE is the pin. The second source of inspiration is Tara from Girl Like the Sea. She’s made some fur hats that I love, which you can see HERE.
