
Ginger jeans progress report
I thought I’d do a little progress report on how my Ginger jeans are going! Okay, actually a long one. Mainly for those of you who, like me, haven’t sewn jeans before, or maybe you’re scared to, or on the fence, or perplexed about the idea in general. Or otherwise just want to read some boring sewing nitty gritty about jeans. There’s a lot of “these are awesome!” finished posts out there but I thought I’d give you a run-down on some of my experiences so far. So this is a long and technical post with some boring photos. You’ve been warned!
I’m using a stretch denim that was inexpensive, hoping to make a few versions with fitting tweaks and such before cutting into the really good cone mill denim I have. My denim has 2% lycra and I probably took “2% or more lycra” a bit too literally for some reason in my head, as I searched for 2% lycra content. I don’t think my denim is particularly stretchy now that I’m working with it, which has caused me some issues since these are such slim jeans.
And that being said, I also think I may have picked the wrong size to sew! Oops. Either I picked the wrong size, or my head’s idea of what skinny jeans for me could be and the reality of skinny jeans are two different things, or both. And coupled with the fairly non-stretchy denim, whoa mama. I basted everything together after finishing the front pockets, and good grief they felt tight. Good at the waist, but really tight everywhere else. This is what I get for not listening to my head and picking a size based on my waist instead of hips, figuring eh, the little extra hip room I need won’t matter so much since these will be stretchy (although actually they were worst in the lower legs). Plus some people said to size down due to stretch, so I thought I’d be okay. Wrong. They’re stretchy but not that stretchy.
So next go of basting (this time after the fly insertion so I could actually zip them for real), I let out all the seams to 3/8″ except about the last 2″ of the side seam towards the waist and about 9″ down from the crotch on the inseam of both legs, as there was too much bagginess in the upper thigh and crotch when I let it out too. That gave me a full 2″ more in each leg, but the knees and just below are still super tight. Everything else is still tight but do-able (and will presumably stretch with wear, too). The knees/upper calves being tight is weird because I don’t have big calves at all, so it’s a strange place to be so tight. I can only assume that if I had a stretchier fabric it would be a lot better.
As it stands, these are definitely form fitting but thankfully I was able to make it mostly work! (It was at that initial basting I should have thought to take the back crotch curve a bit deeper for a low bum, but I was so focused on being able to breathe in my jeans I forgot. And then once it was all later topstitched, nope, not ripping out.)
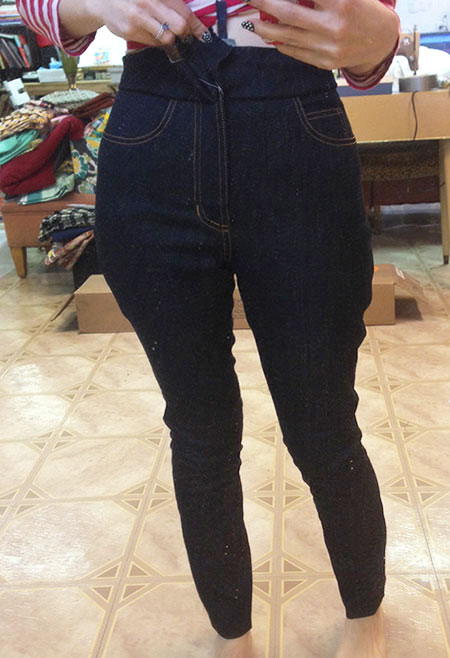
So here’s a really crappy photo in the basement, after I’d installed the fly, and basted with the new narrower seam allowances.

They fit, they zip, I’m not about to bust out of them or anything, and I think they mostly look like the fit on other people! I mean the high waisted skinny version is tight. This is part of the reason why I think my feelings on their tightness is partially based on the reality of skinny jeans living up to their name. The knee area is far too tight, and there’s a bit of bunchiness in some areas of the thighs as you can see above. I’m not quite sure if that’s because they are so ridiculously tight lower down that the thigh fabric can’t get to where it’s supposed to actually sit or they could be narrower in the thigh still, but really I’m not going to worry about it since I can’t let the seams out more and I’m done playing with this pair. So it is what it is for this first version.
Next time, I’m not sure what I’ll do. I cut a 2 for this pair, and may I’ll cut a 6 next time, but use the size 2 crotch and inner thigh. I think I have relatively thin thighs (perhaps on the back only), and I’d pre-emptively shaved 3/8″ off the back inseam for that, which I’m glad. I need to compare sizes based on what seam lines I actually used and the pattern pieces and see where that puts me. I think I’d like overall a little more room than what I ended up with, and I definitely need that in the knee area. Maybe I should just do the stovepipe leg and not the skinny one, I don’t know. Or, since I’m so damn short compared to the pattern, instead of shortening the leg on the shorten/lengthen line, I might just chop it off the bottom. That may actually resolve the tightness in the knee area. I think I’ll compare the pieces to the Butterick B5895 leg and go for something slightly narrower than that. I guess maybe what I really want is between the skinny and stovepipe versions.
Anyway, moving along to modifications. I lowered the back crotch 1/2″ as suggested by Heather in the sewalong fitting post, and also an adjustment I made to the Butterick B5895 trouser pattern last fall. This is a trick that a lot of RTW uses and supposedly helps with bagginess under the butt/thigh. The back inseam is then 1/2″ shorter than the front, and you ease in the crotch to the first notch (or somewhere above knee level if there isn’t a notch). I have no idea if it helped as I did it right from the get-go so can’t compare, but it certainly didn’t eliminate wrinkles under my butt. That adjustment looks like this:
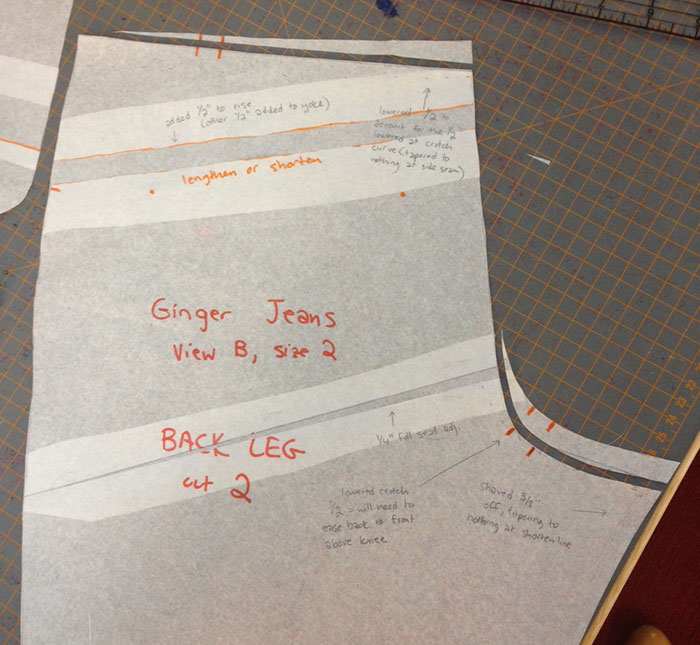

You can also see two other adjustments in that photo: I raised the rise 1″ total (only 1/2″ on the back, the other 1/2″ was on the yoke which isn’t pictured), which is the upper line that’s spread. The lower one was a 1/4″ full butt adjustment I did and then later took out, deciding I would be changing too many variables for one go.
While I don’t have a photo of them from the back, I do still have wrinkles under my butt. Big freaking surprise. But something Heather B said in her first Ginger jeans post really kind of brought this topic all together in my mind, when she talked about needing that ease for her low butt (sorry to be chatting about your butt on my blog, Heather!).
I have a full butt, which is also low. (Something I would have never known if I didn’t sew. Sometimes I think, “damn sewing!”) I have tried nearly every trick I’ve come across to get rid of the under butt wrinkles. Feel free to refer to these two posts if you want to read the saga. (You probably don’t.)
Anyway, the wrinkles under my butt are basically caused by my low rear end shoving the fabric down. If you literally lift up my butt (oh the ridiculous things we try for sewing), the fabric conforms more to my back side how it “should”. I think people with higher butts get the joy of having that sitting ease conform nicely around their can. People with lower butts… not so much. I really do need that ease to be able to comfortably walk, bend over, and sit, if we’re talking about a slim leg style. It’s just that on me, the ease has to sit around under my bum waiting for its time to shine. If I pin it out (as if I could even get rid of it in the first place… we already know from something like 11 muslins that I couldn’t with the Butterick pattern at least), I then can’t comfortably bend or sit. So when I sit in pants with those lovely wrinkles, the fabric conforms beautifully and comfortably to my thigh and rear. That ease is finally doing something for me!
I think I kind of need to make peace with this issue, unless the wrinkles are bananas ridiculous (which they kind of were for my first seventy billion versions of the Butterick trousers). I want to be able to sit and move around in the world comfortably. I don’t want to feel like my ass is poured into pants and I have to do some stupid rigamarole sideways to bend over, and I don’t want my pants riding up my back side when I sit. So, under butt wrinkles, I hate you, but unless I get a butt lift (spoiler: I’m not), I think you’re sticking around. And sewing, I hate you a little bit too, because now whenever I see someone’s butt in pants I look for wrinkles and when I don’t see them, I get jealous. You made me a butt wrinkle stalker, damnit!
So, all that to say: there’s wrinkles under my butt with my Ginger jeans, too. Maybe I’ll try more tricks on this pattern to get rid of them, but I’m not going to stress about it too much.
Now let’s talk about the actual sewing. If you’re not sure, follow both the written instructions and the sewalong. There were a few small steps that were slight head scratchers in the instructions that the sewalong posts totally clarified and vice versa. Brilliant. Seriously, by using both, it’s a total hand-holding experience and it was exactly what it took to make me personally feel comfortable about sewing jeans! Heather covers everything. Yes, jeans are a lot of steps, but everything is broken down into such small chunks it’s not long before you realize you really are sewing jeans and it’s not that big of a deal. That first double line of topstitching and I really was like, “WHOA. These are going to be jeans!”
The fly front was easy, and Heather’s instructions really were totally foolproof as I’d read they were! Unless… you’re a fool and baste the center front seam together slightly off, which I managed to the first time, putting 1/4″ more on one side than the other. Ughhh.
Here’s the deal with fly fronts: when you actually stare at them, you realize that they have an optical illusion going on, where they look off-balanced due to the double topstitching on the fly. (So sorry if you’ve never noticed it, you’ll probably never unsee it now!) Unfortunately, the slightly shorter side was also the side that visually already looks off balance because of the fly topstitching lines but isn’t (i.e. the right side in the photo below). And because I’m pretty narrow at the waist, it was totally obvious (if there’s more space between the topstitching and the pockets this illusion is way less noticeable). Here was the first fly:
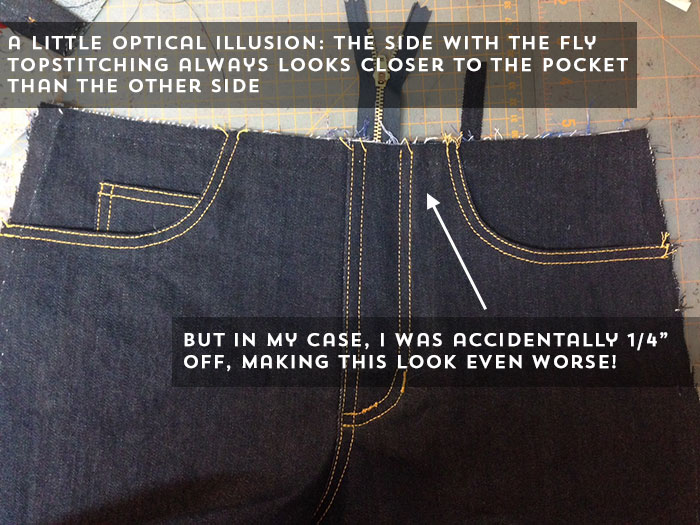

So I had to unpick the entire fly, bar tacks (that looked super crappy as you can see—we’ll get to that), and topstitching. It took the entire length of consuming one much-needed beer to get it all out, but I did. Then I basted the seam together to start fresh, and it was 1/8″ off. Of course this time I checked right off the bat! I realized it was because one of my pockets was somehow 1/8″ off from the other (doh), so I just offset CF towards the top of the pieces by 1/8″. No one but you will ever know, and it totally solved the issue. So other than that, honestly, the fly itself really was easy to do. Twice, even.
My first (well, second now) fly!

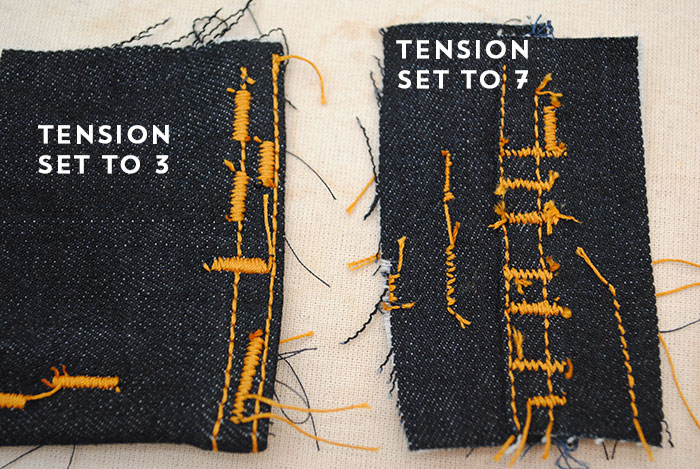
The contrasting topstitching scared me, but with my new Bernina it really was way easier than I thought and within a few seams I was feeling much less anxious. I’d read it can help to increase the thread tension for topstitching thread, which I did (to 7 on my machine), and it worked lovely. I’ve always kind of dreaded topstitching so (mostly) conquering gold thread on dark denim really felt great.
Bar tacks, not so much. Try as I might, I couldn’t get a consistently nice looking bar tacks using topstitching thread. I’d get close, and then not so close. A complete mixed bag! The two on my current fly are iffy, and then I finally decided to use regular somewhat-matching thread after much cursing, so I did that for the side seam bar tacks.
But! Then I read a tip from Tasia in her Sewtionary book. She said to decrease tension for bar tacks. Hmmm! I was intrigued. I changed the tension from 7 (what I’m using for topstitching) to 3 (lower than the standard). Take a look at the difference below. With the tension to 3 I did several good ones in a row, with it to 7 it’s been a total mixed bag as I said, with only one truly good one out of all the bar tacks I’ve done, and several looking far worse than the samples below (including on my garment). If I can keep this up, I’ll go back to topstitching thread for the belt loops and consider the haphazard bar tack assortment in my pair a “personal touch”.

Last but not least! One more optical illusion thing for you. Sewing jeans makes you stare at them a lot. I noticed that one of the back pockets in RTW jeans are usually slightly off from the center back seam line compared to the other, because of the two lines of topstitching throwing off where your mind perceives the center seam line to be. If you place the back pockets at the exact same place on each leg, one will look closer to the seam line because of the two lines of topstitching, even though it’s not—it’s just closer to the outer line of topstitching. I’ve noticed this with a few handmade jeans I’d seen, and wondered why they had an off-center pocket, and then started measuring RTW pairs and realized what was going on. Their pockets were not off-center, just looked like it due to the topstitching.
While you can’t do anything about the optical illusion with the fly (that I know of), you can for the back pockets, since you can put them anywhere you please. So instead, by personal choice I’m using the center of the two lines of topstitching as my guide, instead of the actual seam (which is just to the right of the line of topstitching that’s right of the green line). Below I just have them basted on so I can decide for certain where to put them once I have the waistband finished. I think because jean pockets angle out from the CB seam, it makes this little trick less obvious.

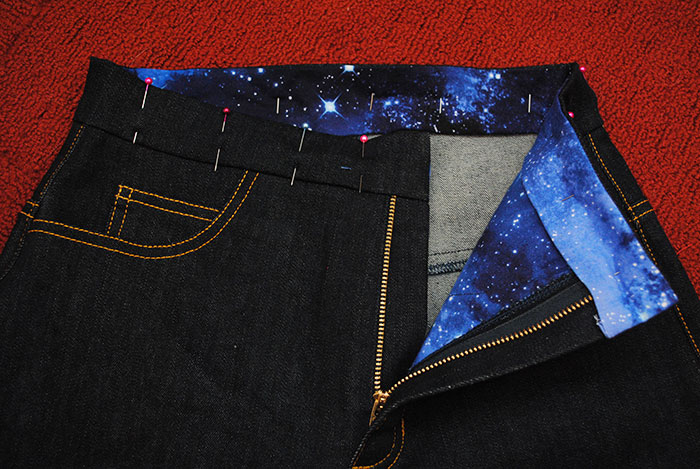
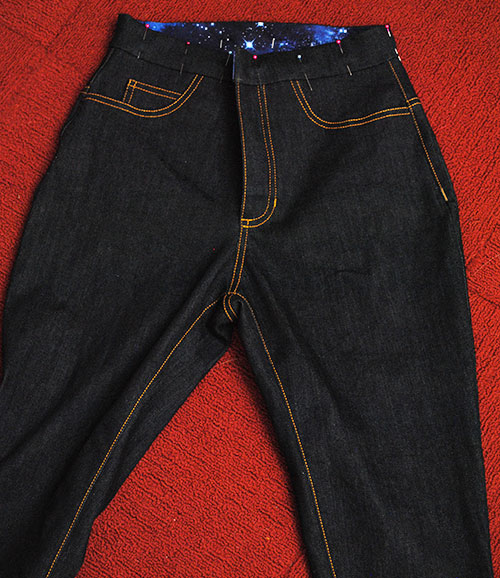
So that’s where I’m at with my jeans so far! I have to shut the waistband, do the buttonhole (haven’t even tried one with my Bernina yet, so there will be much practicing!), all the belt loops and finalize back pocket placement. And then add rivets and the button.

They’ll be far from perfect, but I’m really proud of myself for the work on them so far. And boy, I can’t tell you how much I love that galaxy print for the pockets and the waistband facing!
Sorry for the super long and boring post, hopefully it was interesting to someone out there!