
A Backyard Makeover in a Weekend
Thank you to Troy-Bilt for sponsoring this backyard makeover, and providing us with a Hedge Trimmer, along with all the attachments you can imagine, to complete this project.
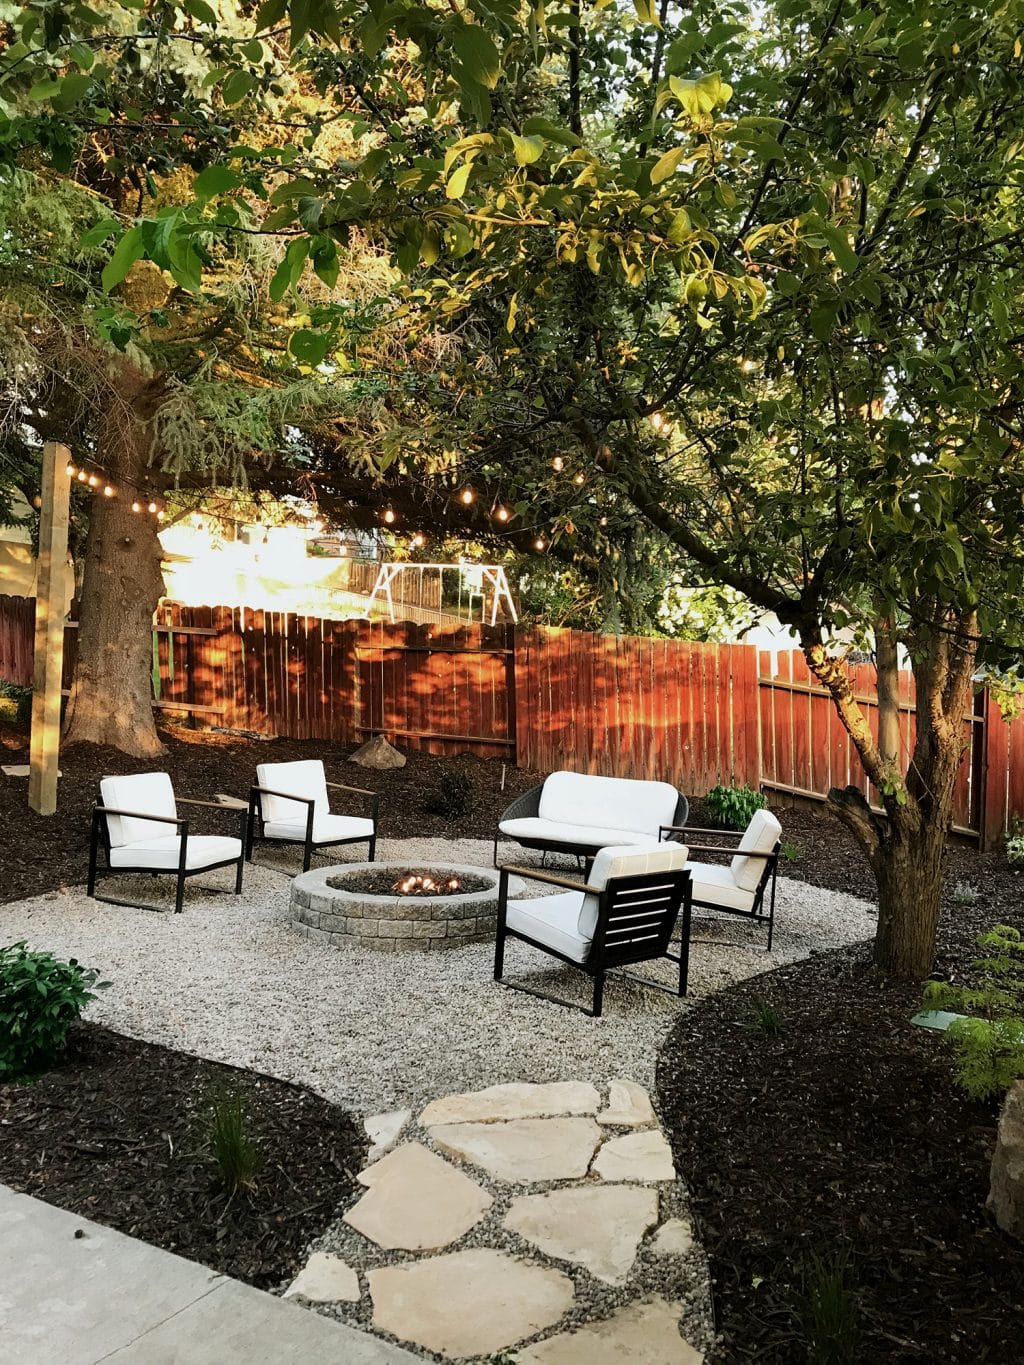
If you follow us on Instagram, you probably already know about the backyard makeover we did, but we wanted to share a bit more on that project here, as well. To give a little context, Troy-Bilt asked us to use some of their tools to makeover an exterior space in a weekend, and since we already did our backyard last year, we decided to pay it forward to a family in our neighborhood. And we honestly couldn’t be more happy with how it turned out. Here’s what it looks like now:

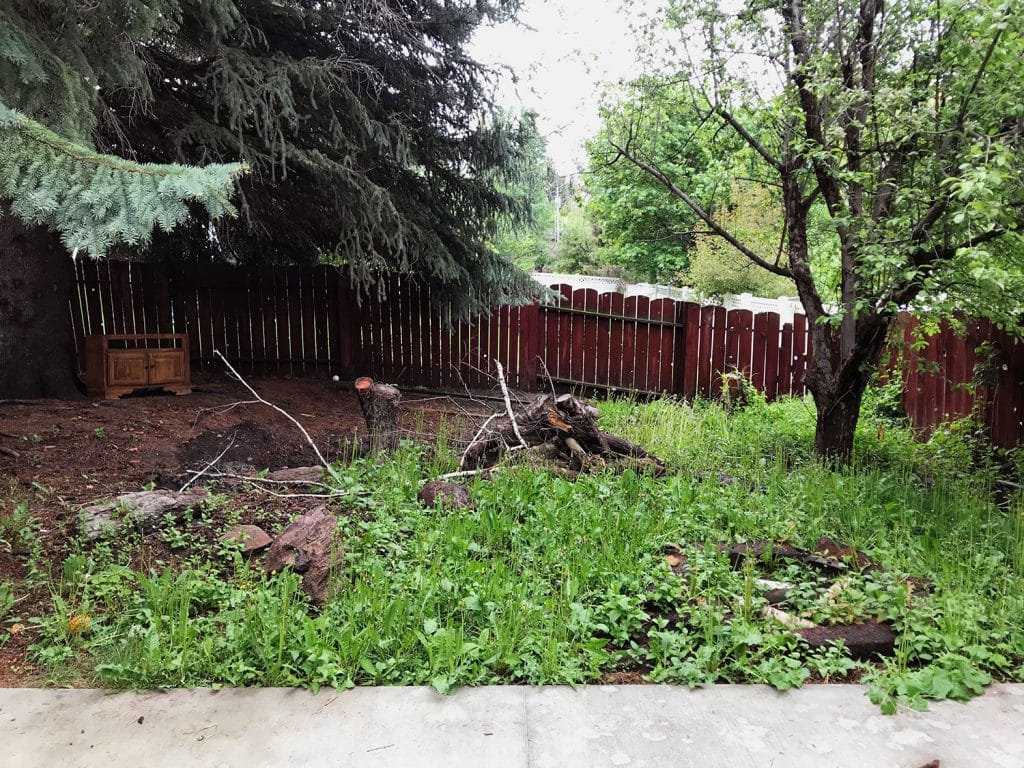
And of course that shot is made even better once you see the before (same angle!):

Can you even believe that??? This little corner of their yard had not been used since they moved in 4 years ago – and when you makeover a space like that, it immediately feels like you’ve doubled the size of your yard. We consulted with the homeowners on their wish list for this space and they really just wanted a space to entertain and a fire pit–Here’s how it all went down:
Clearing & Leveling the Area
The place was a mess, with weeds, boulders, tree stumps, and debris. It actually looks better in pictures than it did in real life. We decided to save the boulders and used them around the edges of the space. We dug around the tree stumps to find the roots, then cut them with the Hedge Trimmer before prying the stumps free.

We had watered the ground the day before, so we used the TrimmerPlus® Cultivator attachment to till up the weeds and raked the entire area clean. The tiller also helped take out the unevenness, so we could then stomp it down and level it out.
Trimming The Trees
The pine trees had become overgrown, blocking the view of this little corner of the yard. Which was a good thing when it looked rough, but we were going to want to see it now. We used the Pole Saw attachment to reach the lower branches and open up the view.

Adding the Fire Pit
We bought a stone fire pit kit from a local stone yard and laid out the first layer of stones to mark the ground. We then dug down a few inches to inset the stones and keep them stable. Once in place, the stones were stacked and secured using construction adhesive.

Since we wanted this fire pit to be simple to use, we decided to bury a ground box a few feet away with the lid at ground level, where we could store a propane tank. We ran a PVC pipe from the ground box over to where we wanted the fire pit to be, which would allow us to later come back and slide the propane tubing through to our fire pit burners from a 5 gallon tank that would sit inside the ground box.
We ran the propane line, filled the pit almost all the way with black pumice rock, then attached our fire pit burner. We covered it with more pumice rock, and that was it.
Installing the Metal Edging
Using the Lawn Edger, we cut a channel through the grass around the pine trees. We also wanted to use the metal edging to separate our shrub areas from the pea gravel (which would come later), so we traced those areas on the ground as well. We then tapped the edging into place and secured it with ground stakes.
Planting Shrubs, Running Drip Lines, Laying Bark
We laid out the shrubs, while still in their planters, to see where we wanted to put them. Some of us then planted the plants while the others began running the tubing between all the shrubs, tying it into a nearby sprinkler head.

We ran a small drip line from the tubing to the base of each shrub and adjusted the nozzles to drip more or less, depending on the shrub watering requirements.

Laying Flagstone and Adding the Pea Gravel
We originally considered adding flagstone around the entire area, but that got pricey, quick. So we opted for two flagstone paths coming from their adjacent basketball court into the space. After putting down a layer of landscaping fabric and blowing it clean with the High Performance Blower attachment, we laid the flagstones. There were even a few stones left over, so we added a little path through the trees, as well.
We then ran load after load of pea gravel down and filled in the rest of the area around the fire pit and in between the stones. After a good sweep with the Broom attachment, the stones were nice and clean.

Hanging Lights & Adding Furniture
Even with the fire pit, we wanted to add a little more ambient lighting to the area, so we planted a 6×6 post in the ground (secured with a couple bags of cement) and ran an outdoor-rated extension cord from the top of it down to the ground, under the bark (secured with lawn stakes) over to the fence, and along the fence line up to the house.
We then used chicken wire and eyelet bolts to secure our LED lights to the post and run them across to the trees where they were also attached using chicken wire. The tree was a bit out of control, so we used the Hedge Trimmer attachment to clean it up and it looks so beautiful now.

We had this outdoor loveseat in storage, and paired it with a couple sets of outdoor chairs we purchased from Target (currently out of stock, similar option found on Wayfair).

Budget Breakdown
Here’s how the budget for materials broke down on this project:
• Pea Gravel – $175
• Steel Edging – $267
• Weed Barrier – $82
• Mulch – $225
• 20 Shrubs & Perennials – $500
• Drip System – $125
• Flagstone – $250
• Fire Pit Kit – $380
• Pumice Rock for Firepit – $100
• Fire Pit Gas Supplies (20′ propane hose, regulator, burner) – $300
• Furniture (on sale) – $385
TOTAL: $2,789

All-in-all, this project was a lot of work in a short amount of time, but with help from the home owners and a few of their friends, we were able to make an amazing transformation in only two days. And it’s a space we know they’ll enjoy all summer long.


The post A Backyard Makeover in a Weekend appeared first on Chris Loves Julia.