
METOD Laundry Room
So, last February we moved to a new home. We did a lot of work in our brand spanking new house over the past months, at last it was time to sort out our laundry room. It is quite a big room (4m by 4m), it is located right next to the kitchen, and contains our back entrance to the house. So we decided to make it kind of a secondary kitchen with a lot of storage space and room to work.
Our washer dryer combo needed a place in there as well, and we liked it to be on a pedestal as it is much more functional.
The goal was to make everything as seamless as possible, while being strong enough to carry the heavy machines. So, on to IKEA
We went with a METOD kitchen and grey RINGHULT doors.
This is was the initial plan: (without washer and dryer obviously)


The process:
We went ahead and constructed all the standard kitchen cabinets and placed them like we wanted them.


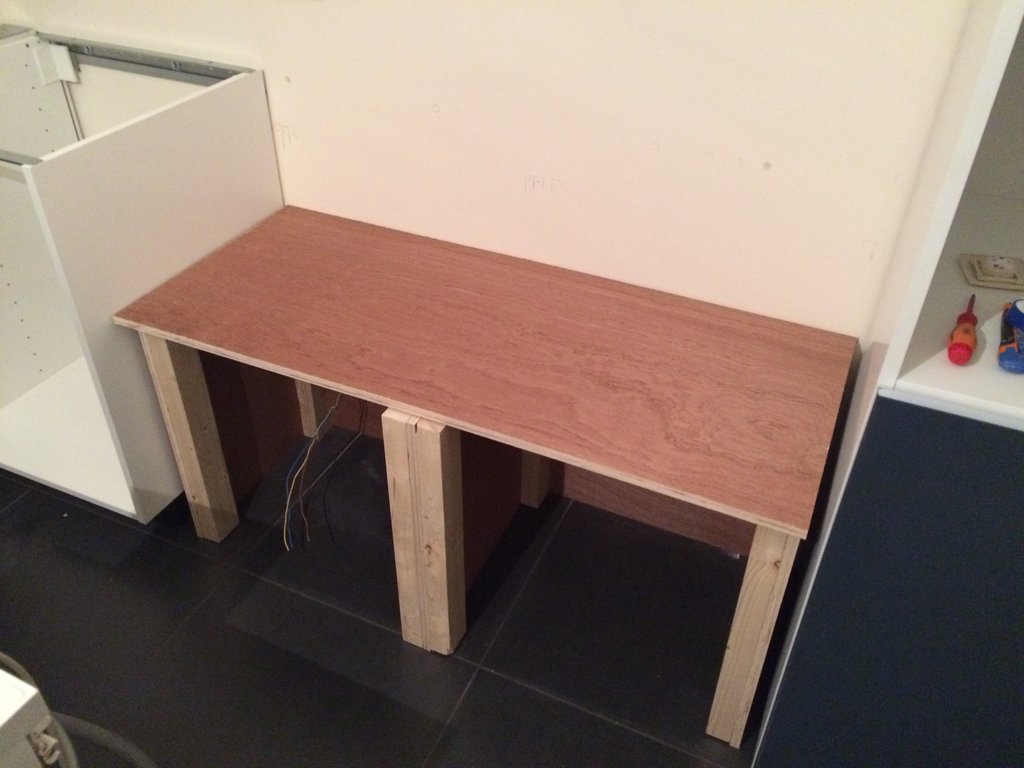
Then we went to the local hardware store and bought some 1,8cm thick plywood and some 4 by 4’s. The plywood is the actual structure where the washing machine and dryer will be standing on. The 4 by 4’s are not resting on the floor and are just there to connect everything as strong as possible.
I cut the wood to proportions, making a back plate and the “ribs”.
Note that the middle one is longer than the sides as I’m planning to use the original hinges and need the space to mount them in front of the new structure.


We did not bolt the side ribs to the cabinets because of vibrations.
Top plate on it (On first design, we noticed a mistake, the top plate is too short … back to the hardware store )

One hinge support made, now you can really see that the top plate is to short … the top drawer (see further on), will not close flush on the plywood as it should.
We cut of the front portion of the METOD cabinet to mount the hinge on, this way when you bolt it exactly as high as the other cabinets, you know that the door height is ok. Also you can use the IKEA holes which is handy.
We used a drawer front (cut length wise) as a spacer. We didn’t want the washer and dryer to stand too close to the surrounding closets or to each other, again due to vibrations.
I bolted the back to the wall for more stability.


The hinge supports we just bolted to the cabinets next to them, the middle portion is mounted with flushed L-brackets to the middle “rib” then we mounted the white METOD part over it so the doors have something to close to, and the L-brackets are almost invisible this way.
On the bottom left and right rib, we attached a wood block so all ribs are the same length, here the baseboard can be mounted to later on.
Time to make some planks in the construction so it can be actually used to store stuff.

I’m not 100% happy with those (standard IKEA METOD planks) because you can see now that not everything is square, and they are not big enough. I didn’t do the cutouts careful enough either … Someday I will replace then with something better! Out of the old top plate for instance.
Got myself a new top plate, the correct size this time. Made the cut out for the spacers

Looking good so far
Time to make the drawers. We got some Ikea kitchen drawers out of the sale corner … 10€ a piece, not a bad deal Took them apart and used only the bottom part of the drawer glider in combination with the bottom plank of the drawer. We bolted the bottom glider to my construction (narrower than standard) and made some holes in the gliders. I cut the bottom drawer plate to size and used the new holes in the gliders to screw the plank down, creating a drawer without sides. Here you can put on your laundry basket while loading and un-loading the machines.

When that was working fine, we took it apart again. Using L-brackets we connected the drawer front to the bottom plate. To be able to do this correctly first mount the doors and made them 100% in line with the rest of the kitchen. This way you have a reference to mount the drawer front.


I was worried a bit about the alignment of everything, but after tinkering a bit with the doors and stuff everything was ok. Nice The baseboard we just glued to the middle rib and the 2 wooden blocks on the side ribs. It is protruding a bit, so the sides got a little baseboard of their own.
With all of this done, we bolted on the top, and we could go for a test run using our old washing machine, a heavy boy that was vibrating a lot. So … a perfect test on which the construction scored an A


I didn’t talk about the 2 holes we made, one is to the neighboring closet, where the water supply and drain are. The other one is down, for a power socket.


The post METOD Laundry Room appeared first on IKEA Hackers.