
Leaf (feather) Quilt Block Tutorial and Giveaway
Hi Everyone,
I had so many lovely comments about the blocks I made last weekend that I thought I would write a little tutorial for you. I have to admit am I kind of in love with them myself. Some people are calling these feathers and that is fine... I choose to call them leaves because that is what I set out to make :)
(it has been raining here this week so please excuse the dark pictures)

This Tutorial Makes Two 9” (unfinished) Blocks
Supplies: 14 - 2” x 9 1/2” Strips for Leaf 4 – 3 ½” Squares for Background 1 – 1 ½” x WOF Strip for Stem Instructions: Lay out 7 strips for each side of your leaves. I chose to do one side in warm tones and one side in cool tones but you can choose whatever you like of course. If you decide to add a low volume piece try to put it in a different place on each side.


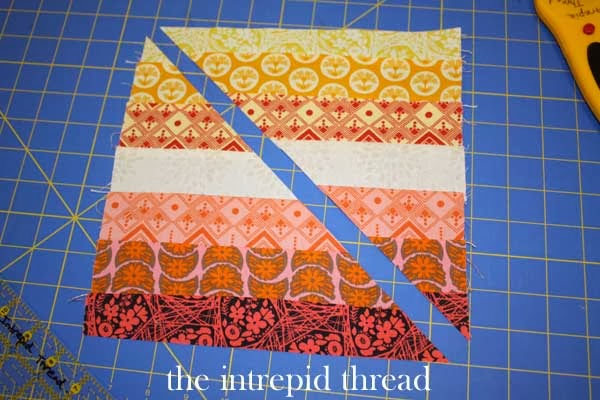
Lay the units out so that the strips are horizontal. Cut units on the diagonal. Make sure to cut from left top to right bottom on one and right top to left bottom on the other. If you are making more than 2 blocks just be certain to cut half one way and half the other.


This is the sort of tricky part but not really… just look closely at the picture. Lay the left side of the leaf on the stem fabric strip so that the bottom of the leaf is next to the left edge of the bottom of the strip and the top edge of the leaf is ¼ inch from the right edge of the strip at the top.


Lay the right side of the leaf on the stem fabric strip so that the bottom of the leaf is next to the right edge of the bottom of the strip align along the edge of the stem fabric so that the stripped pieces overlap at the top.


Square the block to 9” keeping the 45 degree angle line on your ruler somewhere in the stem fabric. It doesn’t have to be perfectly down the center because leaves are organic (and so are feathers).


I drew the lines a little darker so that you could see them in this picture
Sew down the marked line and trim.

Press and Voila... your blocks are done! Please, if you use this tutorial all I ask is that you give me credit and link back to me. You are welcome to make things to sell with it as well. Every once in a while I do something I am extra proud of and want a little credit :) Thanks so much! Also if you make some we would love to see them please post to the flickr group ---> link to the right (Fearless Fabric Fiends)


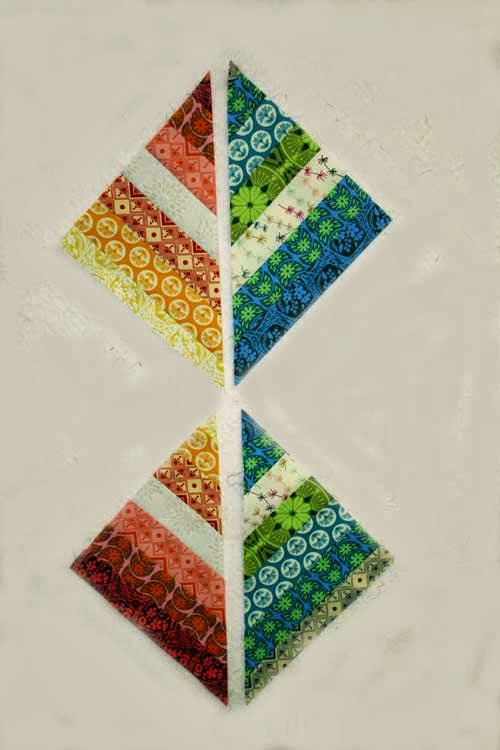
I am adding 2"sashing between the blocks so they look like this.
If you would like to win a little kit to make 4 of these blocks (with 2 inch sashing they make a perfect 20" pillow top) just leave a comment here and tell me which print from True Colors is your favorite. You can find them here on the website.