
T-shirt Throw Pillow (with tutorial)
A couple weeks ago, our puppy jumped up on my daughter and ripped a huge hole in the side of her favorite t-shirt. It wasn't mendable, so we discussed some options and decided that it would make a great throw pillow.

And since it was such a fun and easy project, I thought I'd share a little tutorial with all of you. It is much less work than a t-shirt quilt, plus the knit fabric makes an amazingly soft pillow.
1. Find a fun t-shirt. This one was an obvious pick for us because of the puppy incident, but I think it is something that we will do in the future with my daughter's favorite shirts as she outgrows them. It would also be great for old college or team shirts.
1. Find a fun t-shirt. This one was an obvious pick for us because of the puppy incident, but I think it is something that we will do in the future with my daughter's favorite shirts as she outgrows them. It would also be great for old college or team shirts.

2. Roughly cut around the shape that you want for the pillow, leaving at least a couple inches of extra space on each side.

3. Cut a piece of stabilizer (I used Shape Flex) that is approximately the same size as your t-shirt minus a little and then follower the stabilizer's directions and fuse it to the BACK of the fabric.

4. Now trim your t-shirt to the size that you want for your pillow, doing your best to center the image. I centered the words on mine and it left Chewie ended up a little wonky, oh well. Cutting will be much easier to cut now that you have adhered the stabilizer to the back. Mine ended up more rectangular than square, it is about 10"x12".
5. Determine if you need borders and what size your borders need to be. If your t-shirt was adult sized and you are making a small-ish pillow, you might not need borders, but since I was making mine with a kid's small that had a chunk taken out of the side, I needed borders.
5. Determine if you need borders and what size your borders need to be. If your t-shirt was adult sized and you are making a small-ish pillow, you might not need borders, but since I was making mine with a kid's small that had a chunk taken out of the side, I needed borders.

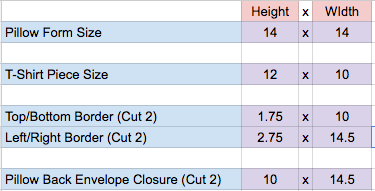
To calculate the border sizes you need, I have plugged the equations into a spreadsheet for you. That math minor from college is totally paying off. You can find the spreadsheet here. Just plug your pillow form size into the first purple boxes (mine was 14") and then plug your t-shirt piece size into the next purple boxes, and it will tell you the size to cut your borders and your pieces for the back of the pillow.

6. OPTIONAL: add batting to the back of the pillow top and quilt it or add interfacing. I added fusible fleece. I like fusible fleece because it adds a little squish like batting but it fuses to the back of the fabric so there isn't any shifting.
7. I like to use this method for finishing the pillow, but you can finish it however you want. If you use your own method you can just ignore the last line on the spreadsheet.

Here is the back of my pillow. And yes, that is the guilty puppy in the background. I think that Harper has forgiven her.
More posts from Erica Jackman