
DIY No Sew Two Toned Curtains


Hey ya'll! So, I've finally found a solution to a little problem that I come across almost every time I buy curtains. You know how most stores sell curtains that are either 63'' or 84''? But when you hang your curtains near the ceiling like the internet tells you to, they end up being way too short? And then you look online, only to find that most 95'' curtains are $100 a panel?
And then you face palm and decide to go without curtains forever.
Well, that's basically what I've done since February.
And then you face palm and decide to go without curtains forever.
Well, that's basically what I've done since February.


Basically, I forgot to take the curtains down in the living room back when we were doing the floors, and during the joyous period of staining our floors dark brown and then sanding them back down to the natural wood, the white curtains turned brown. From the non-stop parade of dust.


So, after a failed bleaching attempt, I threw them away. And pretty much since then, we've been without curtains. To make matters worse, our 1970's windows are made of saran wrap. You think I kid, but I do not. You can put your head next to the window and your hair will blow in the wind. It's really quite beautiful.
So, finally this week I broke down and decided to replace the curtains. And I wanted curtains that were at least 95'' long because I wanted to hang the curtain rod at the ceiling and have the curtains pile on the floor a bit. I used to hang the curtain rod right above the window, and I've since learned that there's a much better way. The internet is a great teacher of non-important life lessons such as this. Here's a very basic drawing (sorry) of one window, with curtains hung two different ways, to show you exactly what I mean.


In a nutshell, you can make your windows seem much bigger if you hang the rod at the top of the wall near the ceiling. Then, hang the curtains beyond the sides of the window. This completely hides the frame and makes the window appear much larger than it actually is. I did this in the office above the door, and it made the room (and doors) look so much bigger than they actually are.


So, for the living room, I had about $50 to spend on new curtains. So, not a lot, but a 'normal human' amount. So, I bought 2 sets of these white 84'' curtains and then went to work adding an extra panel of dark gray fabric at the bottom of each curtain. I ultimately made them into 110'' panels so that they would pile on the ground a little bit, simply because I like the way it looks.


It was a really easy process that literally just involves glue and scissors. Here's what I did in case you want to add some length to your own curtains.
First, I bought 4 yards of gray fabric (which was in the clearance bin for $2.99 a yard), but I ended up only needing about 2 yards for all 4 panels, so oops.
Then, I laid out my curtain panel, measured how long I wanted them to ultimately be, and cut my gray fabric accordingly. I left an extra inch on all 4 sides to allow for a seam.


I used Unique Stitch for the seams.
In retrospect, a roll of hem tape (that you iron on) would have been even easier to use, as there were a few times where I tried to draw a straight line with the glue and it looked more like a cursive love poem. But, the glue did indeed work.
You can find Unique Stitch or Hem Tape on Amazon (affiliate links).


Before I attached the gray panel to the white panel, I made a seam on each side of the gray panel with the glue. Basically squirt glue wherever a seam would be. Try to do it neater than I did.


Once that's dry, flip it over. Apply a line of glue to the top back of the gray panel, and attach it to the white panel. Then cut off any remaining white fabric that hangs down the back.


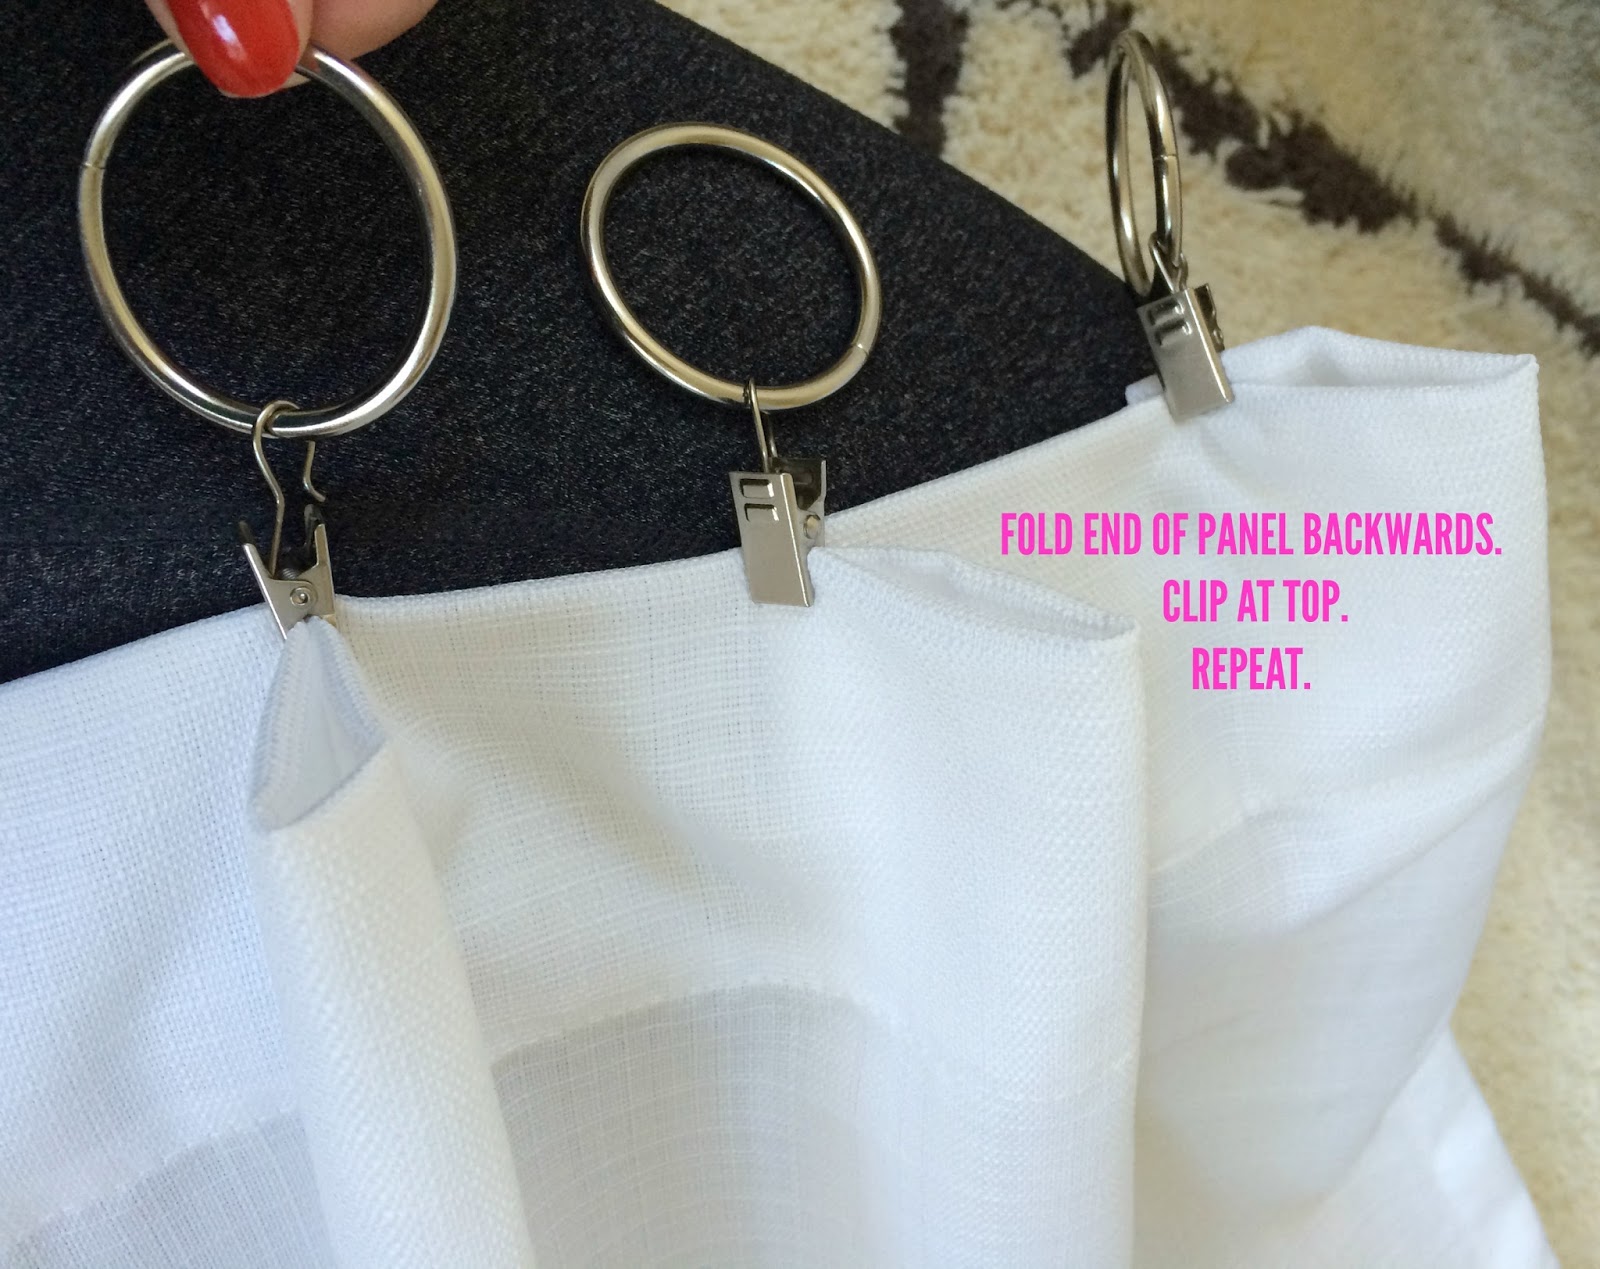
Since I prefer back-tab curtains, but these had rod pockets, I opted to hang them with some clips instead. I've never done that before, but I think I may be newly converted.
It made a big difference and made the curtains hang almost as if they were pleated. I used 5 of these curtain clips (affiliate link) per panel.


My favorite way to use the clips (and I tried out quite a few ways while googling how to do it) was to start at the end of the panel, fold the fabric back and then clip the fold closed. Then you just replicate that every few inches. All that does is create a bunch of pleats, and it makes your curtains look much nicer than if you just clipped them up there all flat-like. I know because I did that and it looked really depressing.

And that's really all there is to it. Now you officially have really cheap curtains that look pretty good, and you can make them whatever length you want. Ignore my diminutive attempt at a Fiddle Leaf Fig. I found it here for $17, and although I swore to myself that I would never jump on this train (because of my history with plants), I eventually succumbed. Because it was $17. And then it arrived and it was 2 feet tall. ***Shakes fist in air. Knows she brought this upon herself.***


That's all for today, ya'll! Happy curtain elongating.


or
Subscribe to LiveLoveDIY with email!
Enter your email address:

//
