
How To Make Gold Leaf Art (Round Two)!

Hey ya'll!
I just got back from Michigan on Tuesday (more on that later), and I was finally able to put the finishing touches on a little art project I've been working on.
This isn't my first attempt at gold leaf art (you might remember this one or this one), but I really wanted to make a larger piece with some hints of pink and purple for the office.
I know that in my last post I debuted this thrifty little dresser with a mirror over it, but the mirror actually goes in another part of the office. So, that was just kind of a temporary setup until I could finish this painting. Ya'll seemed to love the mirror even more than the dresser, and I don't blame you one bit. I mean, how many white painted dressers can one girl make?
*Probably many more. But we can be honest with each other.
So, anyways, here's the new art.

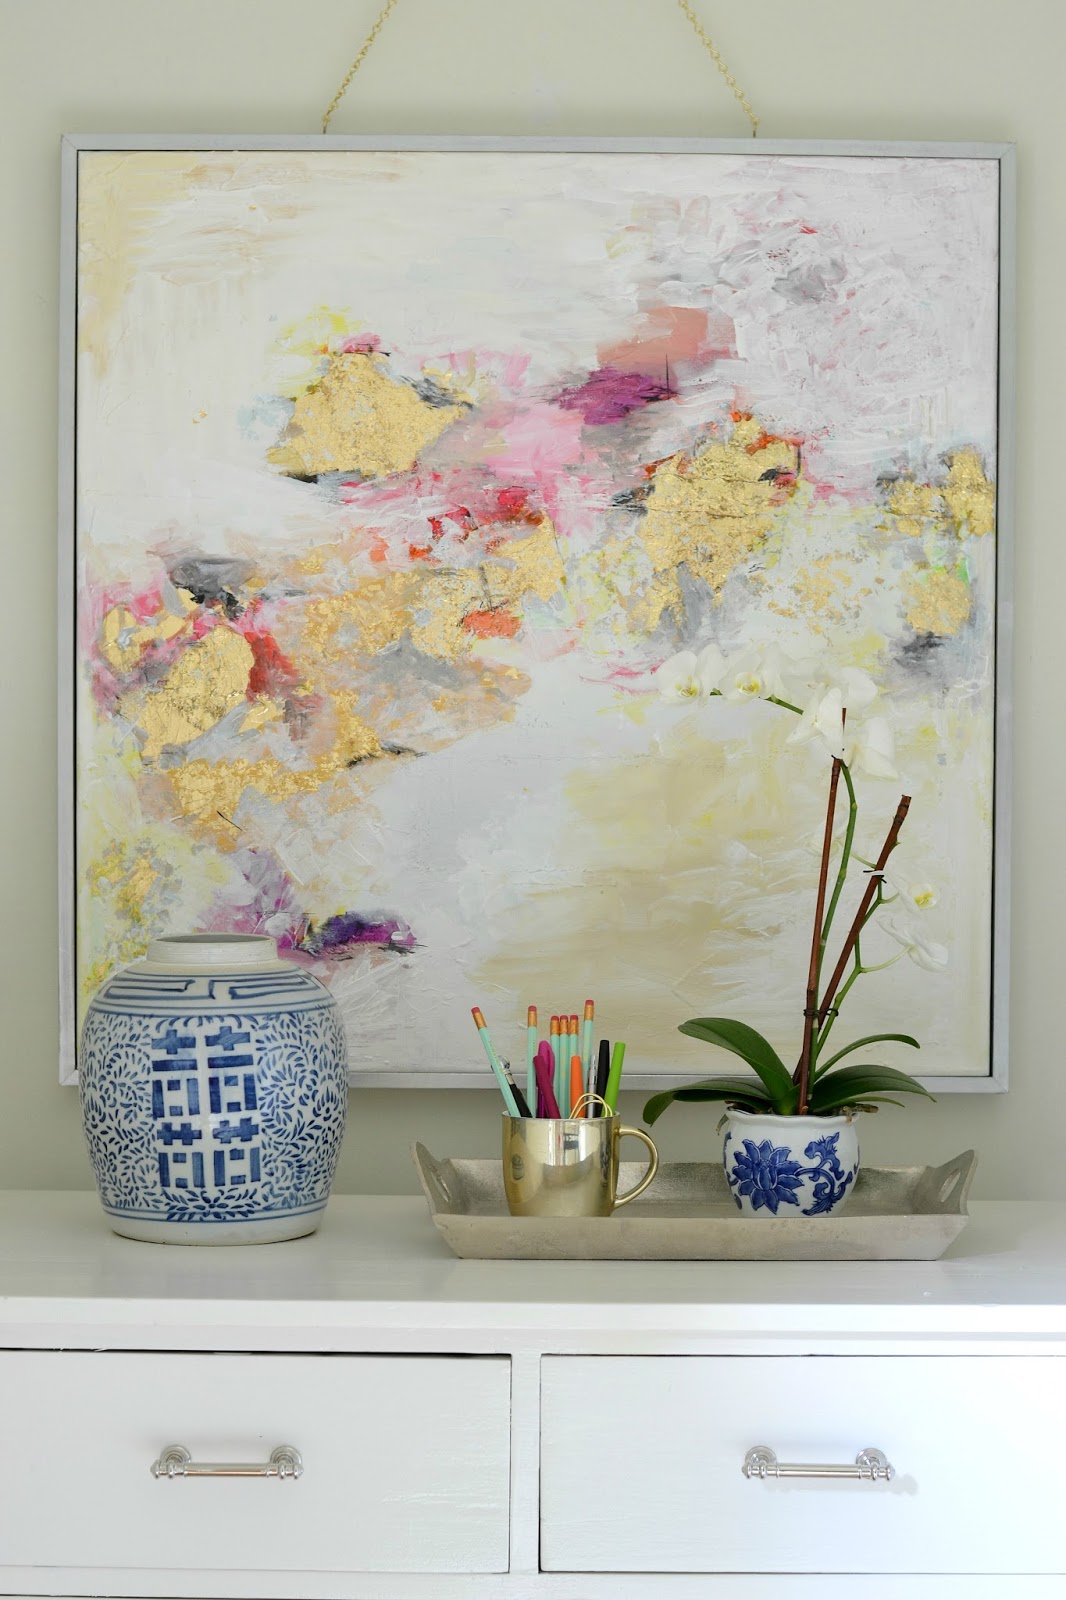
I just love the way it turned out, and my favorite part is the way it's hung on a little gold chain.

I had Jesse help me with building a frame, and I styled it up with a few little tidbits from the thrift store like my ginger jar and gold mug (used as a pencil holder).

So, here's how I did it, just in case you want to make your own version. Prepare for the parade of beautiful nighttime iphone photos. It's headed your way.
The first thing I did was go to the craft store and get a big canvas. I used a coupon, so it only cost me about $20 for a canvas this size. Then, I just used some basic impasto paste/modeling paste (affiliate link) and some leftover off-white wall paint and painted the canvas. The impasto paste just adds a little texture to your painting, so that part is totally optional. I've been working on painting and installing trim for months now (it never ends), and I've temporarily been using the haunted house room over on the side of the bedroom as my workspace.
That poor, sad, little room.

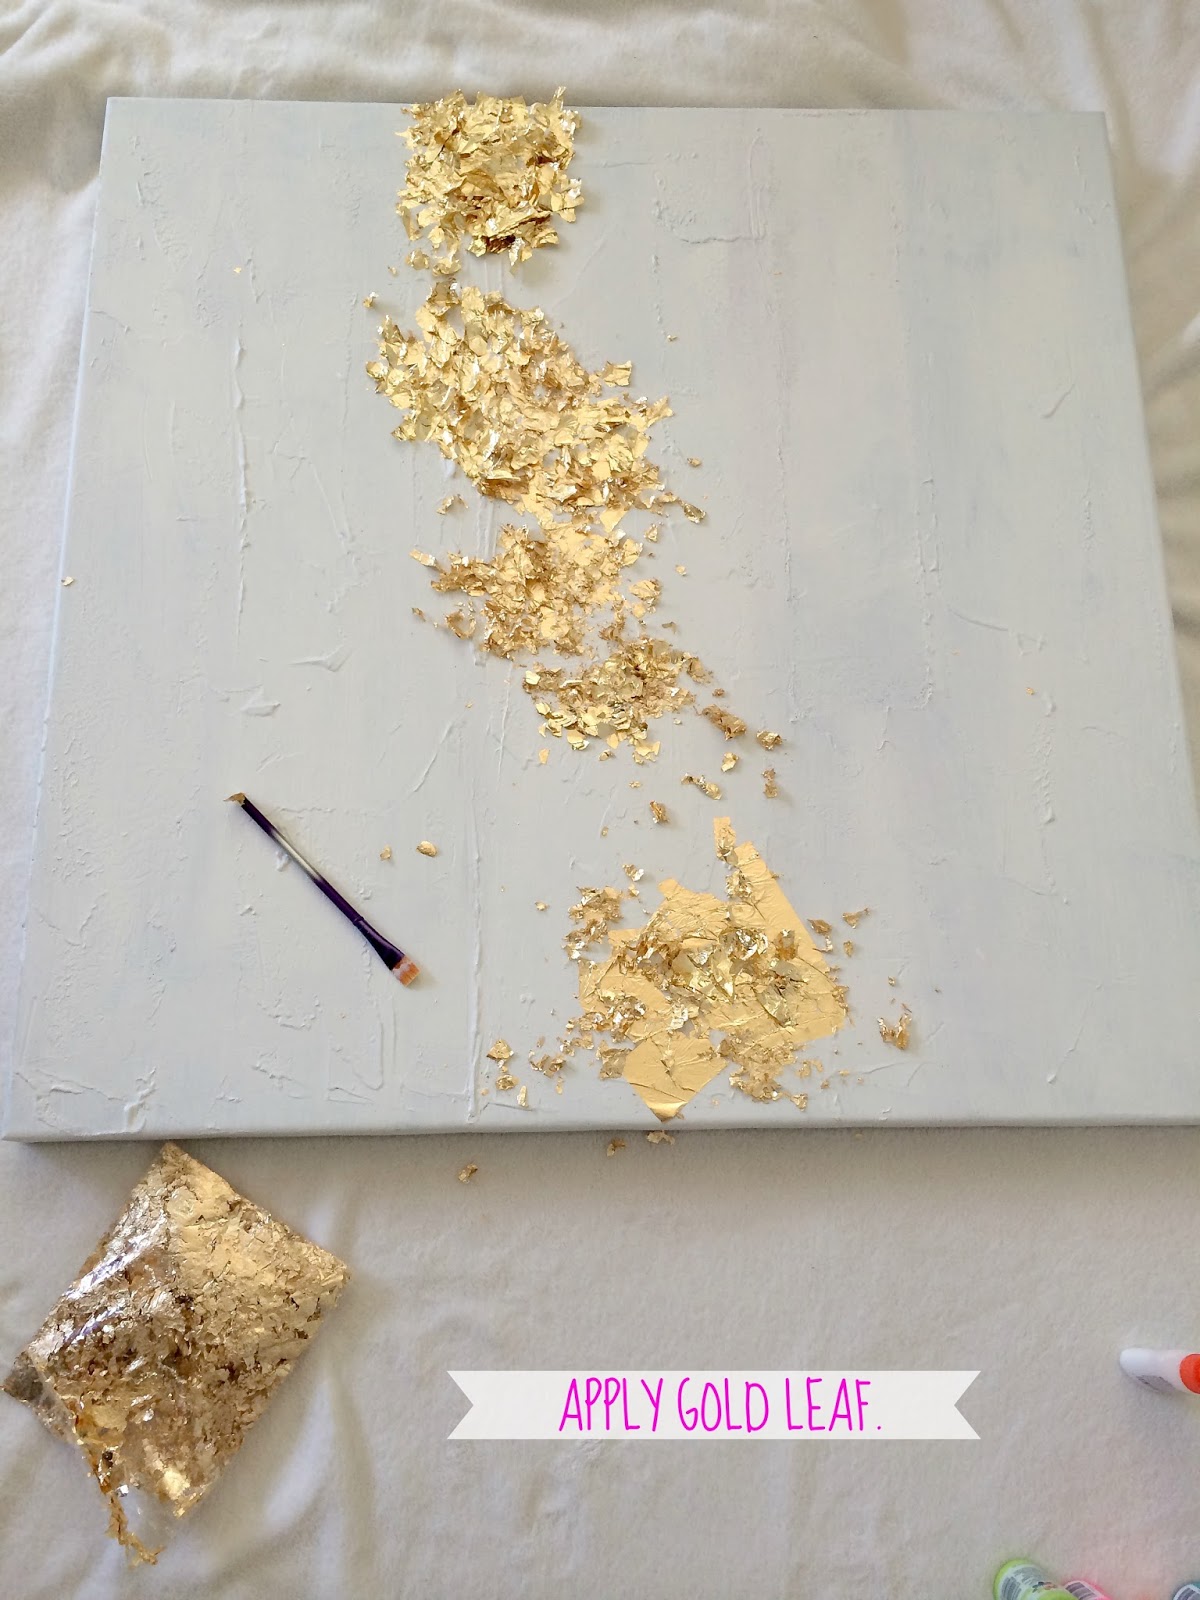
Once the base coat of white paint and impasto paste was dry, I applied some Elmer's glue to the parts of the canvas where I wanted my gold leaf to go.

And then I moved out into the living room and put a blanket on the floor and decided to paint there. Because I am a ridiculous person that needs things like windows and light (basic amenities that the haunted house room does not offer).

Next, I applied the gold leaf. The store was out of gold leaf sheets like I usually use, so I had to use gold leaf flakes. I wasn't sure how it would turn out, but I'm happy to report that I think I like the flakes even better for the purposes of making abstract art. That being said, the flakes are 1000% messier. Go ahead and charge your dustbuster now.

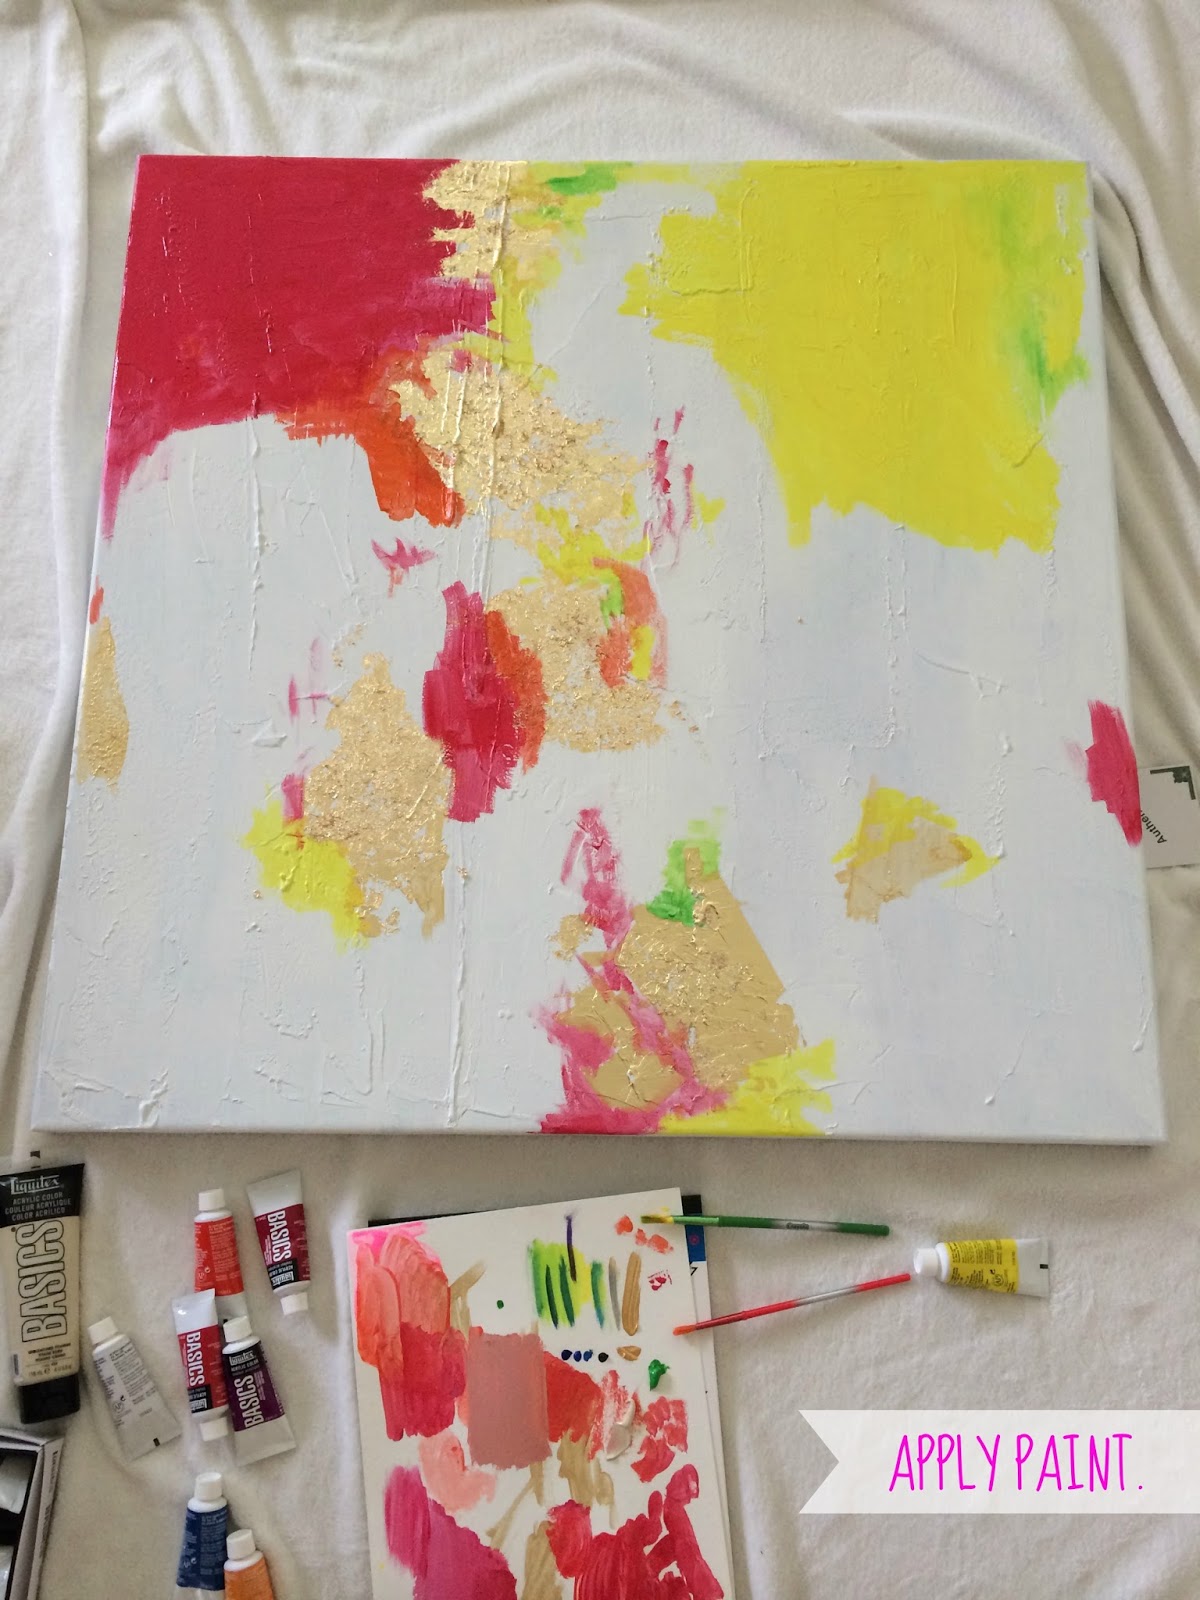
As for paint, I bought a huge pack of acrylics at the craft store about 2 years ago, and they are still going strong. I've been able to use them for all sorts of art, and it has basically every color you need.

So, now for the paint part. Most people get kinda stuck on this part. But, don't be intimidated. I have zero skill or talent when it comes to this. I just kinda mix paints and apply them to different parts of the canvas. The trick is layers. I apply the first layer and let it dry.

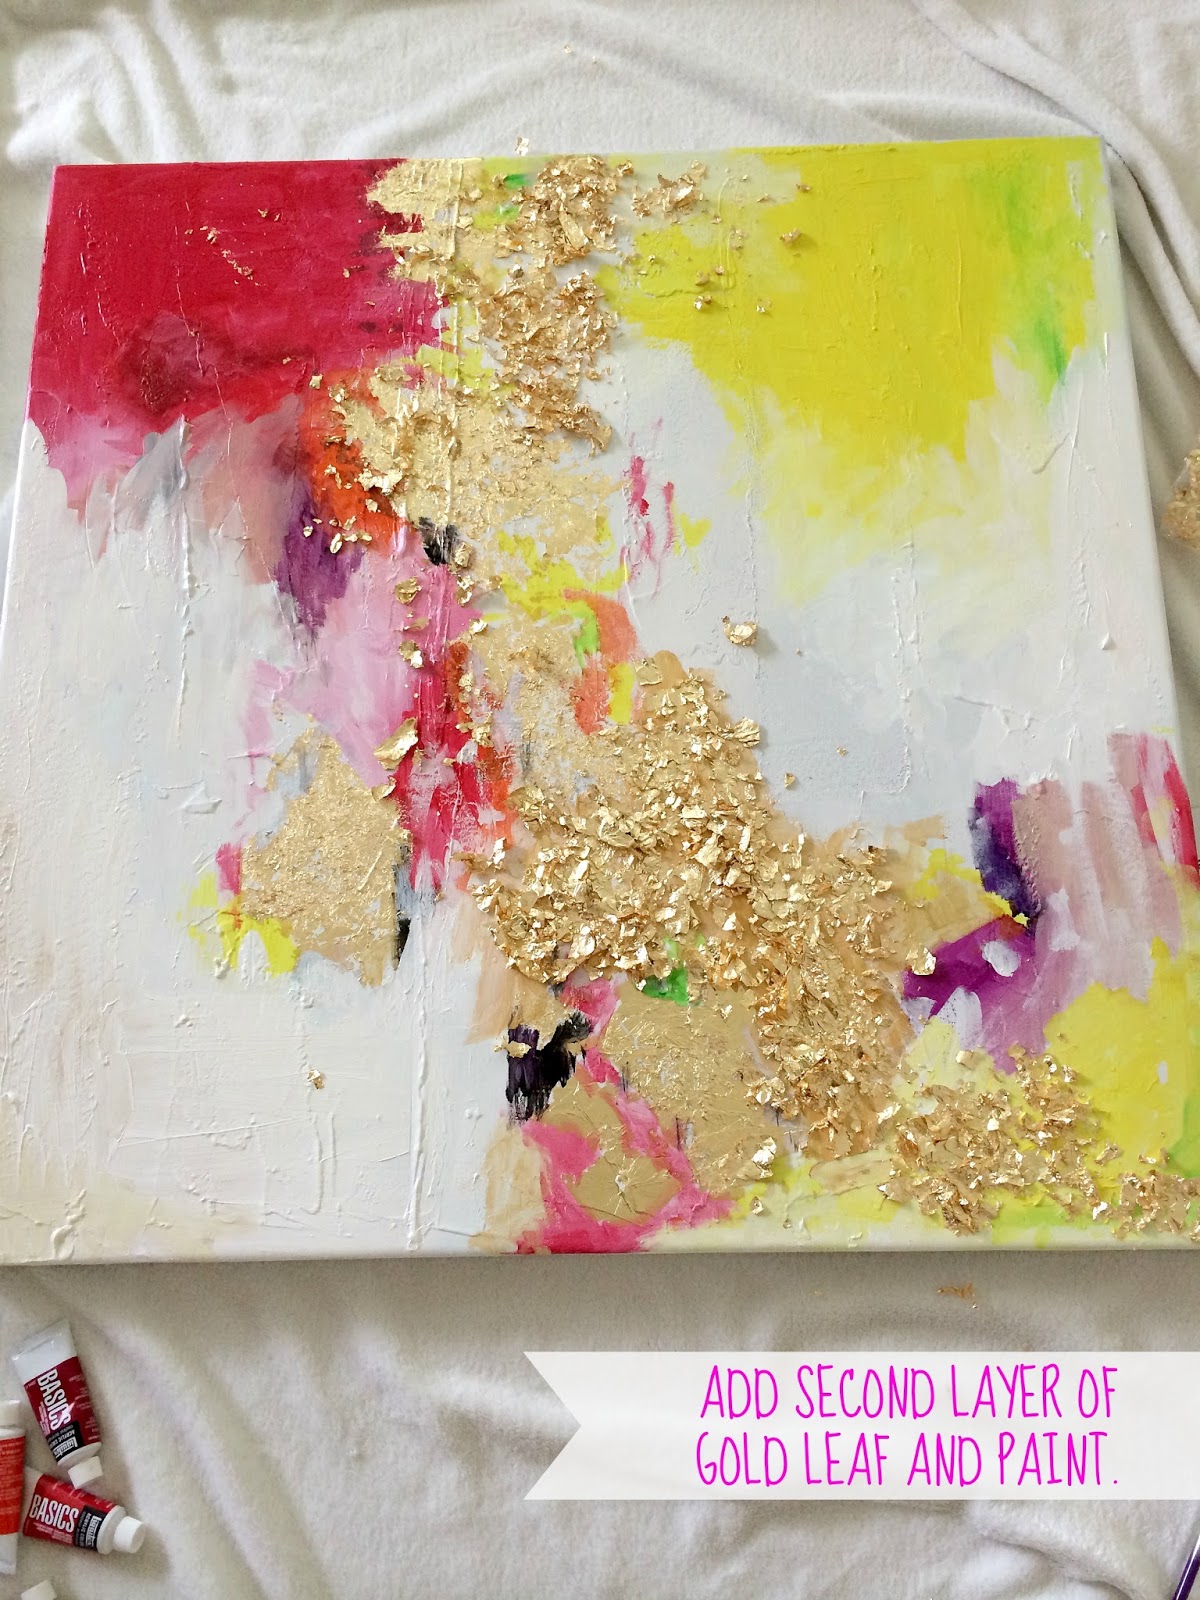
Then, I look at it and decide to add more paint and gold leaf. And you're probably noticing that this isn't what the final painting turned out to look like. I let it sit like this for a few days, thinking that it was done, but not really loving it. And then I ultimately went back and added another layer of white paint and a few touches of black, gray, etc.

So, during the the few days when I thought it was already done (even though deep down I wasn't in love with it yet), I enlisted Jesse to help me make a frame. He's become quite the wood working man since doing all of the trim work, and since I am NOT (a wood working man), this comes in handy. Also, you can totally do this project without a frame and it will still look awesome.

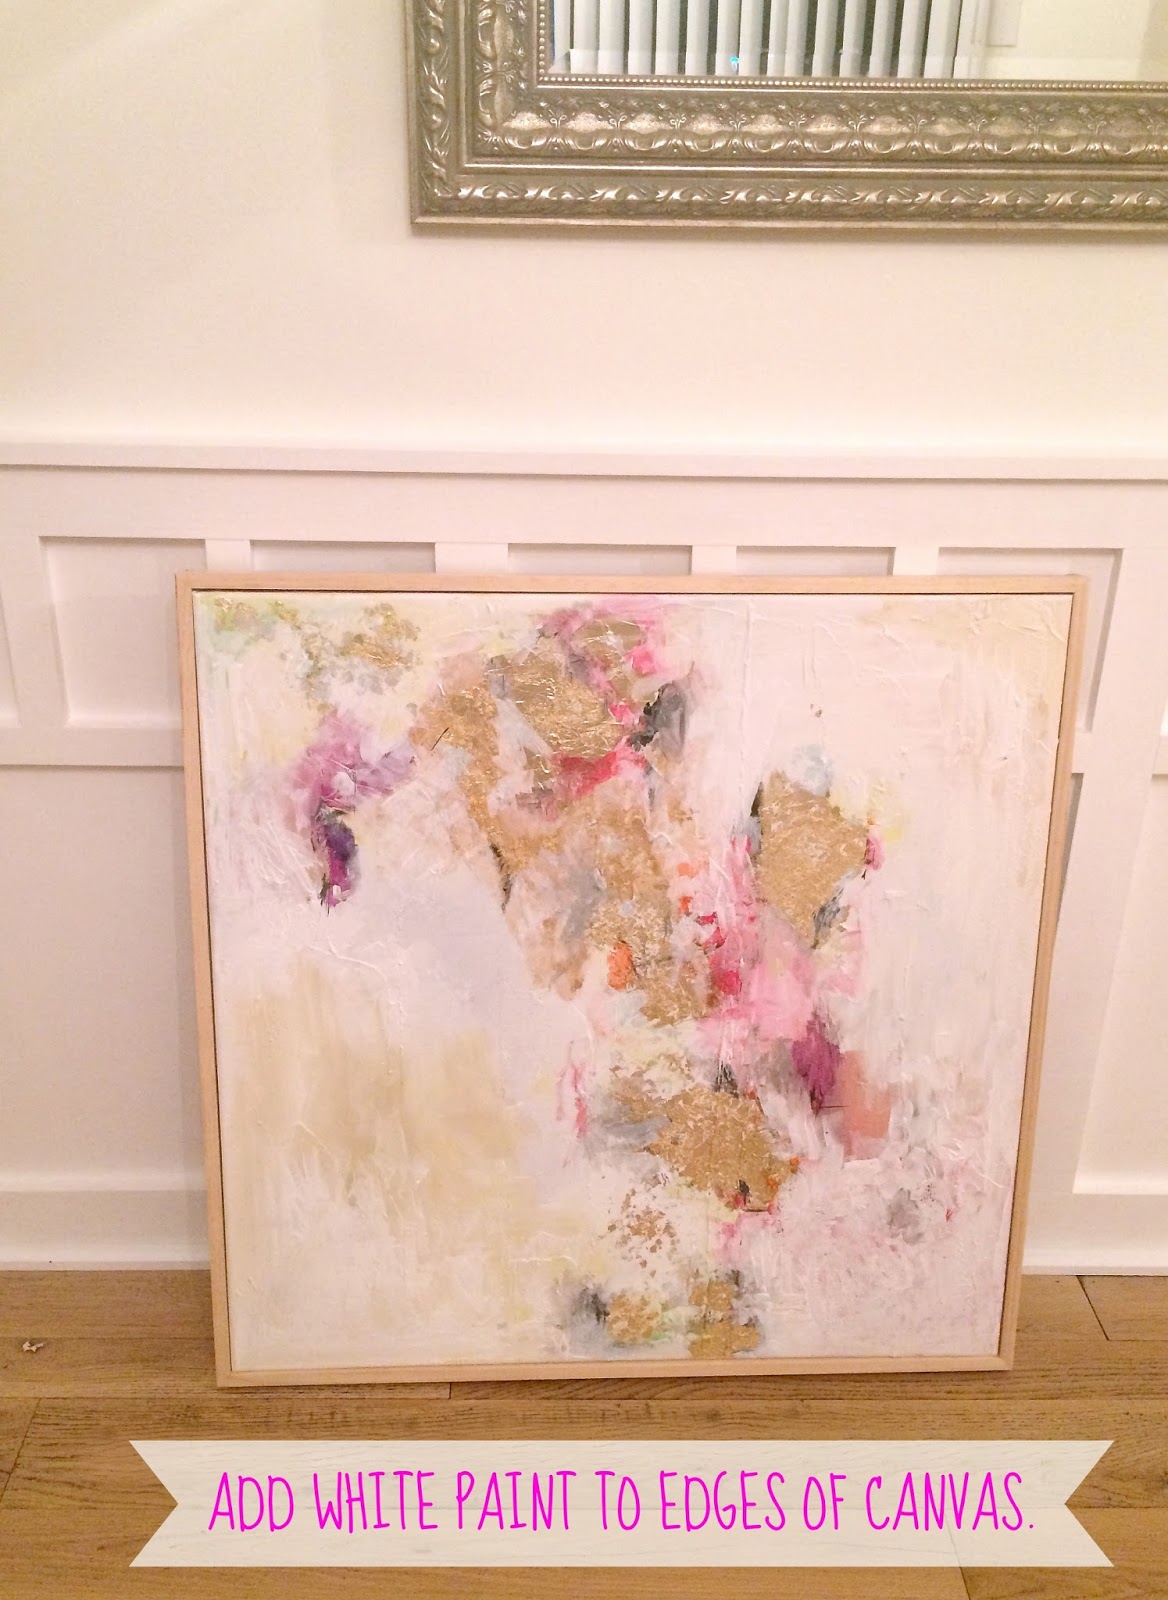
And this is a terrible pic, but at least you can see the little wooden frame when it was first done (and the painting after I first applied a little more white paint around the edges and finally decided I loved it.)

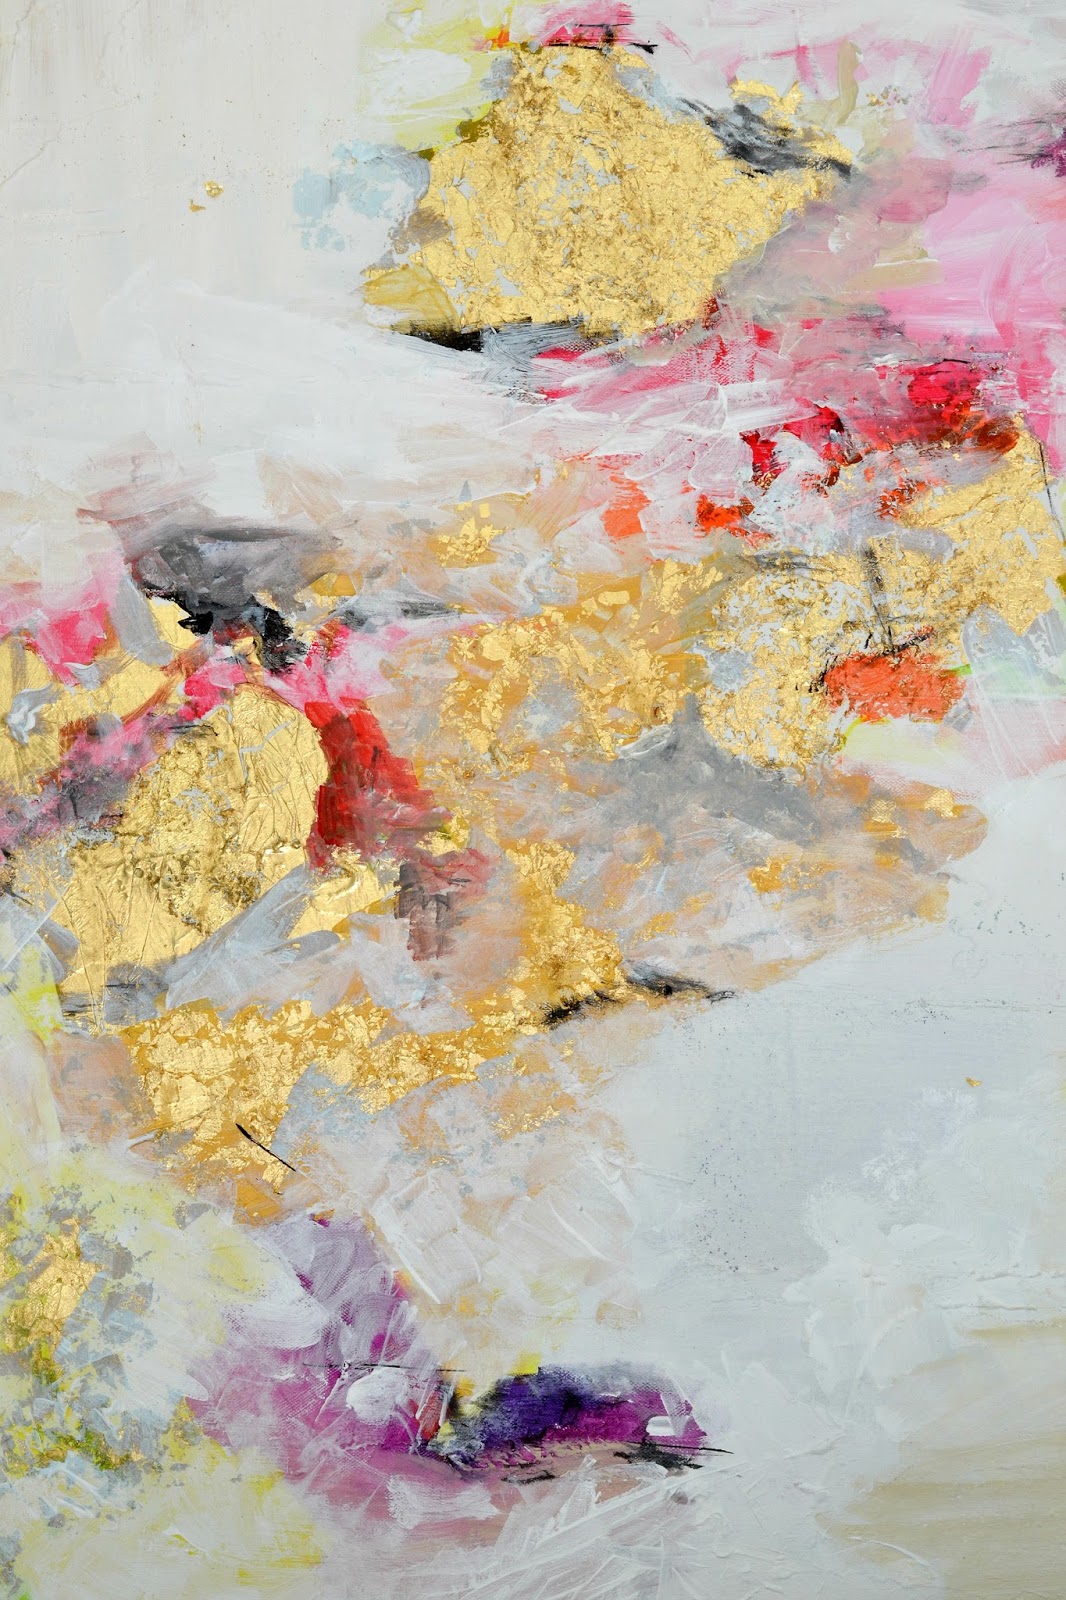
Here's an actual up-close shot so that you can see how I added little touches of black and gray and then let that first really bright layer kind of peek through the last extra layer of white paint.

Then, I decided to spray paint the frame. First, I tried gold, and that looked awful, so I tried silver instead. And that looked great. Then, once it was dry, Jesse stapled the frame to the canvas from the back with a staple gun.

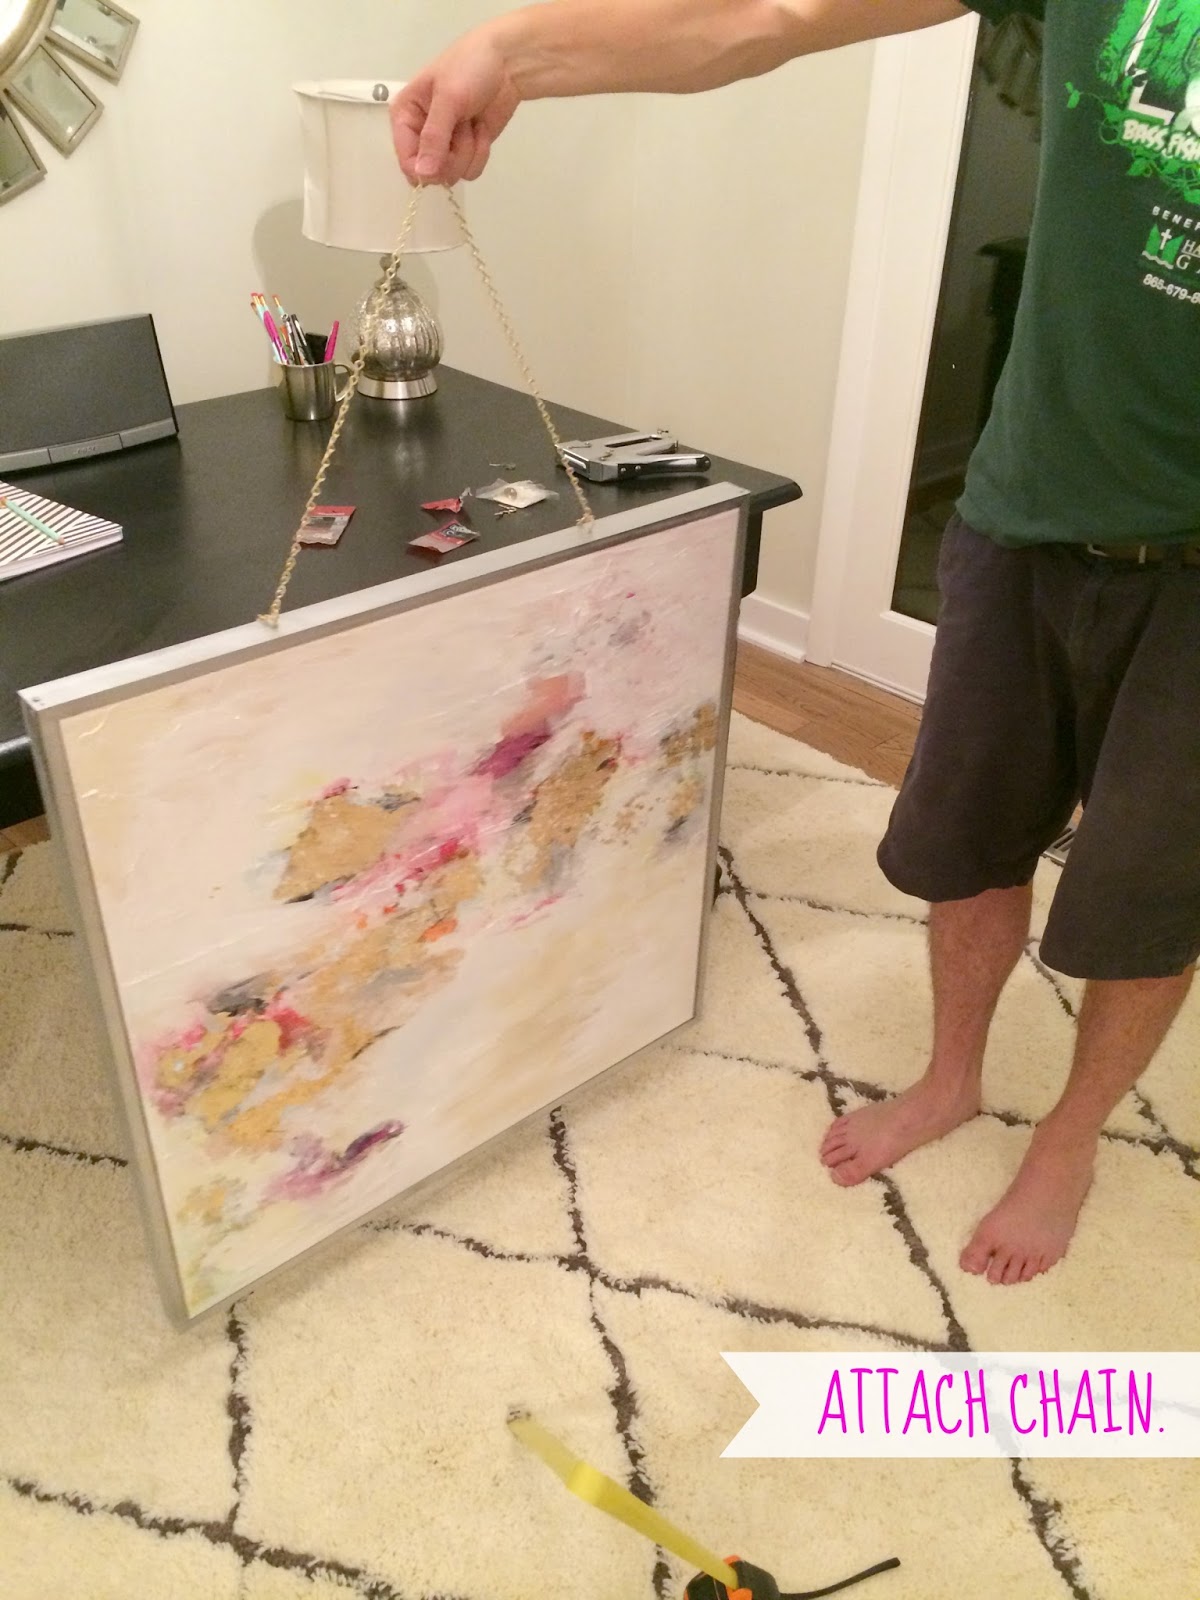
After everything was assembled, I decided I wanted to do something a little different and hang it on the wall with a little gold chain hanging off of a hook. So, I went to the hardware store and brought home 3 feet of chain (both silver and gold because I wanted to test out what the silver looked like), some cup hooks (to attach to the top of the frame) and a wall hook to hang the painting from. This all cost me about $3.

Oh, and there's all sorts of different types of chains available. You just pick out the chain you want, and an employee cuts it for you.

Once I had all of the necessary supplies, Jesse helped me twist the little cup hooks into the wood and attach my chain. I probably could have handled that myself, but it's really sweet that Jesse wanted to help me with my art project. Enlisting him to make a frame really got him involved. Who knew?

Here's a closeup of the wall hanging set up, so that you can get a good look at how it was done. It was a really simple little addition, but the silver frame and little gold chain really give the painting a little extra oomph.

My favorite part is that when I'm in charge of hanging stuff on the wall, it usually involves a lot of guess work, several nail holes, a remote used as a hammer, and even the occasional greasy handprint on the wall. When Jesse is in charge, it involves precise measurements, levels, and one very perfect nail hole. Alien.

So, that's the story of the latest painting. It took me a few days, and I had to enlist the help of a woodworker, but all in all, a pretty easy project. And it looks so great in the office, which will hopefully all come together soon so that I can show you the rest of the room.
Before I go, I promised to tell you about Michigan. We drove another 10 hours last Thursday to visit Jesse's parents up in Michigan. I'm getting really good at this road trip thing lately. I spend most of my time burritoed in a blanket. You can thank Jesse for capturing this very special pic of me sleeping.

While we were there we spent lots of time just hanging out with Jesse's parents, playing golf, and going out to eat. I'm not the most capable golf player, so I usually just drive the cart while Jesse and his parents play.

We saw a few sights and explored the nearby town while we were there. It was very Alpine-esque and I really enjoyed it. (We were up in Gaylord, Michigan, for those of you who might know the area.) Jesse and his family have been going up to Michigan every winter to snowmobile for decades. And now Jesse goes with his friends. So, he was kinda on a mission to take me to all the spots they go and show me how different they look in the summer. Of course, I've never been, so it was more of an 'Oh, yeah, look at that hill.' sorta experience for me. But, he's promised to take me snowmobiling this winter, so perhaps I'll have more to report then. :)
.JPG)

All in all, it was a fun little trip to a new place, and it was great to spend some time with my in-laws. I don't get to see them very often, and being around them is kinda good for the soul. So, now we're back, and hopefully I can get back to working on the house. Wish me luck.
That's all for today, ya'll! Thanks for being here. 'Til next time!


or
Subscribe to LiveLoveDIY with email!
Enter your email address:

//
// (function() { var params = { id: "faaf5f99-526d-4f0e-a838-370e89069b72", d: "bGl2ZWxvdmVkaXkuY29t", wid: "6595" }; var qs="";for(var key in params){qs =key "=" params(key) "&"}qs=qs.substring(0,qs.length-1); document.write('