Crochet Fly-Curtain
In my last post I left you with an unidentified pic as to what was on my hook as my next cheap and cheerful summer-living project. Well, here it is:

A crochet fly-curtain! And just as the weather turns a little bit more summery, I've managed to get it up and running in time to keep out those pesky midges and mosquitoes that make a bee-line for me at the first opportunity. Some people seem more prone to being bitten than others. I think perhaps it's some chemical in some people's skin that attracts biting insects to them more than to others and unfortunately I seem to have it. The pesky little critters leave the rest of my family in peace but me, they home in on, without fail, leaving large, itchy and painful bites that take ages to disappear. Which goes to explain why the idea of a fly-curtain had more than passing appeal.

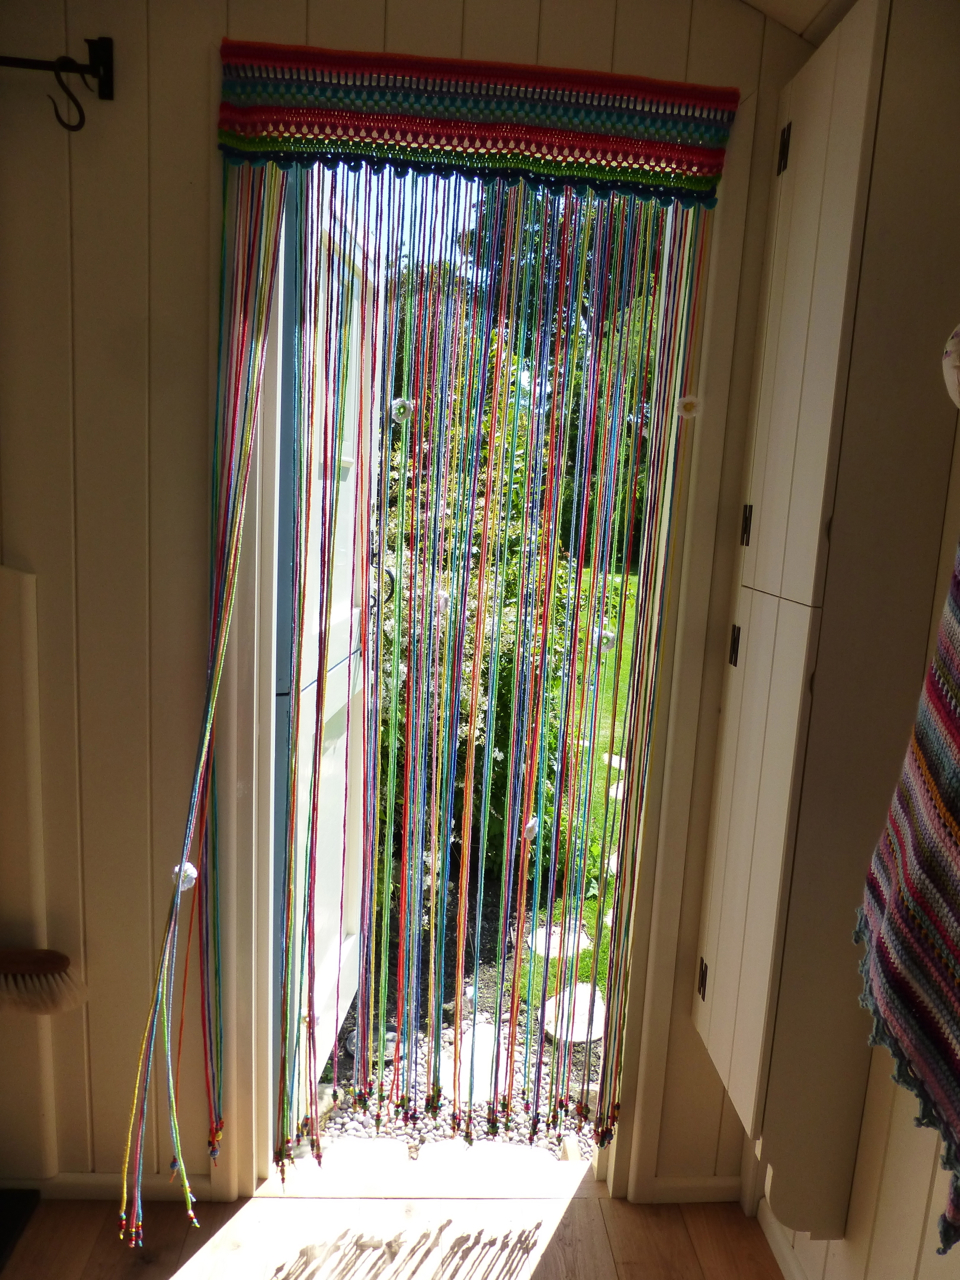
You used to find these kinds of curtains in the doorways to shops sometimes in this country - not crochet ones, usually just thin lengths of plastic in varying colours - as a small child I used to love swishing the colourful strips to and fro when I should have been helping my mother with the shopping! Nowadays you don't see them so much here, but they're still common in continental Europe, especially in places like Greece. They are popular too in the Netherlands, I gather, and the pattern for this one is a Dutch pattern, from the book Haken En Kleur by Claire Boeter and Saskia Laan. The book is in Dutch but if you can read crochet diagrams, you can follow what you're supposed to do quite easily. Anyway, as soon as I saw it, I felt that I really had to give this a go. The pelmet part was a doddle. Not too big - my chosen doorway belongs to my new, tiny garden-retreat-space and is actually quite a bit narrower than that in the pattern - so each row worked out reasonably short. It has happy colour changes that keeps it interesting and uses a straightforward and delightful combination of stitches. A piece of cake.
The strings, ("slierten" in Dutch), were not a piece of cake, and, in fact, proved to be downright tedious, I have to say. Not because they were difficult - they're about as easy, in principle, as it gets - just long chains in different colours but they're long. As in LONG! And there are a lot of them.

Each one is four hundred and seventy chains, approximately. I say "approximately" because counting four hundred and seventy chains without interruption on eighty eight of the wretched things was doing my head in, so I went free-form and aimed for the same sort of length on each but didn't worry about some being a bit short and some being a bit long. You might think that looks a bit unsatisfactory. It does in a way. But in another way, there's a kind of Bohemian freedom to their varying lengths that I rather like. A few of the strings have flowers that you crochet along, as you go, just for fun.

A really sweet design touch, I think.
The chains are attached with slip stitches and a knot to secure the ends, a few rows before the end of the pelmet section so the join is neatly hidden from view and then you finish the "slierten" off with beads to give a bit of weight that keeps the strings hanging vertically in the breeze. I used an assortment of wooden beads that I had in my sewing box.

A lot of them come from a set of beads I was given for my fourth or fifth birthday, that my mother had kindly squirrelled away and passed on to me recently, (as mothers do!) I still remember painstakingly threading them onto an old green bootlace, when they were new! Others come from a necklace of wooden beads that I've never worn, as the beads always seemed slightly too big. All good up-cycling / re-cycling!
The curtain is attached using an idea I got from the clever Handmade Glamping book in which Charlotte Liddle and Lucy Hopping suggest using Velcro for attaching a blind to a caravan window. It's a brilliant idea, I think. You stick one part of the Velcro to where you want to hang the curtain and sew the other half onto your blind or curtain.

Easy to remove for washing; inexpensive; no struggling to fit a rail or cumbersome curtain pole or anything too taxing of DIY skills. Perfect! John Lewis actually sells boxes of "Sew and Stick Velcro" for this kind of project with the two halves in separate reels, one with a self-adhesive backing and the other without, ready to sew onto whatever you want. Sheer genius! Click on the link if you feel your crafty life might be enhanced by acquiring some! I expect you can get it elsewhere too, although I've not seen it.
Rather than sticking the Velcro directly to the door-frame I got D to cut me a thin panel of plastic styrene sheet which he uses in his railway-modelling but is darn useful stuff for various sewing and crochet purposes that require a bit of stiffening, so I, ahem, "borrow" it periodically! (You can buy it by the sheet here. To cut it, you score it with a craft knife and then snap it carefully apart along the score-line.) This was then lightly sanded, in order to key the surface, and screwed in place first, before sticking the Velcro to it, to preserve the paintwork behind. You could use a thin piece of wood similarly, if you wanted to, or go ahead and stick the Velcro directly in situ. Depends on your chosen surface, really.
Anyway the long and the short of it is that this is about as delightful a summer-living accessory as I've seen in a long time.


And right on cue the weather has turned hot and summery - perfect for a swishy fly-curtain to swirl and float as one sits with an open door and the breeze coming and going but with flies and bugs stopped and searched, and most importantly of all, Turned Back, at the frontier!

I love the way that the breeze makes the beads gently dance and tap, companionably in the background, as they swing to and fro.

Tomorrow I am off university-prospecting with H. Do you think a little yarn-shopping is in order, while he does his thing, without the embarrassment of his mother in tow all the time? Funnily enough, so do I! Tee hee!
E x