
Easy Peasy Chevron Quilt Tutorial
Okay peeps! We all know that chevrons (or zig zags, if you prefer) are all the rage right now, so I thought I would take pictures of my process on this one and write up a little tutorial for how to create a quick and easy chevron quilt. Y'all know I'm all about quick and easy!
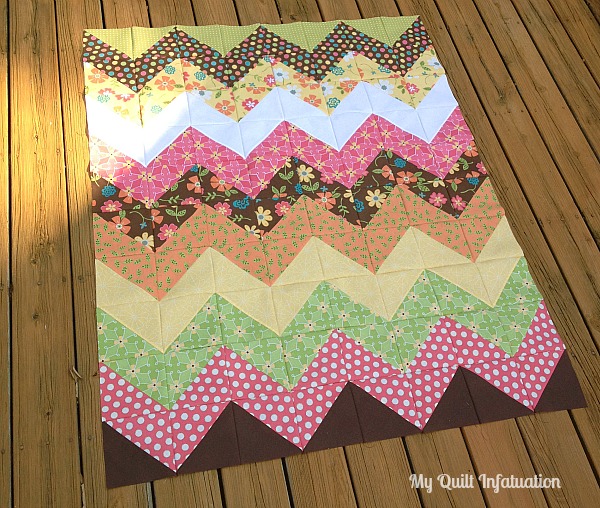
Now, the first thing you need to know about chevron quilts is that there are lots of variations. I'm going to show you how to create a chevron quilt where each stripe is a different fabric, without a solid between each one, like this-

The important thing to remember is that once you have the basic construction down, you will be able to modify the design to suit your needs.
So let's talk about one of the cornerstones of many beautiful quilt blocks- the Half Square Triangle, or HST for short. Let me just tell you right now that if you're afraid of them or dislike them, we're going to conquer that with this quilt. And afterward, you're going to wonder why you ever hated them at all! If you can make HST's, you can make a chevron quilt if you just pay attention to a few details along the way.
Start by choosing several fabrics to create your chevron stripes. You can choose to have just a few that repeat, or eleven different fabrics as I have here. You'll need fat quarters or quarter yard cuts (make sure you have a full 9 inches in width if you choose quarter yard cuts) for each chevron. Arrange your fabrics in the order that you want your chevrons to be on your quilt. I've separated like colors so that they aren't touching each other, but go with whatever is pleasing to you. Take a picture of your fabrics, all laid out in order. I promise, it could be a lifesaver later on! From here on out, keep the fabrics in this order for every step.

Okay, let's talk HST's. We're going to make them four at a time. Now if you know anything at all about making HST's, you know that some don't prefer this method for a couple of reasons-
1. This method leaves bias edges, so the blocks are prone to stretching- True, but I'll explain later how I deal with this, and they're no problem.
2. This method produces HST's that aren't exactly whole or half inch sizes. Again, this is true, but here's the thing, as long as they're all the same size (which they will be) this isn't a problem. Since our entire quilt will be made from HST's, they'll fit together with each other, and we won't even have to do any trimming!
Alyce at Blossom Heart Quilts made this nifty chart that gives the starting square and finished HST sizes and I'm including it here with her permission. Thanks for all the math, Alyce!

Now that we have that out of the way, let's get down to business, shall we? From your first and last fabrics, cut two nine inch squares, and cut four 9 inch squares from each of the rest. Remember to keep them in order when you stack them up!

Take your lovely stack of squares and pair up the two squares from the first fabric, with two squares of the second fabric. Then take the remaining two squares from the second fabric and pair them with two squares from the third fabric. Continue pairing your squares like this until you've reached the end of your fabrics.

Time to make your HST's! Take your pair of fabrics and put them right sides together. Sew a 1/4 inch seam all the way around your squares. Yes, sew it closed. I promise it will make sense in a second. Repeat this for every pair of squares.

Take your sewn squares to your cutting mat, make sure they're straight, and cut corner to corner, in both directions. Cut all of your sewn pairs in this way. You can leave them closed for now. There's no sense in manipulating the fabric any more than you have to.

Once you've got your beautiful stack of HST's, it's time to press them. So, lower your ironing board if you can (so you can sit), put in a good movie, grab a nice beverage (that you keep away from the ironing board, of course), and get as comfy as you can. It doesn't take hours, but you might as well enjoy yourself!

By the way- do you know the difference between ironing and pressing? Believe me- to a quilter, there is a HUGE difference. Pressing involves putting the iron down on the fabric and allowing the weight of it to do the work. Pressing always means picking the iron up to move it. When pressing, you never move the iron back and forth, or pull the fabric with the iron. Be sure to always press your fabric, instead of ironing it.
Open each HST, spray liberally with starch, and press with a very hot iron. I use my iron on the hottest setting. The starch will add stability to the bias edges, but keep in mind that if you rub your iron on the fabric, they will get distorted even more easily when wet.
Take your scissors and trim the little dog ears from each side... and that's all the trimming we're going to do!

See? A beautiful little stack of HST's without too much fuss! Once you have this, you'll have a finished quilt top in no time.

Of course your HST's are still in order, so laying out your blocks will be a snap! Just lay them with the diagonal seams going in alternating directions to create the chevron pattern. Notice that you have 16 HST's with each fabric- 8 with the fabric above it in the quilt, and 8 with the fabric below it. So, lay out your blocks in rows of 8.


Once you have it all laid out, pick up your rows from left to right. Sew the blocks into rows, and sew the rows together. Your finished quilt top should measure about 46x58. Easy peasy, right?

As I said before, once you understand how it goes together, it's easy to make changes to this basic design. Here are just a few easy ways to do this-
1. If you want to make the quilt bigger, you can start your HST's with bigger starting squares, or you can make your quilt have more than 8 blocks across. To keep it easy with the "four at a time" HST method, you could increase the width to 12 blocks across.
2. You can use a solid color for every other chevron, and use several fabrics in the others, giving it a scrappy look. If you choose to do this, then you wouldn't need to worry about pairing the fabrics, since every print would be paired with a consistent solid, making it really easy!
3. You could use just a few fabrics and repeat them in order.
The bottom line is- chevron quilts aren't nearly as tough as they seem! Once you master the HST, not only will chevron quilts be a breeze, but the door to tons of other patterns will be opened to you as well! I hope you give it a try!
Edited 9/14- Here is a picture of the finished quilt. Check out the full post with other photos HERE!

