Woven Place Mats

Here at CT, each catalog cycle, the lucky staff…

get to preview the new books that will be available on the CT website. Recently, I perused Make It, Take It by Krista Hennebury…

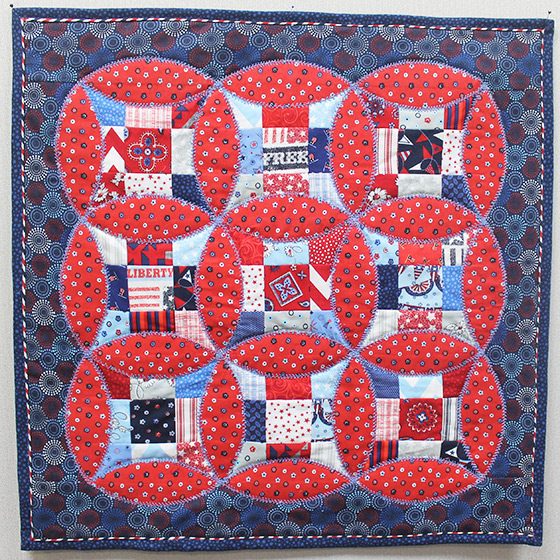
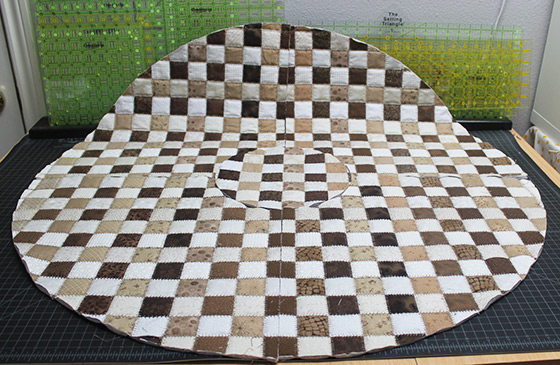
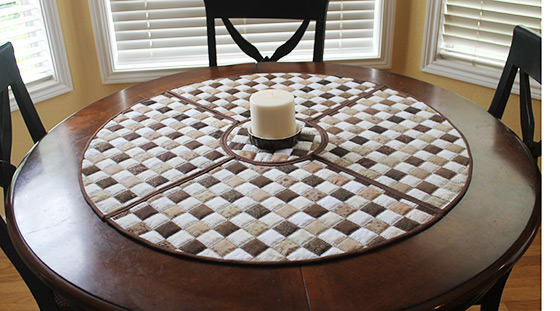
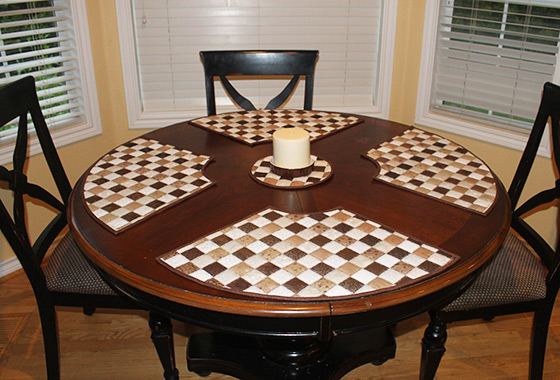
and found the perfect place mats for my kitchen table! I needed place mats for a round table that would go with my plain white dishes. I thought the Woven Place Mats in the photo below, designed by Felicity Ronaghan, were clever because they can be a table topper pushed together in the center and then place mats when pulled apart!.

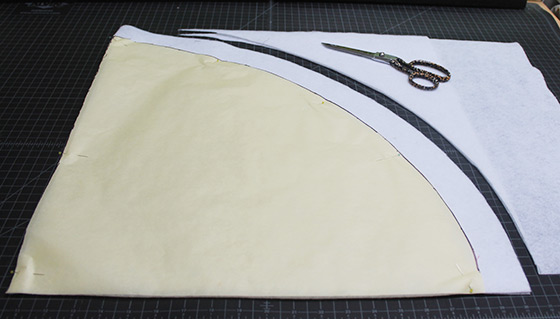
I just happen to have a large stash of neutral fabrics, so I combined the off-whites, tans, and browns with white for some sparkle and to complement my dishes. You can see two stacks of 1-1/2″ strips below to the right of the pattern I traced on Golden Threads paper. I had a wider roll, but you can tape two pieces of the 12″ wide paper or use a 20″ x 36″ piece of craft paper.

The pattern calls for using a lightweight, woven fusible interfacing for the base of the woven strips. Deciding I would try Pellon fusible fleece instead (because that is what I had), I cut a semi-circle a couple of inches larger than the paper template. The fleece is folded because you make two place mats at one time. Note: The packaged Pellon fusible fleece we sell is not quite large enough.

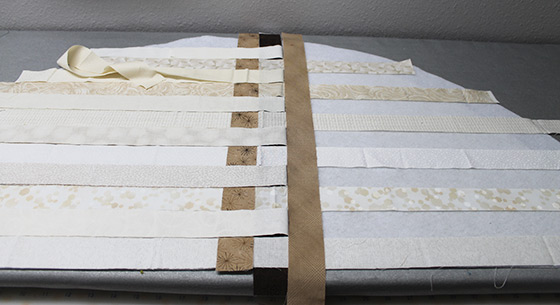
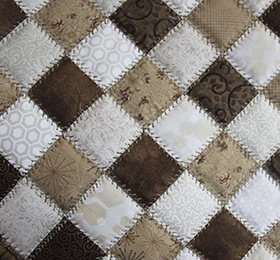
The Woven Place Mats pattern calls for 25 strips each of lights and darks that are 20″ to 42″. Since I wanted a checkerboard effect, I decided to use light strips (whites & off-whites) one way and darks (tans & browns) the other way.
Following the instructions, I started planning the layout of the horizontal strips. It became quickly clear that most of the horizontal strips needed to be close to width of fabric (WOF). Since I had more long light strips than darker ones, I laid out the light strips next to each other on the fusible fleece (fusible side up) – sort of randomly alternating whites and off-whites.

Then I centered a tan strip and starting weaving a pattern of alternating tan and brown strips. It was easy and kind of fun to pull back every other light strip, add the next strip, replace those strips, and pull back the alternate light strips, add the next strip, etc. It was important to line each new strip straight and close to the previous strip.


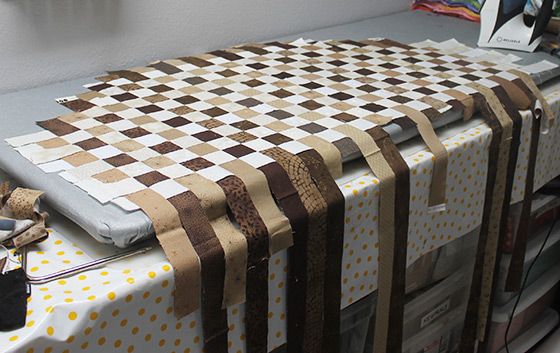
I basted around the edge so the strips would stay interwoven and trimmed off the excess strips for ease during machine quilting.

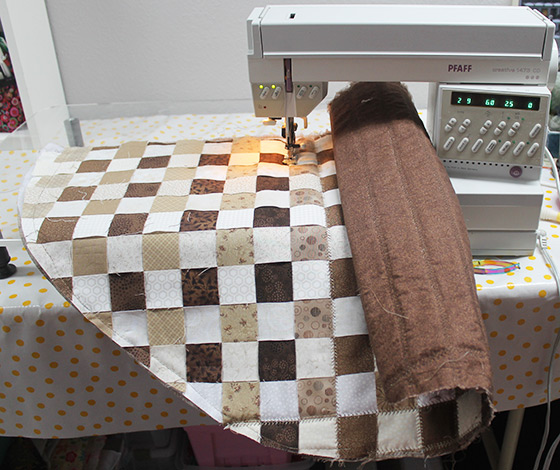
Now it was time to machine quilt – and my problems began!
- Wanting something more interesting than a zigzag stitch, I chose my favorite #4 serpentine stitch on my Bernina. After a while, the combination of the extensive number of stitches, a walking foot, and my “pedal to the metal” style of sewing caused an awful sound and my Bernina ended up at the hospital.
- I was quite ill with the flu when I started to machine quilt the place mats. Not only did I break my Bernina, I also quilted almost a third of the semi-circle of woven strips and fusible fleece without any batting or backing! With great difficulty, I ripped out a few rows of stitching before putting it aside and started over making two new semi-circles for the four place mats – hoping I could later salvage something from the first one.
- My great idea to use fusible fleece instead of thin interfacing turned out to be not so great. Adding regular batting made the place mat too thick and I had to buy thin batting.

Bernina #4 Serpentine Stitch
Fortunately, I have a back-up Pfaff that sews beautifully and has an even-feed foot which eliminates the need for a walking foot. Recently, I blogged about using a decorative feather stitch to quilt my Ringlets Table Topper… to read about that project, click here.

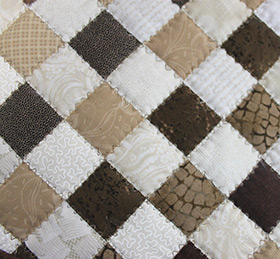
The feather stitch worked well for these place mats, using a 50 wt variegated thread on top and our Essential Thread in the bobbin. Our Variegated Essential Thread would be a good choice for the top thread.

Feather Stitch on my Pfaff
After spray basting with 505 Spray and Fix, I trimmed any frayed threads from the raw edges, and started quilting each row, being careful to sew straight and cover the raw edges. I started at the top and stopped at the bottom, without going back and forth, because the feather stitch is directional. I was glad I chose a tonal brown backing with a matching Essential Thread for the bobbin since there was a lot of stitching on the back!

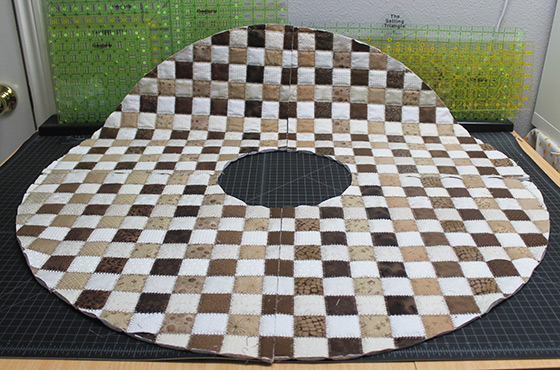
When both semi-circles were quilted and trimmed using the paper template, I cut them each in half through the middle of the center vertical strip, making four place mats. There is no photo, but I used one-quarter of a 9-1/2″ circle to trim the smaller arc at the top of each place mat.

Remember the first semi-circle I quilted wrong and set aside? Well, I quilted it again – this time with batting and backing – and was able to make a fifth place mat, a center circle and two small trivets! I cut the center a little smaller than the 9-1/2″ circle I used to trim the top of the place mats.

I made bias binding from one yard of the same fabric as the backing. I cut the bias strips at 2″, as I usually do, but wished I had cut it at 2-1/4″ or even 2-1/2″ because it was tight due to the added thickness.

I must say I enjoyed making these Woven Place Mats from Make It, Take It and we use them every day. My generally supportive but noncommittal husband is so enthusiastic about these place mats. He said it is his favorite quilting project I have ever made – and I have been quilting 25 years! He thinks they are a great idea, useful, and “really cool” – and offered me permission to quote him in my blog!
I found an unscented candle to place in a brown ceramic tart dish that works for the center. When we eat, we pull the place mats away from the center. Yes, there is room for that fifth place mat if needed.

Here are some things I learned from this project about machine quilting with a decorative stitch:
- The extensive number of stitches puts extra strain on a sewing machine.
- Start with a new needle and change if you start hear a “thumping” sound; I change mine once.
- Adjust top tension as needed – I used about a 3 setting.
- Oil as recommended for your machine.
- Choose thread color and backing that will look good with heavy stitching.
- Use needle down if your machine has that option.
- Set machine for slow speed if you tend to sew fast.
- Check occasionally to see if the sewing machine is heating up; stop and let it cool down if it feels hot!
- Decorative stitches may use a lot of thread – have a full spool and fill extra bobbins if you have them.
- Sew only one direction or alternate consistently if stitch is directional.
- Pulling or not allowing for constant free movement can change the look of the stitch.
- Don’t try to quilt when very ill with the flu!
I highly recommend these Woven Place Mats and the Make It, Take It book for other fun ideas.
If you plan to make Woven Place Mats, think about how they will be used. I don’t pre-wash my fabrics so my strips were not washed. I did pre-wash my backing and binding and chose a polyester batting, hoping there would be less shrinkage with frequent washings. I am glad I ended up with an extra semi-circle because of the center circle, trivets, and fifth place mat, which we will need with our exchange students this summer. In retrospect, I wish I would have used Insul-Bright and cotton batting in the center circle and two trivets so they would be more heat resistant.
If you decide to make the Woven Place Mats, I would love to see them! You can post pictures on:http://www.facebook.com/connectingthreads, or on Instagram by tagging us in your post. To tag us, either write @connectingthreads or #connectingthreads. Look forward to seeing yours!
The post Woven Place Mats appeared first on Notions - The Connecting Threads Staff Blog.