Installing Upper Kitchen Cabinets | #PBJstories
We have KITCHEN CABINETS!
If you remember I talked about my kitchen inspiration earlier and I have wanted white upper cabinets from the second I walked into this space. I knew I wanted a shaker style too... they has clean simple lines and was exactly the style I wanted. I did a LOT, and I mean A LOT, of research for companies that I wanted to choose for our cabinets. I started looking at custom cabinetry companies and once I received a few quotes knew that was an impossible route, they offer a lot of customizing and high-quality materials but have a high price tag which we did not have a budget for. I did a few price quotes at Home Depot and Lowe's for a variety of their brands and it was more reasonable, but still slightly higher than I was comfortable with. I was almost certain we were going to go with Ikea cabinets, but because I wanted a two-tone kitchen and wanted dark grey base cabinets and again was hitting a dead end as they didn't have their Shaker-style cabinets in that color. After more research I found RTA Store and they offered both pre-assembled and ready-to-assemble cabinets which is a great cost savings option. But most importantly (to me at this point) they had a dark grey Shaker style cabinet - WAHOOO! Working with them was really great, I was teamed up with a designer that helped me do a virtual layout of my kitchen so I knew exactly what I needed. I thought I educated myself enough throughout the research process what exactly I would need, but there were a few items here and there that the designer was really able to help me with and point out more beneficial options.
So after we worked through the details of my kitchen they sent me a blueprint layout which was really nice being able to bring that back to my kitchen space and really be sure all the exact measurements would work in the space.

The other really cool part during the design phase is they sent me a 3D rendering of my kitchen -- this felt like GOLD at that point. I was staring at studs and joists at this point and it was the first time I truly saw what I "envisioned" in my new kitchen.

The upper cabinets we ordered are the Aspen White Shaker Style cabinets and are ready-to-assemble cabinets so they are less expensive than the pre-assembled cabinets. When we received the upper cabinets they had to sit in our garage for a few weeks while we were building the bones of our kitchen back --- adding sub-floor, sheet rocking, taping/sanding etc... so one we finally had the backbone of our kitchen back it was time to start installing the upper cabinets!
Once I assembled the cabinets I went back through and labeled all the doors so I was easily able to know which doors reattached to which cabinets.

Then to make the installation process I labeled each cabinet in order of how I would be installing them on the wall.

Jumping right into the installation...on one wall I was doing cabinets on each end of the wall with floating shelves in the middle. On the left side, instead of doing a full 36" cabinet I wanted the two cabinets to be separated so it was easier to store different items in the cabinets - but I wanted it to still look like a full cabinet so I decided to have the right 18" cabinet open with a left swing just as a full 36" cabinet would be.

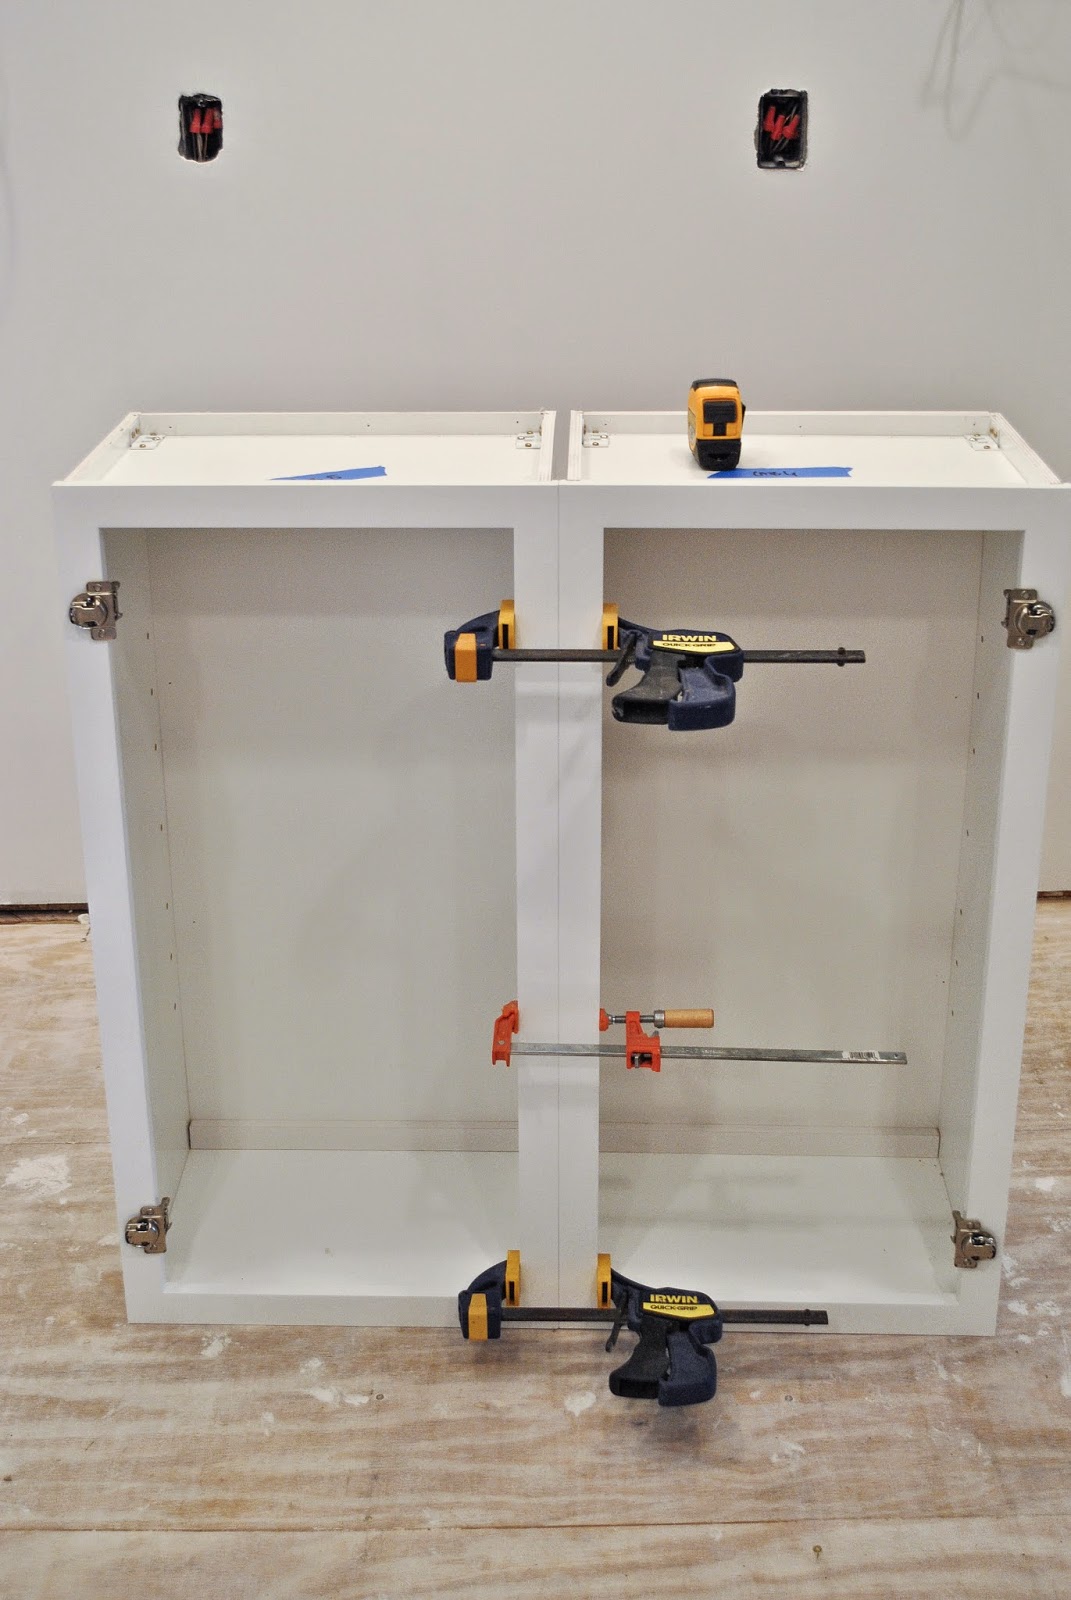
We wanted the cabinets to be seamless so we attached the two together before attaching to the wall too.

Then before attaching to the wall, we needed to add a backer piece to support the attachment of the crown molding. I figured out how to do this just by searching online and finding that adding a piece of backer to the cabinet and then stapling the crown molding to that is the easiest/best way to add it. We just used a 1x2 and measured the full length and sides of the cabinet depending on where we were adding the molding.

Next we located our studs in the space our first cabinets would be attached to the wall and marked those. We measured from the ground up for the placement of our cabinets too. Since we only had the sub-floor installed at this point we measured up: 1" - cement board/tile 34" - base cabinet height 1" - counter top 18" - traditional height difference from counter top to bottom of upper cabinets 54" total. We drew that line with a laser level across the entire span of the wall and used that as a guide for our ledger. The ledger acts as a support piece to set your cabinet on while installing the cabinet. So instead of me trying to keep the cabinet level and supported while my Father in Law screwed the cabinet to the wall, we were able to lift it up to the ledger and I simple had to hold it against the wall - MUCH easier.


This is the part that gets a little tedious. There is a LOT of small maneuvering once your cabinet is up to be sure it's level both horizontally and vertically. If you need to make small tweaks use shims to get the cabinet as flush, and level, as possible. Then when you move onto the next cabinet - you'll have to do the same plus be sure it's square with the cabinet directly next to it. Once it's completely level, attach to the surrounding cabinet too, not just the wall. This will help keep the seams of the cabinets flush and look seamless.

It's been weeks since we installed these cabinets... and I cannot wait until we can fill them up with our goodies. What do you think of the style?!! Are you a fan of white cabinets?
I still have to pick out our handles/knobs for them. It's like picking out the final jewelry piece for your favorite outfit... it was to be just perfect!

More posts from